Fun creating this Berry Basket!

I had fun creating this adorable berry Basket to share with you but first,I want  to apologize not posting my technique video yesterday. I downloaded it to You Tube only to discover it was really dark. I tried to lighten it by editing it but had no luck. I would have taped it again, however, I am at Leadership training without my stamping stuff and video camera. I promise I will share 2 videos and projects with you next week.

On a brighter note~ I was able to enjoy some sunshine today as I sat next to the pool planning my upcoming classes and events. I can’t wait for some fun & different events with you~soon!! If you haven’t already guessed, I’m not in Illinois right now. I will be sharing some fun in the sun with you on my facebook page so be sure to head over there to see what I am doing with my friends from across the country. Tomorrow night we will be heading to Manager’s Reception, one of my favorite perks as a demonstrator!

Boy, I think I got a little off task! Back to my Berry Basket. All I can say about this brand new BigZ Big Shot Die is ,”I’m in love!” I can picture making these for so many different occasions;baby or wedding showers, Easter baskets,birthday goody baskets and oh so much more. This was quick & easy to create and can take on so many different adorable looks.

Those goodies pictured with the berry basket are a few of the FREE Sale-A-Bration products you can choose with a qualifying order. I just love this bright, happy color combination of Cameo Coral, Coastal Cabana and Crushed Curry.

Stampin Up! Berry Basket 
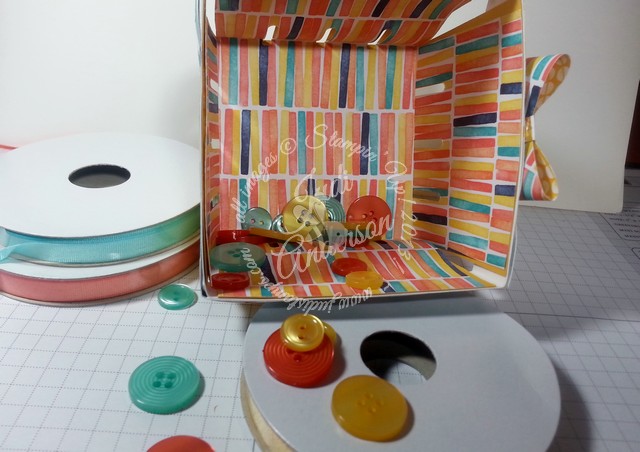
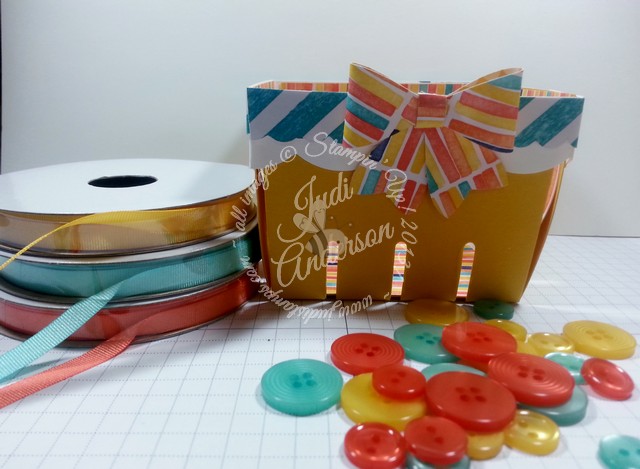
Did you notice the detail of the trim around the basket? The smaller scallop is included with this BigZ die but I added the larger white scallop by using our large scallop edgelit. While this one has a more feminine look to it, I can imagine creating a more masculine look by using nautical colors and Designer Series Papers that take on that more masculine look. I used the Birthday Bash Designer Series Paper for the bow created with our NEW Bow Punch and the lining of the basket. Take a look. . .

Stampin Up! Berry Basket BigZ Die insideI also missed sharing this week’s Weekly Deals yesterday so here they are.

These deals are a crafting fools dream!! You will get to choose a FREE Saleabration item when you purchase all of these great embossing folders and Texture Boutique Machine ( a must-have).

SHOP NOW!

Beautifully Baroque Textured Impressions Embossing Folder

Price: $7.95 $5.96
Decorative Dots Textured Impressions Embossing Folder

Price: $7.95 $5.96
Lovely Lace Textured Impressions Embossing Folder by Stampin' Up!
Lovely Lace Textured Impressions Embossing Folder

Price: $7.95 $5.96
Lucky Stars Textured Impressions Embossing Folders by Stampin' Up!
Lucky Stars Textured Impressions Embossing Folders

Price: $7.95 $5.96
More Amore Ensemble
More Amore Ensemble – Digital Download

Price: $9.95 $5.97
Polka Dot Textured Impressions Embossing Folder by Stampin' Up!
Polka Dot Textured Impressions Embossing Folder

Price: $7.95 $5.96
Texture Boutique Machine

Price: $29.95 $22.46
Zig Zag Textured Impressions Embossing Folder by Stampin' Up!
Zig Zag Textured Impressions Embossing Folder

Price: $7.95 $5.96

Don’t be sorry you missed out on these absolutely awesome embossing deals~ head on over to my online store and get them before they’re gone!

Til we meet again,

buy Stampin Up! here!

The Big Shot & Bundles Promotion!


If you’re anything like me, you absolutely love when BIG opportunities come your way. And because we all know the Big Shot is a big deal, we thought we’d offer you something you couldn’t miss; an exclusive Big Shot opportunity that lasts for the entire month of August!

If you don’t already have a Big Shot you will want to be sure to get it before the holiday catalog comes out on September 1st. It’s  chock full of sweet Big Shot accessories!

  • With the purchase of a Big Shot in August,  you will receive one of five free stamp set/framelits bundles below, of your choice!
  • Already own a Big Shot? You can still purchase these designated bundles at an amazing 15% off!

This is one deal you don’t want to miss-only available from August 1-31-as these bundles are one-time only exclusives.

There is no limit to the number of bundles or Big Shots you can purchase! Why not start making that Holiday Gift List a little early this year and get a jump on that shopping? (You know you will be happy you did when December rolls around) I will help you out. For each Bundle or Big Shot you purchase I will send you another little gift to slip into that gift package this holiday season. You don’t have to contact me. When I see your order placed I will gather your package contents and send it on it’s way!

Place your order here to have it delivered to your front door!

Bundle

Item Number

Stamp Set

Framelits

Discounted Price

Sumthin’ with Bubbly Words Bundle WM

138923

Sumthin’ Sumthin’

Word Bubbles

$33.75

Sumthin’ with Bubbly Words Bundle CM

138920

Sumthin’ Sumthin’

Word Bubbles

$31.25

Decorative Goodies Bundle WM

138924

Oh My Goodies

Deco Labels Collection

$42.25

Decorative Goodies Bundle CM

138921

Oh My Goodies

Deco Labels Collection

$35.95

Celebrating Chalk Talk Bundle WM

138925

Day of Celebration

Chalk Talk

$43.25

Celebrating Chalk Talk Bundle CM

138922

Day of Celebration

Chalk Talk

$37.25

Flowery Daydream Bundle WM

138911

Daydream Medallions

Floral Collection

$54.25

Flowery Daydream Bundle CM

138910

Daydream Medallions

Floral Collection

$45.75

Bright & Beautiful Stars Bundle WM

138644

Bright & Beautiful

Star

$50.75

Bright & Beautiful Stars Bundle CM

138200

Bright & Beautiful

Star

$43.95

Don’t forget, you have Two Choices:

1) Buy a Big Shot and get a free bundle.

and/or

2) Buy a discounted bundle below at a 15% discount.

Here’s a little video on the Big Shot in case you’re not sure why you (or those craters on your holiday list) need this machine.

http://www.youtube.com/watch?feature=player_embedded&v=scXWUoTAyfs


Til next time,

Judi's Stampin' Up! online store

How to cut an interactive “flip” card in seconds!

Imagine yourself sitting down to create one of those interactive cards that always wow you. Now that you’ve started you’re thinking,” Oh my gosh, what am I crazy?”  You never thought it would take you so long. All that measuring and cutting, measuring and then cut again. You just decided this is one of those cards you will never make again. Hold on~ I have the answer for you! In the time it would take you to just do the cutting of one card you can now cut 10! Nope. This is not a late April Fool’s Joke.

Our Thinlits Label & Circle Card Framelits Dies are the answer to your interactive “flip” card creating woes! These two products have been out for a while but as I have chatted with you lately, several of you have told me you never heard of them. I decided to share them here today & my Hostess Clubs will be using the Label Card Framelit to create a card this month. Here is a video showing you a few ideas on what these can do in just a crank of your Big Shot:

http://www.youtube.com/watch?feature=player_embedded&v=CwdGSYeIn44

Thinlits Circle Card #133479
Thinlits Label Card #133480


I know ~ you just have to get your hands on these baby’s so you can crank out moving cards in no time & wow your friends!With the number of dies you’re getting, plus the die that creates the card itself, the price is a great value-especially to create an interactive card!

Click box for latest Digital Downloads

Click here to view the  Celebrate the Everyday Catalog.

Click here to view the Sale-A-Bration Catalog

Click here to view the Annual Catalog

You may purchase any of your stamping, scrap booking and paper crafting products through my online store

Til we meet again,

buy Stampin Up! here!

You’re Amazing Gift Wrap Idea

Birthday Box Topper Video from Stampin’ Up!

Stampin’ Up! made this great video showing you how to make one of the projects featured in our 2013-2014 annual catalog. You will find this cute topper and gift box on page 15.

I know you will want to pick up a few packages of our gift boxes and don’t forget to stock up on our Designer Series Paper Packages found on pages 151,153,&154. We are running a special of buy 3 packages get 1 package FREE for the month of July!

Items used in this project:

Tea Lace Doilies # 129399

Creped Filter Paper # 129393

Kraft Gift Boxes #124106

Pool Party Seam Binding Ribbon #125582

Linen Thread #104199

Delicate Doilies Lace #130966

1 3/4″ Scallop Circle Punch #119850

Dotted Scallop Ribbon Border Punch #119275

You’re Amazing Stamp Set # 132103 (w) #126722 (c)

Whisper White Cardstock #100730

Pumpkin Pie Cardstock#105117

Brights CandyDots #130931

Pool Party Embossing Powder #129398

Heat Tool #129053

Embossing Buddy #103083

You’re Amazing Stamp set  #132103(w) # 126722 (c)


Til we meet again,

buy Stampin Up! here!


Mixed Bunch, color palette series #3

These flowers in the Mixed Bunch stamp set seemed to be the perfect image for this card. The series #3 color palette consists of ; Tangerine Tango, Tempting Turquoise, Daffodil Delight & Lucky Limeade. I think I was secretly wishing that winter would finally end when I picked the first 3 color palettes because they all have been bright,cheerful colors. Some of you have commented that you were surprised I haven’t used my favorite color, Crumb Cake. I am happy to let you know, Crumb Cake will be part of the series #4 color palette!! Woo! Hoo!

For this version of this card I used theWindow Frames Collection framelits to create the Tangerine Tango element. I paired it with the coordinating Festive Piercing Pack  to add the pierced details. Gotta love when Stampin’ Up! coordinates their products to help make creating easier for all.

Mixed Bunch  friend card

 I want to let you in a little secret~ I originally intended to have the Tangerine Tango element at the bottom instead of the top. Why did I change it? Well you see when I added the flower elements it reminded me of a face with one green and one blue eye and the curved piece made a smile!

I can see you tilting your head to see what I’m talking about. . . .

Too funny!!!!!!!


Here, I flipped it for you. . . .
Mixed Bunch stamp set

. . . . .  See, I told you.


Materials used:

Mixed Bunch Stamp set #125535 (w) #125537 (c)

Inks: Tangerine Tango, Tempting Turquoise, Lucky Limeade, StazOn Jet Black

Paper:Tangerine Tango, Tempting Turquoise, Lucky Limeade, Daffodil Delight, Whisper White

Accessories: Paper Piercer tool, Window Frames Collection # 129021, Festive Piercing Pack # 127857, 1″& 1 1/4″ circle punches, jewelry tag punch , Big Shot Die cutting machine

Note: The Jewelry Tag punch,  Lucky Limeade papers, inks, and accessories will not be available after June 3,2013 as they are on the retiring list.

Til we meet again,

buy Stampin Up! here!

Moving Forward gift card holder

Shop online ~ anytime for your Stampin’ Up! supplies.

you earn FREE stamps with Judi!

  The retiring lists have been released! Save up to 60% on some items! Visit here for lists.

As I was creating my In A Snap version for my Facebook post yesterday I was imagining this version. I just couldn’t wait to create this gift card holder when I was creating my Facebook card. The sailboat image from the Moving Forward stamp set just seems to be bobbing along the water.

DSC00367


I added the layer of Island Indigo and used the  Adorning Accents Edgelit to create the waves ~ too dang cute, eh?  The scallops even have scallops! I added a strip of  Summer Smooches Designer Series Paper, a Neutrals Button held on by 2,  1/8″ silver mini brads rounds out the nautical feel.


The note card was created by cutting the card stock to measure 4 1/4″ x 5 1/2″ and then scoring it in half at 2 3/4″. The belly band is stapled at each edge to allow the note card to slide in and out.


DSC00368

Inside you will see I created a pocket on the inside of the card front to hold a gift card. I stamped the sailboat so only a part of it shows allowing you to write a little message.  DSC00369

I am enjoying creating the projects for my In A Snap Series #2. The color palette of Island Indigo, Lucky Limeade, Real Red , & Tangerine Tango are giving them a happy feeling!

Materials I used for this project are:

Stamps: Moving Forward

Inks: Island Indigo Stampin’ Write Marker, Real Red pad

Paper: Island Indigo, Real Red, Very Vanilla

Accessories: 3/16″ Corner rounder punch, Adorning Accents edgelit, Neutrals Buttons, 1/8″ silver brads, Real Red stitched grosgrain ribbon, Summer Smooches Designer Series Paper,Word Window & Modern Label punches, paper piercer , paper piercing mat, staples.

Don’t forget the Moving Forward stamp set will be retiring and not be available after June 2,2013. To see all the images in this set just go here.

Til we meet again,

JudiAndersonSignature

This witch rock & rolled!

Creating this card was fun, I loved how the rock & roll technique turned out. I stamped the witch image from the Toxic Treats Stamp Set # 127898 (w) # 127901 (c) in Wisteria Wonder Ink first then rock & rolled it in the Basic Black Ink then stamped the image onto Very Vanilla cardstock. I used the Labels Collection Framelits # 125598 to cut the image out. I cut out a few banners and the mat from the Howlstooth & Scaringbone Designer Series Paper # 126906. The Tangerine Tango mat bhind the witch image was run through the Big Shot using the new Argyle Folder # 127750. The card base is Wisterria Wonder. I got my color combo from the howlstooth & Scaringbone DSP, however you will notice that Wisteria WOnder is not listed as a color found in the DSP. I love adding purple to my Halloween paper crafts & cards and felt that the Wisteria Wonder was a good coordinating purple because of it's gray undertones. Many that see this card think the Basic Gray in the DSP is Wisteria Wonder! …But I tell them that if they look closely they will see that it is actually gray. Funny how our eyes can fool us!

100_9121


This card actually opens from the bottom, with the fold at the top. If you'd like to add some bling to this card you could use our 2-Way Glue Pen and Dazzling Diamonds Glitter. I think I would go overr the bats in the upper left hand corner, I feel this doesn't need alot of bling but that would be just the right touch if you wanted some. 

I just love all the patterns in the Howlstooth & Scringbone DSP pack, you could change up the look of this card just by using the other sides! I love the dimensional look of the rock & roll technique on this card. 

                                                      HapBEE Stampin'!

                                                           Judi


August Hostess Card Club

My August Hostess Card Club  were thrilled to learn a few new techniques as they made their projects. I told all of them that I was challenging myself to not use Whisper White or Very Vanilla as my neutrals in this months’ projects. Instead, I used Sahara Sand on one of the cards and River Rock on the other. They weren’t too sure what to expect but after they saw the samples they loved them!! Whew!!!!

In the spirit of this years Convention Theme, “My Way”, I took two swaps that I received at convention this year and changed them up “My Way.” The card I am sharing with you today was originally created by Cheryl Braney, a demonstrator from Palm Desert, California.

Cheryl used the following colors in her card: Whisper White, Raspberry Ripple, Baroque Burgundy, and Primrose. She also used the Ribbon Punch.

In my card I used ( I will * the items I changed):

STAMPS:

INKS: Raspberry Ripple

PAPER: *River Rock, Raspberry Ripple, Baroque Burgundy, Primrose.

MISC.: Butterfly Punch # , Basic Pearl Jewels, *Finishing Touches Edgelits # 127010 , Big Shot, Perfect Dots & Delicate Designs (# 127023) Emossing Folders.

Leave a comment to which one you like best!

In creating their second card they learned how to create 3-D flowers that are mailable, and the tile technique. I used the color combination of Sahara Sand, Basic Gray & Pool Party which may sound a little odd but the colors went together beautifully.

I would loke to invite you to join us on the first Monday of each month to laugh, and learn fun new stamping ideas each month. If you aren’t in the Naperville area you can learn “exclusive” projects each month join my “online club.”

Shop at My Online Store 24/7!


HapBEE Stampin’!

Judi

Button Buddies at the Scrapbook Expo

I'm preparring for the Scrapbook Expo being held at the Pheasant Run Expo Center in St. Charles IL on August 24th & 25th. I will be sharing a variety of home decor, holiday ideas, cards and scrapbook pages in my display. I will also be offering a make&take for a small fee. I will have special gifts for those that book a party with me, place an order or join my team. For those that book a party I have "green bags" that hold either a $5.00, $10.00 OR $20.00 gift certificate in them. They will receive this at their party but I don't want them to go away empty handed so I made these cute notecards, using our Button Buddies stamp set ,and box for them.

100_9090


This is a picture of the cards all boxed and ready to go. I've put them into a cello bag and attached a tag. I will be personalizing the tag to each hostess at the Scrapbook Expo.

The box is made from 2 scallop edge envelopes that I cut out using the BigZ die and the Big Shot. I added a belly band using Real Red cardstock. This made creating this box so simple and quick!


100_9089Here are the card sI created just for these special hostesses! I used our Brights Polka DoOt Designer Series Paper Pack to create these adorable 3×3 notecards. Each notecard is embellished with a button or bow. You can't tell in this picture but the little piggy has mini basic pearls for eyes. These make the perfect little gift card for that special person.

DId you see the flap of the envelope for the baby card peeking out? Yes, I even did my signature cusomized envelopes! For these I just took a strip of the Polka Dot paper and attached it to the envelope flap. SO simple but a great personal touch for these Button Buddy notecards!

Be sure to visit me in my booth on August 24th & 25th at The Scrapbook Expo in St. Charles IL.

                                                        HapBEE Stampin'!

                                             Judi


Fabulous, fun, & fast

Fabulous, fun & fast is the technique I used for this card. While it probably didn't take me as long as it may take you to create this card, it is still a quick card to duplicate. before leaving for convention I grabbed a bunch of miscillaneous paper pieces from my scrap bin to challenge myself to create a card from them. I did stamp the whisper white carstock before leaving using the Etruscan Elegance jumbo wheel you will find in the upcoming 2012 Holiday Catalog. You will find it on page 25 with the Halloween marchandise. Let me tell you, I just love this wheel! I knew I had picked out some leftover pieces of Baja Breeze cardstock that was left from some Top Notes we cut out for another card. ( yes I saved them!) I quickly wheeled them and put them in with my other scraps. The birds were stamped in Basic Gray onto Baja Breeze carstock using the Language of Friendship stamp set. I then punche dthem out using our Bird Builder punch. Can you believe I made 64 of these for my masculine swap and then decided not to use them?? You'd think I would have created the card before doing 62 of them but, oh no, I just kept on a going….. Good thing too because this card would never have been created if I didn't make this huge error. The flowers were also left over from a previous club project. Want to see what I came up with?

100_8710Not bad huh? I had also cut out all the framelit frames for ather swap and didn't use them. It's not as bad as it sounds because all the cardstock I used were scraps in my scrap bin and they will be put to use.

I was able to create 10 of these fabulous , fun, & fast cards from the scraps I brought with. Other demos loved this card and commented that they will definately be purchasing the Etruscan Elegance wheel.

You should be receiving your 2012 Holiday Catalog any day now. If you don't, contact me and I will send you one.

Leaving for Convention 2012

It's 5:00 AM and I am ready to leave for Convention 2012! I will be meeting up with a few of my downline ( girls that have joined my team with me directly or someone that has). I always love seeing these gals. You will always find a smile on my face with the excitement I feel as I meet up with old firends and others, face to face, for the first time. I have several girls from across the country and just love that sharing stamping has brought us together.

My husband and I chatted on our way to the airport. He loves seeing the excitement I share when I attend convention. I tell him I am going to see all my sisters from across the country. He tells me that he can tell when convention is drawing near and is happy to encourage me to go. We laugh as we think about what others are about to experience as they see us…. imagining what a sight it is for others who see us at the airports, in the plane, in the hotel lobbies, at the restaurants, walking on the street, and in the Salt Palace Convention Center. If you have gone to convention before you know to always have a few of your swaps with you to exchange with others you may run into. You will see demonstrators working on their swaps too- for some reason we never have enough time to finish them before we leave- or in my case, just want to make a few more!

Todays Share…………..

100_8702Materials:

Stamps: Button Buddies, Tea Shoppe

Inks: Rich Razzleberry, Pretty in Pink, Night of Navy, Gumball Green Stampin' Write Markers, Pretty in Pink Classic pad

Paper: Richa Razzleberry, Night of Navy, Whisper White, Razzleberry Splash Simply Scrappin' Kit

Misc.: Large Oval, Scallop Oval, punch Pack punches, Basic Rhinestone jewels, Perrfct Dots Embossing Folder, Big Shot, Stampin' Dimensionals

                                                         HapBEE Stampin'!

                                                             Judi

Only 1 more day….until Convention 2012!

I have only 1 more day before I leave for the 2012 Stampin' Up! Annual Convention.

I am rechecking my suitcases to make sure I have everything I need packed- swaps having the highest priority. I am also rechecking the food and other goodies that my husband will survive on while I am away.

Over the next few days I will be sharing the fun I am having at convention. You will also get to see some of the swaps I created to share with others from across the continental U.S., Canada, Hawaii, and Puerto Rico. We have guests from across the world visit also so hopefully I will meet some of them and share with them also. For those of you that have never heard of this, I make a number of cards to exchange with other demonstrators. This is just one way we share our ideas with each other.  

Here is the first swap I will share with you. It uses the Bootiful Occasions Stamp Set. I made 3 different designs to swap with this set. I know I could have done several more designs if I had started my swaps a little sooner.

100_8703For this card I used;

Stamps- Bootiful Occassions

Inks- Chocolate Chip, Pretty in Pink

Paper- Chocolate Chip, Pretty in Pink, Whisper White

Misc.- Large Oval & Star Punches, Rhinestone Jewels, Chevron Embossing Folder, Big Shot, Aqua Painter, Stampin' Dimensionals


When you purchase this set you will notice the verse nd boot are actually one stamp. I cut it apart into 2 , using our Craft & Rubber Scissors so I have the option of using the boot with or without the verse.

You can easily use this design for a boy by changing the Pretty in Pink with your favorite shade of blue and exchanging our mini Sliver Brads for the Basic Rhinestone jewels.

Tomorrow- leaving for convention!

                                                HapBEE Stampin'!

                                                       Judi

Reason to Smile Sneek Peek!

This is a Sneek Peek of the Reason to Smile , exclusive stamp set coming up in the Reason to Smile Promotion we will be having from July 1 thru July 31. I just began playing with this set and am loving it! The larger flower image reminds me of my favorite fall flower- the sunflower. For this card I decided to use the color combination of Rich Razzleberry, Midnight Muse, Pink Pirouette, and Whisper White.

I started out by cutting out the 2 decorative edges using 3/4" strips of RIch Razzleberry & Pink Pirouette card stock and the scalloped edgelit from the Finishing Touches Edgelit. * A trick to cutting these is to lay it at a diagonal across your cutting platform. Some of the pieces may not pop out but if you gently run your finger nail along the cut outs most will pop out. I cut a strip of RIch Razzleberry Designer Series paper 2"x3 3/4" and then attached these 2 strips to the left side. The Whisper White card stock measures 3"x3 3/4". Luckily it was the right size for the Happy Birthday from the Curly Cute stamp set( note to self, decide what set you will be using before cutting all your pieces!!). I wanted the card to be more feminine so I used Pink Pirouette & Rich Razzleberry inks.

To give the card a more masculiine look you can change the edgelit to the zig zag one, omit the Pink Pirouette totally, stamp the solid image flower in RIch Razzleberry (I'd stamp off ) and the outline image in Midnight Muse. The Happy Birthday could be stamped in Rich Razzleberry for the repeated words and Midnight Muse for the focal point. I would probably also just use circle punches to punch out the flower and the mat.

100_8695Other products I used are:

Finishing Touches Edgelits # 127010

Delicate Doilies Sizzlits L* # 126999

Midnight Muse Stitched Satin Ribbon # 126847

Large Pearl Basics # 125577

Pearl Basic Jewels # 110247

Curly  Cute stamp set #117014 (w) # 120510 (c)

100_8697This is a close up of the Basic Pearls detail.

Be sure to come back on July 1 to see the promotion and anotherr sample using the Reason to Smile stamp set.

Shop Here  24/7 !

                                     HapBEE Stampin'!

                             Judi

The last day of the 2011-2012 Catalog!

Can you believe we have completed another year with another GREAT catalog? I'm sad to see this catalog come to a close but I am happy to say….. there are great things around the corner in the new catalog.

During this past month I have been sharing several card ideas with you using many products that will no longer be available after today. Don't forget that our Home Decor and Simply Adorned lines will not be available after today. Do you love the Big Shot die cut machine? Be sure to check out the retiring accessories list because several of our Big Shot dies and product are retiring to make room for new Big Shot product.

My million dollar question for all of you is," Do you have everything you want from this years catalog? If not, check out my ONLINE STORE and get the retired products while you still can!

I also want to remind you that you will not be able to place an order between 1:00AM Central time to  1:00 PM  Central time due to updating the system.

If you are in the Naperville area Friday between 6:30 & 8:30 pm be sure to drop in to see some of the great new product in the new 2012-2013 catalog. You can also pick up your own copy of the catalog to take home! I know you will enjoy this rainy, cold weather we are having when you snuggle in your favorite chair to look through the new catalog!

                                                      HapBEE Stampin'!

                                  Judi

Autumn Splendor, retiring Stampin’ Up! set

Autumn is my favorite time of year and that is why I think I am always drawn to our sets like Autumn Splendor that contain leaves. I love the colors of autumn and the ability to experiment with color and techniques when using sets for this time of year. The fine line details found in the images of the stamps in the Autumn Splendor stamp set give the leaves an elegant / formal look. I helped one of my cutomer use this set for her daughters wedding invitations, the table seating cards and to accent the favors. She embossed the leaves in gold on our Shimmer White cardstock. She told me the guests were all amazed that she made them and most commented on how elegant and professional looking they were. She couldn't thank me enough for the idea and the help.

This is a card I made for a family friend that retired this past fall. As you can see, it is simple, yet has alot of texture and the wow factor.


1Materials

Stamps

Autumn Splendor # 116503

Teeny Tiny Wishes


Inks

Cajun Craze, Pumpkin Pie

Paper

Cajun Craze, Pumpkin Pie, Very Vanilla

Misc

Big Shot, 1/2" Peach Parfait Stitched Poly Ribbon, Modern Label Punch, Stampin' Sponge, Elegant Lines Embossing Folder


Purchase Autumn Splendor and your other Stampin' Up! merchandise, 24/7

on my ONLINE STORE

                                    HapBEE Stampin'!

                                       Judi