Polka-Dot Pieces stamp set

I can tell I am beginning to feel. I can sit up without being dizzy, I’m walking without feeling like I’m on a rocking boat & I spent more time creating this past week. I still can’t hear out of my right ear but I have been told it should be better soon. Maybe I shouldn’t tell dear hubby when it’s better so if I want to tune him out I can just blame it on my hearing loss!!

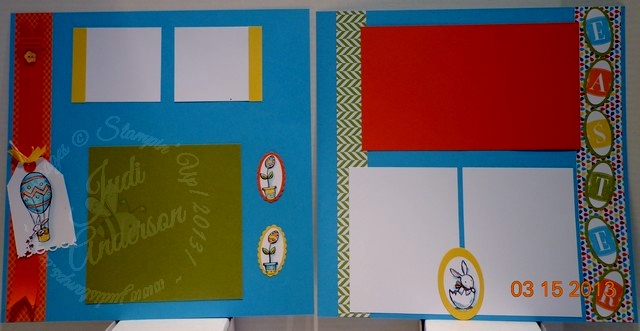
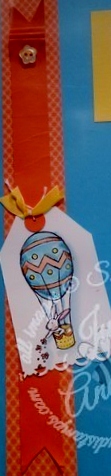
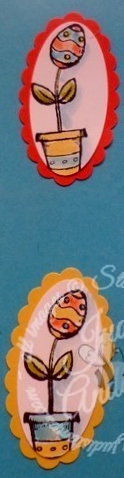
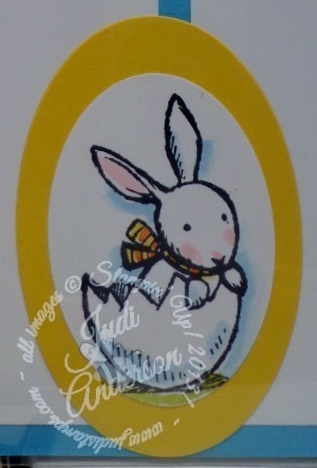
I enjoy creating my memory books for my children & they love receiving these books that all they have to do is pop in the pictures and do a little journaling. This layout will be put in the book for my son, daughter-in-law and my granddaughter. This particular book will be given to them as a family on Samantha’s first birthday in June. It contains 1 page for each month, a page for each of her “first” holidays and then a few 2-page layouts. I went to 3 different stamp sets; Happy Watercolor (w-133188,c-133191), Perfect Pennants (w-133227,c-133230) & Polka-Dot Pieces (w-129705,c-129708) for the theme of this layout. I know there will be a picture or two of the three of them that they will want to put onto these pages. I will be doing a few grandparents & aunt & uncle pages too.

Happy Watercolor stamp set

The colors of this layout will work with almost any outfits that they may be wearing in the pictures so I know we will find many that can go onto this layout. I  wanted to put embellishments on the pages that would co-ordinate with the polka dot pattern from the Birthday Basics Designer Series Paper (130145) without getting too busy. Don’t you agree that the Polka-Dots Pieces stamp set is just right?

Polka Dot Pieces detail


I used our Tiny Wave Stampin’ Trimmer

Rotary Cutting Blade (129409) for this detailed

edge of the strips. Using this blade made it quick to add this detail.


Polka - Dot Pieces stamp set


These 2 pages will be one of the two layouts that my scrapbook clubs will be creating this month. They will be able to choose from the Polka-Dot Pieces or the Blast Off stamp sets, everything else will remain the same. If you are in the area and would like to catch up on your memory book pages why not join us? Visit My Calendar of Events for details.


The stamp sets I used in this layout:

Happy Watercolor
Perfect Pennants
Polka-Dot Pieces

Til we meet again,

buy Stampin Up! here!


Click here to view the  Celebrate the Everyday Catalog.

Click here to view the Sale-A-Bration Catalog

Click here to view the Annual Catalog

You may purchase any of your stamping, scrap booking and paper crafting products through my online store.


Claim YOUR FREE Markers today!

Over 7000 people are enjoying their brand-new, FREE In-Color Stampin’ Write Markers~ are you?

track-1Would you like a fully designed project kit (packaged in a charming box) delivered to your front door each month? You will find the box filled with stamps, ink, and paper, everything cut and ready for you to create. Paper Pumpkin as a great stress-free way to create. Why not have some friends join too and you can gather together to create these fun projects. We like to create a project on our own, gather our extras, get together for coffee, share what we created and then create some more!

An Exclusive BONUS just from me– I will send you a photo & quick video of a project that I created  with Paper Pumpkin each month you are a member when you sign up through me!

What are you waiting for? Get ready to share what you love by joining today!

All new members who join by March 31,2014 will receive a FREE set of In-Color markers- a $14.95 value!

Visit: www.mypaperpumpkin.com today to get started and enjoy your FREE markers! *Be sure to choose me ~  ( Judi Anderson from Illinois as your demonstrator to receive your exclusive bonus)

Til we meet again,

buy Stampin Up! here!

January My Paper Pumpkin Samples

I wanted to share the cards I created with the January My Paper Pumpkin. I received my monthly kit today and when I opened it I found a surprise tucked inside! Wooo! Hooo! we all LOVE surprises especially when it’s FREE crafting stuff. If you have liked me on Facebook you have seen what I received, if not, pop over and take a peek.

I created 2 of the 4 cards as the samples shown and decided to rebellious and do 2 different. It only took me about 20 minutes to complete all 4 cards & envelopes. I will share the note cards tomorrow.

January 2014 Paper Pumpkin Samples


I just love these cards!


close up of Paper Pumpkin 1-2014


Here is a close up.

The cards that are Crumb Cake are the samples shown in the kit.

F0r the other 2 cards I reversed the inside and outside of the cards by folding them the opposite way. For this card I also changed sides when stamping on the front.


Why not get your own monthly kit delivered to your front door? Check this post for the details and how you,too can receive a FREE Gift for a limited time. Remember to choose me as your demonstrator!

Til we meet again,

buy Stampin Up! here!

FREE 2012-2014 In Color Stampin’ Write Markers when you. . . .

That’s right !I’d love to share & introduce you to the Paper Pumpkin experience. You will receive Free 2012 – 2014 In Color Stampin’ Write Markers when you join the monthly Paper Pumpkin club between   January 11th  & February 10th!! That’s a $14.95 value just for giving this great in- the- mail club a try.

Get your free 2012-2014 in color markers through Judi Anderson

But wait, there’s more!!

I have entered a challenge and I would love to share my winnings with you. I know you are like me, you love FREE stuff! SO here’s MY EXCLUSIVE SPECIAL just for you~

**Judi’s Exclusive Paper Pumpkin Special

Sign up for Paper Pumpkin through me, Judi Anderson

between January 11th & January 25th.

When I get up to 6  new subscribers-

I will send each a surprise package of product worth at least $20.00!!

When I get 7- 10 subscribers-

I will send each a surprise package of product worth at least $35.00!!

Q&A

Q- Do I get both the 2012-2014 In-Color Stampin’ Write Markers & the surprise package ( a minimum $34.95 value) if I sign up with Judi Anderson by January 25th?

A- Yes! But in order to get Judi’s Surprise package you MUST sign up by January 25,2014.

Q- What if I sign up on January 26th?

A- You will only receive the 2012 – 2014 Stampin’ Write Markers , still a great deal!

Q- What kinds of projects will I be receiving?

A- Each month you will receive the materials (except adhesive) to complete a different project(s) each month. You will receive a different project(s) each month that are hot now & keep up with the latest trends. In the past we have received assorted greeting cards, journaling book, party decor & more.

Q- Are these projects too hard for a beginner or those of us with little time?

A- If you fall into one of the above categories Paper Pumpkin is for you! These projects are quick & easy for those of you on the go. BUT, for those of you veterans they are a great starting point and you can go to your paper crafting supplies to add embellishments and more if you wish.

Q- How will I receive Judi’s exclusive surprise package?

A- I receive an email when you sign up and choose me as your demonstrator. Once I receive a confirmation on how many subscribers sign up, I will send out the packages in February once I win the challenge & receive the product. It’s a win-win for all! I will win the challenge I will pay it forward and pass along my winnings to YOU. YOU will receive a paper crafting kit (all supplies included except adhesive) delivered to your front door, a FREESet of 2012-2014 In-Color Stampin’ Write Markers PLUS *Judi’s Exclusive Special.

Q- What if you don’t win the challenge?

A- I know that with your support I can win. But if I don’t, I will send those who did sign up by January 25th a surprise package.

Q- Where do I go to sign up ?

A- Just click here to go to MY PAPER PUMPKIN, be sure to put me, Judi Anderson from Illinois as your demonstrator.

I am sure you are eager to start your creativity escape each month, today. If you have any more questions just email me at judi@judistamps.com.

Til we meet again,

buy Stampin Up! here!

**This special is exclusively from Judi Anderson, Stampin’ Up! Independent Demonstrator

Paper Pumpkin

Over 11,000 People Have Registered For Me!

NO NEED TO READ THIS . . . . . . if you’re one of the over 11,000 people who have already joined Paper Pumpkin. If you’re not one of the lucky 11,000 +, you’ll want to pay special attention. . . . . . .

Hi there,

Did you miss out on the first delivery of My Paper Pumpkin and don’t want to miss out on the action?  Don’t forget to sign up for me (Paper Pumpkin) before  April 10 so you won’t miss out on any more of my kits. (They are all really cool!) Remember, my kits are only available for a month at a time; each month is a different kit! Yea, how exciting! Go to www.mypaperpumpkin.com to sign up. Select Judi Anderson as your demonstrator! or contact Judi asap to get your first kit! Don’t be the one that misses out.
See ya soon!

-Paper Pumpkin

*Don’t forget that when you name Judi Anderson of Illinois as your demonstrator you will receive a file with an additional project you can make with your kit!

JudiAndersonSignature

Is your memory book ready for Easter?

Easter is coming soon, are you ready? My Scrappin’ Friends club members from across the US are! Well, as far as their memory pages are concerned.  One of the 2, 2-page layouts they made this month is an Easter layout. All they have to do is take the pictures , have them developed, and drop them on the pages! (Better known as crop & drop )

They learn new stamping and scrapbooking trends and techniques each month as they create their layouts. For this layout they water-colored, learning to create depth creating depth &  made a rippling paper ribbon.

Stampin Up Easter

Doesn’t this layout put a huge smile on your face?

Just imagine of how it is going to look once pictures are dropped onto them?

I thought I would share a few of the elements on these pages with you:

paper ribbon techniquefirst, the paper ribbon with ripples at the top

Flower eggsNext the little flower pot cuties

bunny in egg bunny in an egg


Eager to find out how you too, can get in on this exclusive monthly club?  Just subscribe to my monthly newsletter and you can sign up to learn & create 2 new memory page layouts each month.Buy Stampin' Up! online

NEW- Paper Pumpkin Project of the Month Kit

Click: Shop 24/7 with Judi

Your Fairy God-mother has arrived!

Paper Pumpkin

DEMO_B1_Paper_Pumpkin_Logo
A magical paper escape every month!

Visit My Paper Pumpkin for info and to sign up today!

Love to Create Crafty Projects,

but sometimes short on time or ideas?

Stampin’ Up! to the Rescue!

Our new monthly crafty stampin’ kits

are perfect for you!

just visit My Paper Pumpkin for more information and subscribe today!

Starting TODAY you can subscribe to this great new service to receive a monthly stampin kit delivered right to your door for only $19.95!! this INCLUDES shipping!  Your first kit will arrive in March!

Remember to select Judi Anderson , Naperville IL as your demonstrator when asked for your demonstrator

Get a new fun kit each month, mailed on about the 15th of each month.

Unsubscribe, or, put a “hold” on your membership at any time.

  • Each month we send you a unique, surprise kit with a project-cards,
    journals, décor, and more! (We’ve even color-coordinated, measured, and
    cut everything for you!)
  • Each kit includes stamps, ink, paper, and accessories-everything but adhesive.
  • This is separate from any customer online order and may not be combined with other products you may wish to order here.
  • Sign up by the 10th of each month to get that month’s kit.  If you
    sign up after the 10th, you’ll get next month’s kit as your first kit.


Be one of the first to receive this fun new monthly stampin’ kit!

      www.mypaperpumpkin.com

Only $19.95 a month!!

Contact Judi with any questions:www.judi@judistamps.com

JudiAndersonSignature

August Hostess Card Club

My August Hostess Card Club  were thrilled to learn a few new techniques as they made their projects. I told all of them that I was challenging myself to not use Whisper White or Very Vanilla as my neutrals in this months’ projects. Instead, I used Sahara Sand on one of the cards and River Rock on the other. They weren’t too sure what to expect but after they saw the samples they loved them!! Whew!!!!

In the spirit of this years Convention Theme, “My Way”, I took two swaps that I received at convention this year and changed them up “My Way.” The card I am sharing with you today was originally created by Cheryl Braney, a demonstrator from Palm Desert, California.

Cheryl used the following colors in her card: Whisper White, Raspberry Ripple, Baroque Burgundy, and Primrose. She also used the Ribbon Punch.

In my card I used ( I will * the items I changed):

STAMPS:

INKS: Raspberry Ripple

PAPER: *River Rock, Raspberry Ripple, Baroque Burgundy, Primrose.

MISC.: Butterfly Punch # , Basic Pearl Jewels, *Finishing Touches Edgelits # 127010 , Big Shot, Perfect Dots & Delicate Designs (# 127023) Emossing Folders.

Leave a comment to which one you like best!

In creating their second card they learned how to create 3-D flowers that are mailable, and the tile technique. I used the color combination of Sahara Sand, Basic Gray & Pool Party which may sound a little odd but the colors went together beautifully.

I would loke to invite you to join us on the first Monday of each month to laugh, and learn fun new stamping ideas each month. If you aren’t in the Naperville area you can learn “exclusive” projects each month join my “online club.”

Shop at My Online Store 24/7!


HapBEE Stampin’!

Judi

More ” Bootiful Occasions”

By now I am sure you have noticed that Bootiful Occasions is a stamp set that I am using quite  bit. Fall is my favorite season &  I just love creating Halloween projects . I have so many ideas using the Bootiful Occasions stamp set and I love sharing them with you. This card uses alot of our merchandise, however, I want to let you know I went to my scrap bin for many of the pieces used in this card. I often wonder when saving some of my scraps why I do. isn’t it amazing how it seems you will find “just that right piece” in your scrap bin?

Tip: I ran the whisper white cardstock and the basic black scallop circle through the Big Shot at the same time in the Web embossing folder.

Here is all that I used to create this fun card:

Stamps: Bootiful Occasions

Inks: Basic Black, Whisper White craft, Rich Razzleberry, Old Olive & Tangerine Tango Stampin’ Write Markers

Paper: Tangerine Tango, Whisper White, Old Olive, Basic Black, Silver Glitter, Rich Razzleberry DSP

Misc: Web embossing folder, Old Olive dotted ribbon, large oval,Curly Label & Scallop Trim Border punches, Multi-purpose adhesive sheets, Dazzling Diamonds Glitter, Big Shot, Brayer, Basic Rhimestones, Brights Buttons, Linen Thread, Mini Glue Dots, Stampin’ Dimensionals.

I htink if I were a witch I would want to wear this blingy boot! More samples from the Bootiful Occasions stamp set will be coming……


  HapBEE Stampin’ !

                                                  Judi

Flight of the Butterfly

My Hostess Club members will be using the Flight of the Butterfly stamp set as they learn a new technique this month, Faux Tile. To create the Faux Tile effect we will be using the Diagonal Plate for the Simply Scored Scoring Tool. They will score their piece of cardstock at 3/8″ intervals in both directions. This creates little diagonal squares. To create the “tiles” they will lightly sponge on Daffodile Delight, Melon Mambo, and Tempting Turquoise Classic inks. Making sure not to press down so heavy that they fill the scored lines with ink as they will be your grout lines.

Another look is to make your piece look like a tile mural by scoring your lines then take your solid stamp image and stamp on top making sure not to press too hard. I have also then embossed the paper with clear embossing powder to give it high gloss.

Materials:

Stamps

Flight of the Butterfly # 111564

Inks

Daffodil Delight, Melon Mambo, Tempting Tuquoise, Basic Black

Paper

Daffodile Delight, Melon Mambo, Temtping Turquoise, Whisper White

Misc.

Simply Scored Scoring Tool # 122334, Simply Scored Diagonal Scoring Plate #125586, Stampin’ Sponges 101610, Ticket Corner punch #119867, Brights Flower Brads # 119734.


The items that are highlighted in yellow will be retiring and not be avaiable after May 31.

Purchase

Flight of the Butterfly and other items at My Online Store now!


HapBEE Stampin’!

                                                                Judi


Holiday Happiness

The Holiday Happiness stamp set features 6 images to create your holiday cards in a snap. I love the tiny ornaments in this set, did you know they can double as mini vases for your tiny floral sets? All you need to do when you ink them is to create a flat bottom and walla! you have tiny vases….. They card I am sharing today is a holiday card, tomorrow I will share anotherr card I created using the ornaments as vases so be sure to check back tomoorw if you want to see how to achieve this look. 

1Materials:

Stamp

Holiday Happiness # 120786 (w) # 120792 (c)

Ink

Lucky Limeade, Cherry Cobbler, Old Olive

Paper

Whisper White (card base) , Lucky Limeade, Cherry Cobbler

Misc

Big Shot, Perfect Polka Dots embossing folder, Extra Large Oval Punch # 119859, Large Oval Punch # 119855, Basic Rhinestone Jewels # 119246, Dazzling Details

Note: To ahcieve the oval layers I cut a large oval from Lucky Limeade cardstock in half lengthwise and layered behind the Whisper White large oval punch.

Look closely at this scan and you will see the card base is Whisperr WHite and I layered 1/4 sheet of Lucky Limeade onot it- this is a great way to stretch your colored cardstock!

                      HapBEE Stampin'!

                                      Judi


Vintage Vogue

Vintage Vogue is just one of the sets I will miss sharing with my guests at workshops and classes. I am continually using the elements found in this set! My scrspbook clubs have also learned several fun things using the Vintage Vogue set. This set coordinates wonderfully with the following sets, also retiring; Notably Ornate # 117098 (w) #120561 (c), Frame It#122840 (w) #122852(c), Timeless Treasures # 118748 (w) #120615 (c), Charming # 116519 (w) #125829(c), Clearly For You # 121911 (w) #121976 (c), Extreme Elements #115181, Best Friends Forever # 122805 (w) #122807 (c), & Grunge Rock # 117080 (w) #120555 (c). There are quite a few more sets that I have used with this set but you get the idea- it is versatile…


***************************************************************************

If I have listed the item number behind the item it means it will be retiring on May 31,2012. The accessories are while quantaties last ( many are already out of stock!) so if there is something you want, order it now.

For the complete retiring list click on the appropriate link below;

Stamps

Accessories

Decor Elements

PURCHASE HERE

1The card I am sharing with you today is one that we made in my Hostess Club, and they loved it!

Materials used;

Stamps

Vintage Vogue #117690 (w) # 118598 (c)

Ink

Always Artichoke, Chocolate Chip

Paper

Crumb Cake, Always Artichoke, Chocolate Chip, Naturals White

Misc

Square Lattice Embossing Folder, Big Shot, Early Espresso 1/8″ taffeta Ribbon, Metallic Brads, Paper Piercing Tool # 116631, Mat Pack # 105826, Dotted Scallop Ribbon punch


                           HapBEE Stampin’ !

                                     Judi


Take It to Heart stamp set double slider card

My monthly Hostess Club enjoyed using the  Take It to Heart stamp set to create this  double slider card. They were honestly a little intimidted when I first showed them the sample but were quickly put to ease. The double slider technique is so much fun to do and will WOW those who receive a card using the technique. For the Card we used:

Stamps: Take It to Heart ( from the Occasions Mini Catalog)

Elements of Style

Inks:       Cherry Cobbler                             Versamark

Basic Black                                    Crumb Cake

Always Artichoke

PAPER: Sahara Sand                                    Basic Black

Very Vanilla                                   Mocha Morning Specialty DSP

First Edition Specialty DSP

Misc.:     Black Embossing Powder, Heat Gun, Aqua Painter, Cherry Cobbler Seam Binding Ribbon, Vanilla SHimmer Smooch Spritz, Word WIndow & Lace Ribbon Border punches, Hearts Collection Framelits Die, Big Shot, Stampin’ Sponges.

1

Here is the card closed


Here is the card opened – 1


The images in the Take It to Heart stamp set lend themselves to so many occasions! Be sure to check the set out here and scroll to page 14.


HapBEE Stampin”!

Judi

Easter Basket Video!

I have completed my first video, a Easter Basket/ Spring Basket, and hope you enjoy it! While there isn’t any rubber stamping done on the basket the possibilities are endless when it comes to accessorizing these cuties.  Other demonstrators have shared a similar,cute little basket but not the instructions or measurements. This video contains my version of creating a spring/ Easter basket, simply and quickly. For this version you will need the following:

1 piece of 8 1/2 x 11 cardstock, your choice of color

Simply Scored Scoring Tool # 122334

Paper Snips #103579

Lace Ribbon Border Punch # 122362

Brads # 127279 (I used  FREE Sale A Bration , Everyday Enchantment Ribbon & Brad Pack)

SNAIL Adhesive # 104332

Crop O Dile # 108362


I did embed the measurements into the video but am not sure why they’re not showing up! If you need them please leave a comment and I will send them to you.

I am making an assortment of these to give to those who visit during the spring and Easter. I found some flower seeds on sale for 10 cents a pack and think they would be a cute item to stuff into these along with some other goodies.

I know you will enjoy making your own version of these spring/Easter baskets!

HapBEE Stampin’!

Judi

Tea Shoppe Emboss Resist

In my mid-month newsletter, I am sharing the emboss resist technique. This a technique that is simple to do yet it will WOW your friends! This is a perfect technique to do with our Tea Shoppe stamp set found on page 19, in the 2012 Occasions Mini Catalog. You and your guests will get a chance to learn and then make a project doing this technique when you book a workshop to be held in March. If you would like to get on my Monthly Newsletter Mailing list CLICK HERE.

It is also the technique my card clubs got to do at their February meeting. The card I am sharing with you today is the card my club members made and loved!

Materials we used are;   

Stamps: Tea Shoppe

Inks: White Craft, Lucky Limeade Classic     100_8659

Paper: Lucky Limeade, Whisper White

Misc.: Embossing Buddy,White Embossing Powder

            Lucky Limeade Ruffled Ribbon, Scallop Oval

            Punch, Stampin' Sponge, paper towel,Heat  

             Gun,Basic Pearls

Don't you just love how the emboss resist technique gives this tea cup a soft, elegant look? You could even use a different color ink on the flowers , I would probably use Wiseria Wonder because this tea cup reminds me of playing dress up when I was younger. I would pick violets and lily of the valley from around our garage and have tea parties. I would put on this purple violet long robe, high heals and share cookies with my dolls. Sorry~ a short trip down memory lane!

If you would like to learn how to do the emboss resist technique just contact me by visiting my website. Be sure to click on "My Ideas" to get more projects &  inspiration! Did you know you can also shop there, 24/7 by clicking  HERE!

HapBEE Stampin'!

Judi