Tea for Two Spring Wreath

What is a stamper to do with fabric? Lots! I love using fabric on cards, scrapbook pages, frames, and….wreaths. I recently held one of my quarterly all day events and taught guests how to create an assortment of flowers combining fabric and paper. The theme for the event was Beat the Winter Blues so this spring project fit the ticket!

For this particular project I went down memory lane and taught them how to create one of the fabric/paper flowers we created at Leadership a few years back. They also learned how to create; fabric roses using strips of our Tea for Two Designer Fabric extra-wide fat quarters &paper roses using an assortment of punches.

Here is a sample of the wreath they created. Fabric/paper wreath

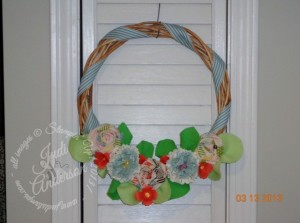
After everyone finished they were able to get extra leaves if they wished to add some to their wreath. Everyone just loved this wreath and loved learning the different techniques in creating the flowers.

Want to learn how to make one of the flowers?

Be sure to come back on Tuesday, March 19 to learn how in my Tuesday’s Tip, Techniques, and Trends Made Simple Series.

See, fabric isn’t just for sewing!

buy Stampin' Up! online here

Serene Silhouetts

Are you looking for a stamp set with images that lend themselves to many different looks and techniques? Serene Silhouettes is a great choice & is my current favorite set.

This is a card I created for one of my swaps for Leadership.

100_9280

100_9280

Serene Silhouetts thumping techniqueHere are the supplies I used:

Stamps: Serene Silhouettes # 127322 (w) #127324 (c)

Perfect Punches # 117022(w) #120516 (c)

Inks: Pretty in Pink, Perfect Plum, Garden Green Stampin’ Write Markers. Perfect Plum Classic Ink Pad.

Paper: Perfect Plum, Pretty in Pink, Whisper White

Misc.: Punches- Itty Bitty Punch Pack #118309, modern label #119849, Pretty in Pink stitched grosgrain ribbon #126880, Big Shot  Die Cutting Machine #113439, Petals-a-Plenty embossing folder Multi-Purpose Liquid Glue # 110755

I used the “thumping” technique on the flowers to give them a 2-tone look. To create the “ticket” corners  on the Pretty in Pink mat I punched them out using the circle punch that comes in the Itty Bitty Punch Pack, only inserting the corner about 1/3 in. I just love this trick and use it quite frequently on my paper crafts, cards and scrapbook pages. You can vary the size of your corners by using different size circle punches.

Until we meet again,

                                                   my signature


Open House, Everything Elenore

My new Catalog Open House was such a fun evening of stamping and laughing with guests. Each guest received a gift of a Stampin' Up! foldable trash can ( everyone was delighted ). Inside the trash can I had tucked in 1/4 sheets of the new In-Colors and their supplies for the make&takes that evening.  Attached to the trash can was a cute tag hand stamped by me.

  100_8671


Everyone was anxious to see the new catalog but I held off giving them out until they completed their make & takes. Everyone got to know one another as they stamped their cards. That is what I love about being a demonstrator~ making new friendships with my guests and experriencing them making new friendships through these types of events. I am always amazed at how many people actually have another perrson in common with someone they just met….it is a small world!!

The first make & take for the Open House was using the Everything Elenor stamp set and Summer Starfruit, a new In-Color. I also shared some cards using the remaining In-Colors and the same design as the one they made. I also explained to them that if they use a paper-saver technique I taught them they would be able to create a set of 16 cards of each In- Color with 1 multi-pack of In-Color 8 1/2 x 11 cardstock and 8 sheets of either Whisper White or Very Vanilla  8 1/2 x 11 cardstock. That is a total of 80 cards from 1 assortment pack!! I was happy that some of the guests had never seen this technique before! This is a great mono-chromatic card to give as gifts with a card holder. I would stamp a couple different verses on the tag, attach a few Stampin' DImensionals, to the place the recipient is to place the verse, to give them a few options when giving the cards.

100_8673

 This was the Make & Take

         This is a sample of some assorted cards you can make using the Everything Elenor stamp set and 1 package of the 2012-2014 In-Colors. 100_8680


Did you know?

That when you purchase all 5 in-Color Classic Pads you get a  package of 8 1/2 x 11 In-Color cardstock for 20 cents ? How is that for helping make a few hand-made gifts a little bit more economical? You will find this  great deal on page 82 of the New Catalog. Just look for "Card stock & Pad Kit" in the top row of the pictured items in the lower 1/2 of the page.

To purchase  this GREAT DEAL just click this link: I want this GREAT DEAL!!


                            HapBEE Stampin'!

                                 Judi

Stampin’ Up! retiring stamp set Upsy Daisy

Upsy Daisy is one of those stamp sets that you will find yourself going back to time and time again. I love any of the solid image stamps because they lend themselves to so many different techniques which lends to their versatality.

You can find the Upsy Daisy set on page 116 of the 2011-2012 Catalog / Idea Book. You will also find that the set also contains 3 verses, “Birthday ****Celebrations***”, “You’re     on my mind”, and “Thank you ………for your friendship”. The verses are great as they are or with the omission of a word or two. I find myslef using Upsy Daisy for masculine, female, and young adults on a variety occasions.

1Materials used:

Stamps

Upsy Daisy # 111710

Elements of Style # 118611(w) #120045(c)

Inks

Certainly Celery and Not Quite Navy Classic Ink Refills , Jet Black StazOn

Paper

Certainly Celery, Basic Black, Glossy White

Misc.:

Acetate sheets


For this card I used the “smashed acetate” technique. When doing the technique I will figure how big of a sheet I will need to create 4 cards. I will create the background on that piece , let it dry overnight and then cut it into desired pieces. Each card you create is an unique piece of art!

I hope you add Upsy Daisy to your stamp collection.

Be sure to place your order for your favorite retiring stamp sets Here today!


HapBEE Stampin’

Judi

Simply Scored Faux Tile Technique

I'll be honest, this Faux Tile Technique is soooooooo much easier to do with our new Simply Scored Scoring Tool. I have done and taught this technique several times and my students often comment that they just can't keep their paper straight all the time. You won't have this problem if you use the newest tool Stampin' Up! has come out with~ the Simply Scored Scoring Tool.

I am letting you get a sneek peek on one of my samples for the Scrapbook Expo this weekend. I scored the tiles at every 1/8" for the tiles in the center of the card. Our new Simply Scored Scoring Tool made creating these tiles simple because of the rulers along both edges. I scored all the lines in one direction, turned my paper and then did the lines in the opposite direction, forming 1/8" tiles.  After doing the scoring I stamped the images from the Friends Never Fad stamp set # 118750 (w) 120618(c) in Rich Razzleberry and Old Olive inks. Be sure not to press too hard when stamping your images as you don't want the ink to get into the scored lines. I love using solid images when doing the Faux Tile Technique because it looks more realistic. Another hint: you ink pad needs to be well inied but DO NOT saturate it. Give yourself a couple of practice runs on scrap paper before doing your actual card. I ususally do my scored squares to measure 1/4" because it was easier doing the scored lines but the Simply Scored Scoring Tool makes dong 1/8" squares a snap!

You can order your Simply Scored Scoring Tool on September 1 HERE

Now for the sample I promised you~

Faux tile
I guess I should have scanned it on black instead of a white background…….

HapBEE Stampin"!

Judi