Holiday Collection SIngle Stamps

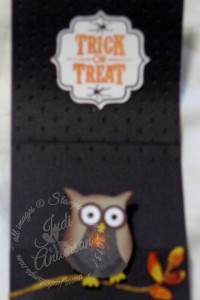
 Did you know. . . . . .

A holiday-themed collection of single stamps is  available!

The holidays will be here before you know it, and these holiday-themed single stamps may be just what the budget-conscious stamper needs. There are eight different stamps to choose from, six of which coordinate with Framelits dies or punches.

new holiday single stamps

  • You can find the stamp item numbers on the flyers, just click the picture above for a larger view.
  • Single stamps can be ordered through my online store here.
  • These won’t be sent in our typical cases or packaging; they’ll be packaged in cello bags. If you’d like a case for your stamp, you can buy our Clear-Mount Stamp Cases that come in packs of four (item 119105).
  • This offer is available for clear-mount stamps only.
  • The stamps won’t come with a Clear-Mount Block, and you’ll need to buy a block separately if you don’t already have one. The recommended block sizes can be found on the flyer.
  • There’s no limit on how many pieces you can buy.
  • These holiday-themed stamps are only available through January 31, 201, so get them while you can!

Til we meet again,

buy Stampin Up! here!

Digital One Day Sale!!

All Digital Daily Deals Back on Sale
Hopefully this week has gotten you inspired to start creating with MDS.  We know there were quite a few of you that missed out on some of the Daily Deals, so as one last final surprise to end Digital Scrapbooking Days, the My Digital Studio team has decided to put all of the Daily Deals back on sale for 24 hours! Get your orders in between November 8 at midnight and November 9 at midnight (MT).

Here are the downloads that will be on sale:

  • Amped Up Ampersands Kit (item 134844)
  • Hello There Kit (item 133374)
  • All Time Fave Photobook Template (item 132915)
  • Modern Medley Overlays Kit (item 134839)
  • Be Brave Pocket Cards (item 134840)
  • Nobody’s Business Photobook Template (item 134812)
  • Autumn Traditions Kit (item 127600)
  • Afternoon Daydream Kit (item 130861)

Order your Digital Downloads here!

buy Stampin Up! here!

Halloween Owl Treat

It’s almost Halloween & I thought I would share the Halloween Owl Treat I will be giving out to people I meet when I go out tomorrow morning. This is a great treat holder to show off your stamping talents!

Owl Punch

This is a matchbook treat holder that I will slip a Gheradelli chocolate inside . Do you love techniques? This is definately for you! I sponged around the moon, the owl, and the branch. The leaves are done with the direct to paper technique . I then used the Perfect Polka Dot embossing folder to create “stars” in the night sky. I then dabbed some of the polka dots with Dazzling Details( to add that bling we all love!) I know they look like blobs in the picture but I just couldn’t get them to come out right. That’s Dazzling Diamonds Glitter on the edge of the moon – heck diamonds ARE a girls best friend!.

Want to see the inside?

Owl Halloween treat holder

Just too dang cute. huh??

To keep the holder close you tuck it behind the flap that the owl is attached to.

I will tuck the treat inside holding it in with a mini glue dot.

I know you’re thinking, “I want one of these cute Owl Halloween Treat holders!”  for your very own.If you placed a minimum $50. order at my online store this month you could be seeing your soon!!  Yep, these are one of the treats I sent out for supporting my business this month.

Supplies:

Stamps

Tags For You # 131820

Ink

Chocolate Chip #126979             Tangerine Tango #111349

Paper

Basic Black # 121045                    Whisper White#100730

Crushed Curry #131199

Witches Brew designer series paper # 132185

Accessories

Owl Builder Punch #118074

Perfect Polka Dots embossing folder #117335

Dazzling Details #124117

Dazzling Diamonds glitter #102023

2-Way Glue Pen#100425

Glue Dots #103683

Stampin’ Dimensionals #104430

Til we meet again,

buy Stampin Up! here!

View the latest Stampin’ Up! Weekly Deals here!

blog calendar

Use this months’  hostess code #ZEJJM2G7  when placing your order.

Weekly Deals!

Great news! During this festive week, there are no tricks here, only treats! Make sure you head over to my online  store to get your deals before they run out.

Secret Garden Framelits Dies
Item #129372 

Regular Price: $24.95 US/$30.95 CAN
Discounted Price: $18.71 US/$23.21 CAN
Stampin’ Pierce Mat Item # 126199
Regular Price: $4.95 US/$5.50 CAN
Discounted Price: $3.71 US/$4.12 CAN
7/8″ Scallop Circle Punch Item # 129404
Regular Price: $12.95 US/$15.95 CAN
Discounted Price: $9.71 US/$11.96 CAN
Ovals Collection Framelits Dies
Item #129381

Regular Price: $26.95 US/$32.95 CAN
Discounted Price: $20.21 US/$24.71 CAN
Paper Snips Item # 103579
Regular Price: $9.95 US/$14.95 CAN
Discounted Price: $7.46 US/$11.21 CAN
Baker’s Twine Island Indigo Item # 125575
Regular Price: $2.95 US/$3.95 CAN
Discounted Price: $2.21 US/$2.96 CAN
Blossom Petals XL Punch Item # 121808
Regular Price: $6.79 US/$9.19 CAN
Discounted Price: $5.09 US/$6.89 CAN
Keep This Memory Photobook Template
Item # 129879

Regular Price: $19.95 US/$21.95 CAN
Discounte

Til we meet again,

buy Stampin Up! here!

Photopolymer, Two new travel sets!

We have two brand-new photopolymer stamp sets available. They’re both travel-themed so will be perfect to use in documenting your  travels and adventures, no matter when you went or go.

new photopolymer travel stamp setsThe first of the two newest Photopolymer travel stamp sets is,” Greetings From”.

Greetings From photopolymer travel stamp set


Don’t you just love all the images in this stamp set?  I can see using it for holiday cards too! Imagine, draping holiday lights on the cactus, or if you live in a warmer weather state you could drape some under the beach umbrellas and the palm tree. Do you have children in scouts? You could use this travel stamp set for several different scouting events too! The “Greetings From” Photopolymer stamp set is a winner!


The Map It Out Travel Stamp Set is the second of our two newest photopolymer stamp sets.

Map It Out photopolymer travel stamp set


I have several friends who plan on visiting all 50 states with their children. I can see them using both these great stamp sets while making scrapbooks of their travels as well as fun projects to keep the kiddies busy while traveling. They could make a journal with the map of the United States on the cover, they could stamp the states’ name as they visit. Inside they could journal what they did in each state and decorate the pages with the stamps.

Can you think of ideas to make learning the states fun with your children? These Photopolymer Travel sets could be just the ticket for some fun times together!What? You haven’t tried photopolymer stamps yet? Take a minute and check out this video that tells you all about them.

These two Photopolymer Travel Stamp Sets will help make your travel documentation so much quicker that no stamp collection should be without them.  Be sure to order  #’s 134621 & 134620, here,  today so you are ready when you sit down to work on your next project.

Til we meet again,

buy Stampin Up! here!


Envelope Punch Board

Envelope Punch Board

  • You can create totally customizable envelopes in up to 66 different sizes (not to mention a million different color and pattern options depending on the paper you want to use). Even tried and true envelope sizes will only take you moments to create!
  • It’s super easy to use; this tool may look  intimidating at first glance, but when they see that all you have to do is measure for the first punch and from there you just turn and score ,you’ll go crazy (in a good way).
  • It’s small and lightweight; this makes it easy for you to take everywhere. The Envelope Punch Board is super portable and easy to store. It’s small and light enough that you could use it while watching a soccer match, at a park, at a friend’s for craft night-anywhere.
  • It even has a slick scoring tool as well as a punch that lets you create rounded corners on your envelopes.
  • It’s easy to keep it all together; the stylus storage compartment and two punches are designed into the tool so you don’t have a bunch of little pieces to keep track of (even the instructions are printed right on the tool so you won’t lose them!).
  • The price is terrific– just $19.95, especially for a tool that does so much.

Just watch this video that Brian Pilling from Stampin’ Up! made.

I will be sharing this great new tool in all my events in September so if you’d like to see it in person just let me know which one you will be attending.

Ready to order yours? Just go to my Online Store  , put in #133774,and it will be shipped directly to your door. You may want to add some Designer Series Paper cause I know once you start playing with this Envelope Punch Board you aren’t going to want to stop!

Til we meet again,

buy Stampin Up! here!


Best of 25 years Halloween stamp set

When I saw the Best of 25 Years stamp set for August was one with Halloween images I was super excited! I am definately getting this one! I have  loved all these images when they were out originally but will admit didn’t buy a few of them. I hope that you will, like me, take advantage and purchase them this time around. Take a peek.. . . . .

Best of 25 Years Halloween stamp set

Just click on the picture above for a better look at the images in their actual size. I already have a scrapbook page in mind that we will be creating in y September Scrappin’ Friends class on September 11. Be sure to check out my calendar of events if you’d like details.

I know I will be using the images in this set along with our Pumpkin Pie Goodie Gear kit Judi Anderson Pumkin Pie Goodie Gear kit to create fun goodie bags for friends and guests at upcoming events.

These images would also look cute used with our banner kits  found in the Holiday Catalog.

Halloween Banner

Banners are a huge trend right now. Not sure how to get started? Invite a few friends over for one of my upcoming Banner Parties! Everyone will go home with a completed banner ready for their holiday decor.

As you can see, this month’s Best of 25 years stamp set is a real winner and you don’t want to be the one who doesn’t get it!

Til we meet again,

buy Stampin Up! here!


Carve your own stamp!

make your own stamps!

have you ever wanted a stamp but can’t find it? Our Undefined Stamp Carving Kit allows you to carve your own stamps! When you carve your very own stamp, you have will have an entirely new and different creative experience. And when you’re finished, you will have created a one-of-a-kind stamp! You will be limitless in what you can create.

Maybe you have a special family logo or a sketch you’d like to have as a stamp. How about having the girl scout or boy scout troop create their own stamp for a badge? They could then make cards, stationary or even t-shirts using their very own logo. Have a special event coming up? How about a  birthday party, a baby or wedding shower? Let’s not leave out the bachelor & bachelorette parties.   Undefined is Stampin’ Up!’s new stamp carving product line. You define the rubber stamp any way you want.

Watch this video and learn all about our NEW Undefined Stamp Carving Kit.

http://www.youtube.com/watch?feature=player_embedded&v=B4hJPO_5k5w&t=0

Looks like a lot of fun doesn’t it?

carve your own stamps

Included in the Stamp Carving Kit:

  • 2 carving tools
  • 3″ x 4″ rubber
  • 3″ x 4″ foam
  • 4 wood blocks (various sizes)
  • 1 Island Indigo Stampin’ Write Marker
  • 3 postcards
  • Instruction sheet
  • Stamp image templates


133402

Undefined Stamp Carving Kit

$19.95

134808

Undefined Refill Kit

$9.95

124236

Clear-Mount Cling Foam*

$10.95

*Add a sheet of Clear-Mount Cling Foam to create your own clear-mount stamps. Mounting your stamps on the cling foam allows you to make stamps any size you want, not just what will fit on the blocks in the kit.

Til we meet again,

buy Stampin Up! here!

NEW! Thinlits Card Dies

Thinlits Card Dies

The new Thinlits Card Dies are one of those  products you just have to see in action before you realize how much you need them.

They’ve been called flip cards, flip flop cards, swing cards, and more-but they have always been a bit tricky to create. Not anymore! Our amazing new Thinlits Card Dies cut and score to create a card that flips in just one step. These make great announcements, invitations, or Christmas cards. We can get together and I can show just how quick it is to create one of these fun cards.

These new card dies come with extra die pieces that have versatile designs, so you can use them on other projects, not just flip cards. (The Circle Card Thinlits Die comes with 10 total pieces; the Label Card Thinlits Die comes with nine total pieces.)

The thing I love is that the main shape in the cards (circle and label) can work with a lot of our stamp images so you can create tons of different kinds of cards using many different stamp sets. Here are just a few suggestions to get you started:

Label Card Thinlits Die (item 133479):

  • Happy Day Stamp Set (item 130294 W item 130297 C)

Circle Card Thinlits Die (item 133480):

  • Worth the Wait Stamp (item 131094 W)
  • Five-Way Flower Stamp (item 131088 W)

Both card dies pair well with:

  • Oh, Hello Stamp Set (item 131931 W item 130733 C)
  • Yippee-Skippee! Stamp Set (item 131341 W item 131344 C)
  • Really Good Greetings Stamp Set (item 130330 W item 130333 C)
  • Regarding Dahlias Stamp Set (item 130324 W item 130327 C)
  • These dies also work well with our new magnetic platform (item 130658) so you can place the dies exactly where you want them!

Here is a video to show you just how easy peasy these are to create!

http://www.youtube.com/watch?feature=player_embedded&v=CwdGSYeIn44&t=0

 Now wasn’t that easy? Get your Thinlits today!

Til we meet again,

buy Stampin Up! here!


You’re Amazing Gift Wrap Idea

Birthday Box Topper Video from Stampin’ Up!

Stampin’ Up! made this great video showing you how to make one of the projects featured in our 2013-2014 annual catalog. You will find this cute topper and gift box on page 15.

I know you will want to pick up a few packages of our gift boxes and don’t forget to stock up on our Designer Series Paper Packages found on pages 151,153,&154. We are running a special of buy 3 packages get 1 package FREE for the month of July!

Items used in this project:

Tea Lace Doilies # 129399

Creped Filter Paper # 129393

Kraft Gift Boxes #124106

Pool Party Seam Binding Ribbon #125582

Linen Thread #104199

Delicate Doilies Lace #130966

1 3/4″ Scallop Circle Punch #119850

Dotted Scallop Ribbon Border Punch #119275

You’re Amazing Stamp Set # 132103 (w) #126722 (c)

Whisper White Cardstock #100730

Pumpkin Pie Cardstock#105117

Brights CandyDots #130931

Pool Party Embossing Powder #129398

Heat Tool #129053

Embossing Buddy #103083

You’re Amazing Stamp set  #132103(w) # 126722 (c)


Til we meet again,

buy Stampin Up! here!


Hey There Scrapbook Page


I can’t wait to put pictures on this “Hey There” scrapbook page. I can just imagine capturing Samantha doing some cute pose or doing something she isn’t supposed to and putting it on here. I love how the images from one of My Paper Pumpkin Kits ( the saying and the splotches)  coordinated with the images I used in the  “Oh Hello” stamp set.

You're Amazing scrapbook page

I plan to add journaling to the strip of Whisper White that runs along side the mat. I used Baked Brown Sugar and Marina Mist from my Series #4 color combination. The chevron pattern is trending right now and I decided to accent the pattern on the mat simply by stamping onto Whisper White, cutting it out and placing it in the bottom image.

Here is a peek at the “Oh Hello ” stamp set

Oh Hello stamp set

Til we meet again,

buy Stampin Up! here!

A little (Digital) something for everyone . . . .

newest digital downloads

This weeks’ Digital Downloads has something for everyone! Take a look and then download yours today…

Do you have children?

  • With just a few clicks, you can keep the little ones busy all summer long with the Chores & More template.

(Boy, this sure would have saved me lots of time when my children were young!)


chores&more digital kit


  • Or, you can capture all those memories with the Memory Milestones Photobook before “momnesia” gets the best of you. ( I just downloaded this one to keep up with my grandbabys’  pictures) This will be so easy to just drop in her photos and before I know it she will have a memory book she will be able to look through for years to come!

Memory Milestones Baby Photobook

Do you love our traditional product?

  • A great way to jump into digital is with a stamp brush set from the catalog like the new Lovely Romance Stamp Brush Set.
  • It’s  just like the traditional stamp set, it coordinates with the Chalk Talk Framelits Dies.~ BINGO!!!  This is an awesome time saver too!

Lovely Romance Digital Brush set

Are you a creative genius?

  •   You’ll be amazed at how easy it is to recolor elements in MDS using the Designer Series papers. You will especially like the Everybody’s Business Designer Series Paper. We’ve included 12 grayscale patterns just for that reason! ~ I know your creativity is going to run amuck ( is that a word) and soar to new heights with this new download!

Digital Designer Series Paper

Be sure to check out the HOORAY FOR TODAY Digital Brush set that’s new today too!

What are you waiting for? It’s time to get your digital on. . . . .

Til we meet again,

buy Stampin Up! here!


Creative Elements Sponging Technique Video

A quick & simple way to color your stamp images is to use your Stampin’ Sponges. That is exactly what I did in this video using the Creative Elements stamp set. I knew I wanted to add a little dimension and color to the stamped layers without taking too much time in coloring the images. You will also learn how to center punched shape from a piece of card stock to create a frame in the video. I have included the products used and the measurements to re-create this project.

Products used for this card are:

Stamps:  Creative Elements  #122645 (w)   #122647(c)

Curly Cute #117014 (w)   #120510 (c)

Inks: Regal Rose # 126947      Soft Suede #126978

Paper: Pink Pirouette # 111351   Soft Suede #115318

Accessories: Soft Suede 3/8″ Taffeta Ribbon #122967 , Stampin’ Sponges #101610 , SNAIL  Adhesive #104332 , Stampin’ Dimensionals #104430   1-3/4″ Circle Punch #119850

Paper measurements are;

Pink Pirouette- 5- 1/2″ x 8- 1/2″ (score @ 4- 1/4″),3- 3/4″ x 4- 1/4″,3- 1/8″ x 3- 1/8″,  2- 5/8″ x 2- 5/8″ (punch circle from center), 2- 1/2″ x 2-1/2″(for butterfly piece)

Soft Suede- 4″ x 4-1/2″, 3-1/4″x3-1/4″, 2-3/4″x2-3/4″,

To view the samples seen in the video please visit this post.

I hope you are excited to try this quick, simple technique and if you find you just have to own the Creative Elements stamp set or any other product I used please be sure to visit my online store.

Til we meet again,

                                        JudiAndersonSignature


Creative Elements card samples

These Creative Elements card samples are from my Coloring with Sponges Technique video which I will be sharing with you tomorrow. I am sharing 3 different versions using the samples included in the Creative Elements stamp set. Although they are all a little different, the pieces are all the same and the coloring of the stamped images were all done using our Stampin’ Sponge. The sentiment in all the cards is from the Curly Cute stamp set.

Creative Elements stamp set

This was the first version of this card I created.

I used only the background and butterfly stamps

on the layers and then the label stamp to accent

the verse at the bottom.


Creative Elements sponge tech


In this second Creative Elements card I used the larger image for the two bottom layers and then the flower image on the third. I then made a banner for the verse and tied it with the bow. I feel thie third layer “pops”, don’t you?


Creative Elements stamp set sponge colored

Another look with the Creative Elements stamp set! Each layer of this card uses a different stamp found in this versatile set. I used the border stamp at the top and bottom of the card base, the larger image for the second and the flower image for the third. By doing this you give each layer an importance of it’s own.

Again, I stamped the “thank you” from the Curly Cute stamp set on the banner and attached it with Soft Suede 3/8″ Taffeta ribbon.


Secret Garden stamp set


This last sample uses a different color combination; Daffodil Delight/Tangerine Tango/Basic Black. The stamp sets are the  Secret Garden & Collage Curios sets from the Seasonal Catalog. If you’d like more information on this card feel free to contact me.

Be sure to come back tomorrow for the Color Sponging Technique video on how quick and simple it is to color & create these cards. I will also be posting the supply list as well as the measurements so you can re-create them easily.

I am sure the Creative Elements and Curly Cute are on your “gotta own this” list!

Til we meet again. . . . . .

JudiAndersonSignature


How to make a fabric and paper flower

Ever wonder how to make a fabric & paper flower? Paper and fabric flowers, by themselves, are a hot trend right now so why not mix the two mediums together?

I love mixing these two elements together. The paper gives the fabric some structure and the fabric adds a softness to the paper. I am sharing a video that will help give you some ideas on how , you too, can create many wonderful flowers with scraps you have.

Here are the materials I used for this fabric and paper flower;

Tea for Two Designer Fabric #129308

Very Vanilla card stock # 101650

Big Shot Die Machine # 113439

Circles Scallop BigZ Die #113468

1/8″ Silver Mini Brads #122941

Piercing Tool #126189

Stampin’ Pierce Mat #126199

Stampin’ Spritzer 126185

Baja Breeze Re-inker #111844

Enjoy the video!

Now wasn’t that easy?

You can use any kind of paper; card stock, Designer Series Paper, newspaper, magazine pages and what ever you want to recycle. The important thing here is color, not pattern. I love mixing different types of paper together to make each flower unique, just like in nature.

Remember that even though I layered the paper in the back on this flower, you can alternate the paper & fabric in any combo you wish. You may also hold it together using hot glue if you wish but I like to use our mini 1/8″ brads because it is less bulky.


I am eager to hear how your fabric and paper flowers turn out!

Until we meet again. . . .

JudiAndersonSignature