Painted Harvest Card in non-traditional colors

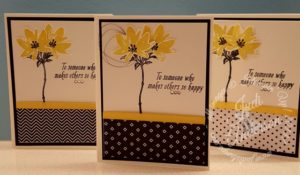
This Painted Harvest card is made in a color combination that is non-traditional to sunflowers. The Painted Harvest Bundle was my Stamp of The Month which means I featured projects using it in all my classes this month. I held several 3/$10 Card Classes on the Road along with the 5/$20 classes in my studio All cards used the Painted Harvest stamp set showing its versatility. I included at least one project from this bundle in my Birthday 6/$25, Framed Art Sampler, and Hostess Clubs.

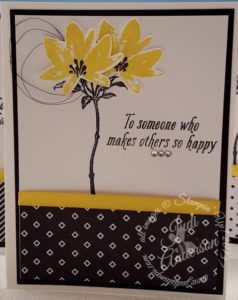
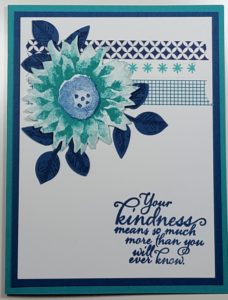
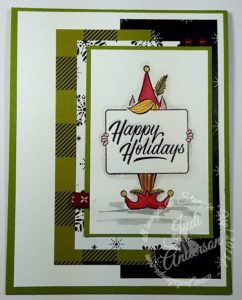
I wasn’t sure how this particular card would be received because of the color combination of Bermuda Bay, Dapper Denim, & Soft Sky. Not that the combination isn’t a great one, just that you probably wouldn’t think of using it with this particular set.

I was jumping for joy & happy to let you know that everyone LOVED it!! WOO! HOO!

What do you think?

It’s gorgeous isn’t it?

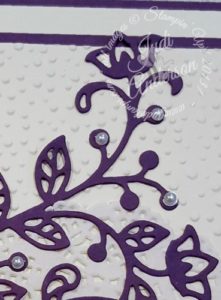
Here is a close up of the flower

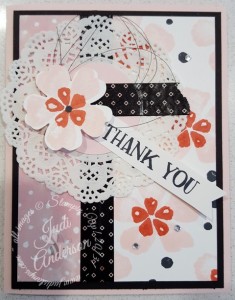
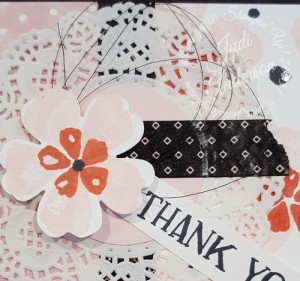
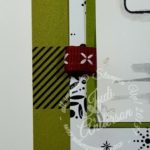
My customers also love to (as they say), “Learn what the heck to do with washi tape.” This card will help you use up those smaller pieces left on the roll. Don’t worry about cutting the ends, just tear them for this look!

I probably could have used this card for our SBTD Blog Hop this past weekend but wanted to share it with those taking my classes. ( I was actually nervous on what people would think of the color combination). If you missed our Hop you can check it out here.

This is what you get when you purchase the Painted Harvest Bundle.


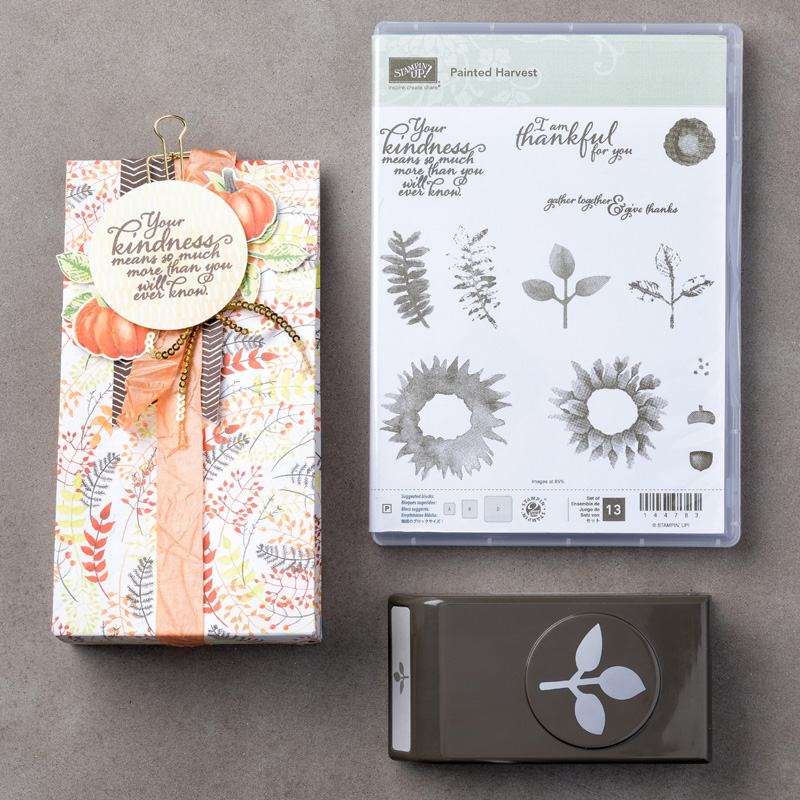
The gorgeous Painted Harvest stamp set that includes a variety of 13 photopolymer stamps that feature the 2-Step Style.

The NEW Leaf Punch.

AND you save 10% when you order the bundle using #146021 !


Don’t forget to use this month’s HOSTESS CODE: PVJUKP6V    When your order is *$40 or more you will receive my Exclusive Card Kit. If your order is over $150.00 please don’t use the Hostess Code because you earn Hostess Dollars!!

*Total before Tax & Shipping.

The otherr products in the Painted Autumn Suite can be found on page 49 of the Holiday Catalog. Don’t miss out on these, they will make your creations look so professional without much work. The Painted Harvest Bundle is a must-have for your fall projects. (You will be able to use them into the spring and summer too!!)

buy Stampin Up! here!

At Home with You Bundle SBTD Hop 9/2017

The At Home with You and Colorful Seasons Bundles were shouting my name as the morning air is crisp and and the fall colors are beginning to show earlier than normal this year. I felt these bundles were perfect for this month’s SBTD Blog Hop Theme, Leaves and Trees. We are 12 Stampin’ Up! Demonstrators from around the world bringing you assorted projects each month. Be sure to read all the way to the bottom of this post to watch a video about the At Home With You Bundle!

At Home with You Bundle #145351
Colorful Seasons Bundle #145348


My card base is Very Vanilla cut to 5 1/4″ x 8″ and then scored at 4″. I used the leaves from the Colorful Seasons stamp set to create a background paper for the 1 3/4″ x 5 1/4″ paper strip. The colors I used for the leaves are Pumpkin Pie, Old Olive and Crushed Curry and Early Espresso for the veins. I backed this strip with a piece of 2″ x 5 1/4″ Early Espresso cardstock.

I felt the card needed more texture so I added the splatter image from Swirly Bird in Crushed Curry along the tip edge of the card and opposite corners of the image mat. The bouquet of sunflowers in the bucket from the At Home with You Bundle was my inspiration for my card and make the perfect focal point. Sunflowers are my favorite fall flower and I continued the color theme when water coloring them. The bucket is colored using Crumb Cake for the bucket and Smokey Slate for the metal rings. I added a bit of sparkle by adding Clear Wink of Stella to the rings. I then cut the image out using the Seasonal Layer Thinlit Dies, gotta love thilits! I then popped the image up with our new Mini Stampin’ Dimensionals.

I felt the image needed grounding so I cut a branch from Early Espresso by using the die from the Colorful Seasons Bundle. The Pumpkin Pie and Old Olive 1/4″ Stitch Ribbon are a perfect touch.

The verse I chose is also one from the Colorful Seasons stamp set however, the At Home with You set also has verses that could be used for this card that can be used for an assortment of fall occasions.

Now to see what Susan has created for you this month!

Rachel Pine

Karie Beglau

Judi Anderson – You are here!

Susan Simpson

Tricia Butts

Lyndsay LaRae Carara

Courtenay Heuston

Tashana Lundy

Carly Middleton

Sharleen Luciano

Vicky Thompson

Anastasia Radloff

I though you might enjoy this video Stampin’ Up! made showing you all about the At Home with You Bundle.


Be sure to use this month’s HOSTESS CODE (PVJUKP6V)! You will receive my exclusive Card Kit FREE with a $40.00 minimum order when you do!!

buy Stampin Up! here!

Festive Phrases for the Stampers By The Dozen Blog Hop

I am excited to bring you a  project using the Festive Phrases Stamp Set for our Stampers By The Dozen Blog Hop this month. We are 12 Stampin’ Up! Demonstrators bringing you an assortment of 12 projects the third Saturday each month. This month our theme is our 2017 Holiday Catalog that you may purchase from beginning September 1st.

Have you ever turned the page and fell in love with a stamp set? Well, that’s what happened when I saw the Festive Phrases set, especially the silly little elf hiding behind the Happy Holidays sign! Oh my gosh, I am simply in love with him and have a few other ideas up my sleeve.

For this card I went to the Merry Little Christmas Designer Series Paper. I just love that you can use this paper for projects from elegant to rustic and just plain fun.

It might be hard to tell, but I added an illusion of snow on the top of “Happy Holidays” by running Wink of Stella across the top.

I looped our Cherry Cobbler Stitched Ribbon and tucked it on the side of the top matt.

Cherry Cobbler Enamel Shapes for accents on the upper right corner completed the look.I am sure you are getting excited to see the new 2017 Holiday Catalog while browsing through our samples. Which items will be at the top of your wish list? I hope you choose the Festive Phrases as one of your must haves! If you aren’t currently working with a demonstrator and would like your own copy, just comment and I will contact you to send one your way.

Click the button below and it will bring you to Susan’s Holiday Catalog project.


buy Stampin Up! here!


Here is the list of Bloggers

  1. Rachel Pine
  2. Karie Beglau
  3. Judi Anderson   You are here
  4. Susan Simpson
  5. Tricia Butts
  6. Lyndsay LaRae Carara
  7. Courtenay Heuston
  8. Tashana Lundy
  9. Carly Middleton
  10. Sharleen Luciano
  11. Vicky Thompson

Anastasia Radloff

Carols of Christmas Early Release


I am excited to be sharing a card using our Carols of Christmas Bundle, an early release Bundle, today. Before I get to the card I want to remind you that. . . . .

You have 2 days left to join my HapBEE Stampers in Ink TEAM & receive the stamp set as an added bonus! Not only do you get this stamp set but you also receive these stamping basics ~ a total value of more than $72!! In total, the starter kit has a value of almost $250 and only will cost you $99.00 plus tax (shipping is FREE!!)

CLICK HERE TO JOIN MY TEAM TODAY!

Now, let’s get back to the card. . . .

The bundle consists of the Carols of Christmas stamp set and The Card Front Builder Thinlits Dies. and will be available for you to purchase on August 1.  These thinlits dies are sure to be one of your favorites in turning ordinary cards into extraordinary! I can see using these on a variety of cards from anniversary to  the young at heart and every occasion in between. (almost made it from a to z!) They will also be great to use in your memory albums; as frames for pictures, page edges, and amazing page and pocket embellishments.

The card I am sharing today has a few quick & fun techniques that bring it to a simple but WOW card.

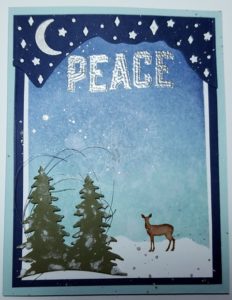
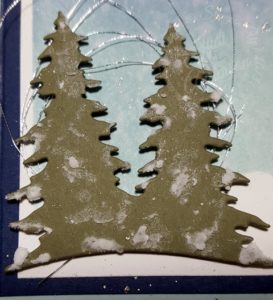
Let’s start by making the background by using the sponge and spritz technique. Using Whisper White cardstock as a base, I masked off the bottom to create snow drifts and the edges to create a white border. I then sponged Soft Sky from the bottom to about midway to the top. Next I sponged Night of Navy to the top of the card overlapping the Soft Sky a bit so they blend seamlessly. Using our Spritz Sprayer I spritzed water over the entire piece & let it dry to create depth in the sky.

I created the top by cutting an edge after using the moon and star thinlit from Night of Navy. I mounted this onto Whisper White and trimmed it to match the Night of Navy.

I cut the trees from Always Artichoke cardstock. Adding our embossing paste to create snow  is added dimension and texture. In some areas it even looks like it is melting!

I decided to add some Silver Metallic Thread behind the trees for added glitz and simulating the glow from the moon.

I assembled the card by layering the Whisper White onto Night of Navy and then a Soft Sky card base. I added the top cut from the Cardfront Thinlits. Next, I embossed the “PEACE” in sliver by omitting the “On Earth”, added the trees using our new Mini Stampin’ Dimensionals, and stamped the deer in Soft Suede ink.

Wanting a bit more glitz, I used my Wink Of Stella on the cut outs at the top and then added “Stella Snow” (as I call it) by tapping the Wink of Stella pen against my finger to add specks over the card..


I love customizing the inside of cards also. For this one I sponged the edges using both, Soft Sky and Night of Navy inks.


I used the negative from my trees to sponge a few using Always Artichoke ink.

You probably have noticed I haven’t put a verse on the inside yet, I will do this when I go to send this card as I like to personalize it.


I hope you enjoyed this sneak peek of the Carols of Christmas Bundle. This stamp set is one of two I am featuring in this month’s Christmas Card Class so be sure to visit my Calendar of Events for more information.


Use HOSTESS CODE: XXMXTMM7 

buy Stampin Up! here!


A great card for your child’s teacher.

With all the last minute activities going on at the end of the year I want to help you show your appreciation with a great card for your child’s teacher. You can easily make this card or have your child help you. This card can be used for any friend but I thought the primary colors made it perfect for that favorite teacher.  I used a few retiring stamp sets, Love & Affection (141545 )  for the verse and flowers, and Papillon Potpourri (123759) with coordinating punch for the butterfly. The You’ve Got This set (139575) made for the perfect sky background.  The flower stems and leaves were doodled using a Garden Green Stampin’ Write Marker. I created the tree with our Tree Builder Punch (138295 ) and Layering Ovals Thinlits(141706).

I’m not sure about you but I just love a simple card that has such cuteness like this one! I did a Facebook Live FREE Class on how to make this card. You can watch it here. You will also need to watch part 2 for the completed card. I did add the colored pearl jewels and sponged around the oval with Emerald Envy ink after the video ended. As you watch the class you will see I tried a few different items on the tree, I ended up coloring the pearls (119247) with a red Sharpie marker. I love how it turned out, don’t you?

The Love & Affection  and  The Papillon Potpourri       stamp sets are retiring so you will want to be sure to order them no later than May 22nd because after that they will only be available while supplies last.

Now that you have a great card, filled with cuteness, for your child’s teacher all you need to do is find a little gift  just as sweet!

buy Stampin Up! here!

Autism Awareness Blog Hop- Garden in Bloom

I am so blessed and honored to be participating in my first blog hop with some of my fellow Stampin’ Up! demonstrators to bring awareness to Autism. We are raising funds for Autism Speaks to enhance lives today and accelerating solutions for tomorrow.


A small fact about Autism is that it was added as a special education in 1991 and now is the sixth most common classified disability in the U.S.


The card I am sharing today uses the following; Garden In Bloom stamp set, Hello You Thinlits, By the Shore Designer Series Paper, & Brights Enamel Shapes. I kept with the colors of Autism by using; Real Red, Dapper Denim & Daffodil Delight cardstock & inks.The doily adds a touch of softness to the card.

The word “friend” is also from the Garden in Bloom set, I used my Dapper Denim Stampin’ Write Marker to ink the word friend and omitted the rest of the verse. I just love how the font used goes with the Hello thinlit.


I would love to have you make a donation to Autism Speaks today. If we all give a little we can make a big difference! Click the image below and you will be directed to my fundraising page. After you donate please send me a message and I will be happy to send you one of the thank you cards I have prepared just for you!

Please be sure to visit all these fabulous blogs of stampers who have joined in on today’s Autism Awareness Blog Hop.


                                                Until we meet again,

buy Stampin Up! here!


Avant Garden in Yellow & Black

I needed to use some colors to brighten up a dreary winter day so what better colors to pick than black & yellow. I chose the Avant Garden FREE Sale-A-Bration set for today’s card. I love this set because it has wonderful on-trend floral images as well as an assortment of sentiments. I decided to add a little twist when using the flower images. I love the stem with the leaves and decided to add the soft flower image on top. Now you could do this one of a few ways; 1) omit the flower from the stem by using Stampin’ Write Markers, or 2) just stamp the image and fussy cut the flower, add a Stampin’ Dimensional and place over the stamped flower. I chose the quicker of the two, the second choice!

I went to my stack of Designer Series Papers and chose the black & white patterns from the  Pop Of Pink Specialty Series Paper. Just perfect for the look I wanted.


This is the first card I created. I add some black Metallic Thread behind the flower and some Metallic Enamel Shapes. I didn’t have any current Daffodil Delight Ribbon so I dug out some from my retired drawer. I am sure it will  put a smile on the face of the person I send it to.


Here are a few more I made with some of the different patterned paper in the Pop Of Pink Specialty Designer Series Paper package. Do you have a favorite?

Shop my Online Store  24/7

February Hostess Code: FDDYV6T9

Spend a Minimum of $50 * and I will send you 4 hand made cards!

*before shipping & tax

  Visit my Facebook Page to view a video on how I made these!   Part 1    

                                                                                                       Part 2

Be sure to “LIKE” my page to receive notice when I do these live classes!

                                                                  Until we meet again,

buy Stampin Up! here!


Flourishing Phrases Sympathy

Flourishing Phrases Stamp set, I love it for the number of verses, there are 16 assorted that can be used alone or paired together! It also has a wonderful flower and an elegant flourishing image.The set does have a coordinating Thinlits set that is just as beautiful.

This card is very basic but so stunning! I used Perfect Plum and Very Vanilla as my colors. The Veryflourishing phrases sympathy card Vanilla mat is embossed using the Softly Falling embossing folder. The Delicate Doily adds a layer of softness. If you haven’t tried these yet I want to warn  they are addicting! You will want to add these to all your projects because they are so soft and the perfect size. The framelit image adds another elegant layer making this card perfect for any occasion!


Did you earn a Bonus Coupon last month? This would be a great use of that coupon!! Depending on the number of coupons you received, you save a minimum of $5.00 on this bundle!!
The wood mount item number is: 142322JudiAndersonButtonOrder
The clear mount item number is: #142323


Flourishing Thinlit

This is a close up of the thinlit, isn’t it gorgeous?

You may be thinking,” What is a thinlit?” It is a die that is intended to coordinate with a set and others. Unlike framelits, which are intended to cut out images in its’ coordinating stamp set, thinlits aren’t.

I love the elegance of the thinlits in this set!


comfort&healingdoily


The doily detail , you won’t believe how soft these are!


The LIMITED TIME OFFER special Thoughtful Branches bundle will only be available for the month of August, or WHILE SUPPLIES LAST, so my suggestion is to grab it now!

The Thoughtful Branches stamp set,  the Beautiful Branches Framelit dies are brand new and available for a limited time only!! This Exclusive Bundle offer is 10% discount over the individual price of the stamp set & framelits!

 Thoughtful Branches Bundle (10% savings!) #144328


Til we meet again!

buy Stampin Up! here!

Thank you Fresh Fruit

I came up with this card while prepping for my Facebook Live Event that was supposed to happen last night. Like many others, I experienced technical difficulties, my phone would not / could not connect! After many attempts I had to abort the event for last night.

Now you all know that I am not the most technical person but I won’t give up! Got up this morning and after several more attempts my phone still would not connect so I could do a live event, even standing right next to the router!! I had to take a break to enjoy some time with my friends in my product of the month class.

We had a fun time in class and it was just the break I needed! I decided it was a phone problem and not an internet so I started digging into my phone ( Galaxy 6) I mean what is the worse thing that would happen? I would have to take a trip to the phone store for them to get it up and running because I did something I shouldn’t? Wouldn’t be the first time and I am quite sure not the last.

I did it!

Sorry for the babbling, on to the card. . . .

Well, I came up with the start of the card and admittedly finished the design right there with everyone watching! I know, scarrrrrrrrrry! My motto is, ” It’s only paper.”

I created the card using the flower images from the Fresh Fruit stamp set, one of my new favorites! I chose Pink Pirouette, Watermelon Wonder, and Basic Black and added a Delicate White Doily (141701), Pop of Pink Washi Tape (141659) & Black Metallic Thread (141695) & a few Rhinestone Basic Jewels (119246).

Don’t you just love it?

Fresh Fruits Stampin' Up!

Here is the detail of the new Black Metallic Thread

fresh fruit Stampin' Up!detail

If you would like to watch the video on how to create this card do a search on Facebook for

Judi Stamps. Be sure to “LIKE” my page so you can get more project ideas & watch my next Facebook Live event next week!


Shop 24/7 for the products I used here at My Online Store

Til we meet again,

Judi's Stampin' Up! online store

Going Global Sneak Peek Project!

I thought I would share a Sneak Peek project using the Going Global Stamp Set with you today. Many of you are aware that you may begin ordering from our new 2016 Occasions Catalog tomorrow AND you can earn a FREE Sale A Bration item with each $50 you purchase! Sadly, this means that the End of Year Sale ends today. It is also the last day you can order product from our 2015 Holiday Catalog, I will miss many of those products. In fact, I stocked up on several of the consumables to begin creating some fun holiday goodies for next year.

Today marks the beginning of  new season of paper crafting for me. I look forward to our Occasions Catalog and spring ( well, spring won’t be here for a little while). I love creating projects for birthday’s during the month of January as well as some Valentine goodies. You would think that with all the cards I create, I would send birthday cards. I want to be honest here, my intentions are there, but I seem to forget to send them!! Yep, I have an entire box of birthday cards just waiting to be sent! This changes this year! I will get a system in place, during January, and send birthday cards all year. I didn’t put a birthday greeting inside this card yet, but I will when I put it into my January slot. I will be doing a more feminine version using a different color pallet but the design will be the same. My mission for today is to go through my Birthday Book and see how many masculine and how many feminine cards I need for this month. I will then create them, this week, and share the pile of cards with you on Friday.

Here is a video showing you how you can create your birthday cards for the month of January too! (Don’t forget, you can order these items beginning tomorrow, January 5,2016)

I will be sharing my monthly design with you right here, each month to help keep me on track!! I will be sharing my card for February next week to give you time to order the supplies and create your cards by the first of February. Are you up for the challenge? Let me know by leaving a comment below.

This is what I used for this card:

STAMPS:

Going Global Stamp Set (W-140745) (C-140748)

INKS:

Mossy Meadow (133645)

Delightful Dijon (138327)

Lost Lagoon (133644)

Memento Jet Black

PAPER:

Very Vanilla (101650)

Tip Top Taupe (138336)

Going Places Designer Series Paper Pack (140581)

Foil Sheets- Gold (132622)

ACCESSORIES:

Fast Fuse (129026)

Multipurpose Liquid Glue (110755)

Stampin’ Dimensionals (104430)

3/8” Satin Stitched Ribbon – Basic Black (138430)

Banner Triple Punch (138292)

Confetti Stars Border Punch (135861)

Label Bracket Punch (132153)

World Traveler Textured Impressions Folder (138289)


Til we meet again,

buy Stampin Up! here!


HapBEE Stampers in Ink Stamping & Crafting Getaway

Our next HapBEE Stampers in Ink Stamping & Crafting Getaway is coming on February 26 & 27, 2016. If you love having a fun time while crafting with others, learning techniques, tips and ideas using some of the recently released products, plus so much more, we invite you to join us! Early Bird Registration begins today, 11/29/15. By registering during the Early Bird Registration period you will save $15.00 off the event fee. Not only saving money, you will receive Exclusive, V.I.P. status!

This exclusive status is given to the first 20 who register.

With this status you will receive:

  • a free exclusive class
  • a VIP pin
  • a pillow gift for those staying overnight
  • and more!

For more information on how you can join us, check out all the details here.

Til we meet again,

buy Stampin Up! here!


DIY Video on Creating a Spooky Sky

How did you like my Spooky Halloween card yesterday where I showed off the stamping on your embossing folder technique? As promised, I am sharing a video I made to show you how I did the spooky sky. I know once you try this technique you are going to fall in love with it!  I will share a few more cards I created using the technique tomorrow. This will give you the chance to play and create to see what you can come up with.

And what did you think about my big announcement about my Periscope Button? Don’t forget to come back here at 11:30 Central time to give it a try!

Remember, You can purchase all materials I used in this video through MY ONLINE STORE HERE.

Til we meet again,

buy Stampin Up! here!


A Spooky,Haunting Sky on this Halloween Card

Using the stamping on an embossing folder technique, I created a haunting, spooky sky on this fun Halloween card. I used my brayer to add color to my Woodland Texture embossing folder (#139673). Wanting it to be a scary, Halloween sky I also used my sponge to dispurse and soften the color in parts. After embossing the Whisper White cardstock, I added the owl and scary eyes from the Among the Branches stamp set (#139823). But, oh no, I just couldn’t stop there! I wanted the details of the tree bark so I colored the embossing folder, again, using my Basic Black marker, ran it through my Big Shot die cutting machine and I was getting closer to the look I wanted. Embossing the Basic Black cardstock with the Woodland embossing folder drew the tree detail onto the mat. Some thing was missing. What could I add to bring out that glimmering touch to my spooky sky?

GOT IT! I used the Splattered Glitter Technique and our Gold Glitter. That was it!!

Success!!

This is the final result, the picture I had in my mind from the day I first saw this set in the Holiday Catalog!

Among the Branches stamp set

How would you like to see how I created that haunting, spooky sky and see how it sparkles? (this picture just doesn’t bring out the gorgeous beauty of this sky) Come back tomorrow when I will share a video of me creating it. Well, actually not this same exact one but another one just like it. You will feel just like an artist because no matter how hard you try, no two backgrounds will be the same.

Products used on this card can purchased through my online store.

Among the Branches stamp set #139823

Woodland Textured Impressions Embossing Folder #139673

Daffodil Delight stamp pad ,Pumpkin Pie stamp pad ,Night of Navy stamp pad,Lost Lagoon stamp pad

Whisper White cardstock , Basic Black cardstock

Brayer

Sponge

Be sure to check out the Weekly Deals Here!

buy Stampin Up! here!


Watercolor Wings, Butterfly Basics using Bohemian Designer Series Paper

These cards using the Watercolor Wings & Butterfly Basic stamp sets with the Bohemian Designer Series Paper (DSP) were just one of the great projects attendees of our Summer HapBEE Stamping and Crafting Getaway created. It was actually one card, but depending on which side of the Bohemian DSP they chose to show is what their card looked like. In this particular class they created an assortment of 4 different cards using these stamp sets, DSP and coordinating cardstock. All were wow’d by all! The first 20 who registered were VIP’s and attended an exclusive class just for them on Friday night. The project they made was a coordinating card holder that coordinated with these cards.We also offered scrapbook themed classes in addition to the card classes, all were included in the registration fee.

Watercolor WIngs & Butterfly BasicsWhich side of the Bohemian Designer Series Paper would you have chosen?

Paper Pumpkin Monthly Kit in the Mail

*Only 3 days left to get your first TWO MONTHS of Paper Pumpkin at 1/2 off!!

  Be sure to check out the new Weekly Deals.

Shop My Online Store and have your purchase delivered to your front door.

buy Stampin Up! here!


How to create your own dimensional polka dot background paper

Ever find yourself looking for a polka dot background paper only to find you don’t have any in the colors you are using? This is your lucky day! I ran into the same problem recently and thought you may have also so I made this quick video teaching you how I solved my problem

If you can’t view video please go to: https://youtu.be/aa9dZgR9rQY to view.)

I hope the next time you run into the problem of needing a polka dot background in a color you don’t have, you remember this video and make your own!

Do you love surprises?

How about surprises for 1/2 off?

You will want to be sure to sign up for our (Paper Pumpkin) Monthly Kit in the Mail BEFORE August 10th. WHY? Because when you do you will receive the August & September kits for 1/2 off each! I was able to get a Sneak Peak at the kits during convention a few weeks ago and they are simply adorable!! Here’s a hint for the August Kit; Do you love pink & black? Septembers’ hint is; it’s a bewitching treat!

If you enjoy sitting down and having a project all designed for you, these kits are for you!! You will receive fully designed projects with everything included ( pre cut paper, ink, embellishments ).  And if you are one who loves putting your own personal touch on your projects, these kites are a great starting point!

For more information visit;

Paper Pumpkin Monthly Kit in the Mail

  Be sure to check out the new Weekly Deals.

Shop My Online Store and have your purchase delivered to your front door.


Til we meet again,

buy Stampin Up! here!