A few things to keep in mind when doing re-inker techniques:
Choosing Paper
When working with re-inker techniques, keep in mind that the paper you use will affect your results. For techniques that require the dye to sink quickly into the paper, you might go with an uncoated cardstock or watercolor paper. Watercolor paper might also be a good choice for techniques that require a lot of water. On the other hand, for some techniques, you want the color to move on the paper surface. For these, you might instead choose a slick, glossy cardstock. You could also use canvas instead of regular paper or you might use it on another fabric like ribbon. (Regular dye re-inkers are not fabric inks, but you can use them to dye fabrics you won’t be washing. They won’t be color fast and so may fade with time. You can help to set the ink a little more by using a dry iron)
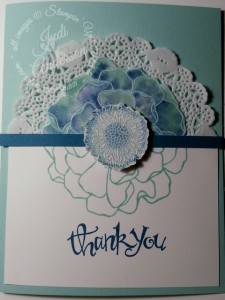
The Re-inker Float Technique
is a variation of the Dotting Re-inker Technique. The difference is that the surface has an open line image heat embossed on it so that the inks pool within the open sections of the embossed image instead of being able to float all over the paper. I recommend practicing this technique on different papers to see the different effects you can achieve. I am demonstrating it on our Shimmer White cardstock for this sample.
Keep in mind:
- You want cardstock heavy enough to handle getting fairly wet and also that will let the water “float” on top rather than absorbing into it.
- I’ve used Whisper White cardstock, glossy white cardstock and watercolor paper. My cardstock tended to curl a bit with the watercolor & glossy papers; I recommend using removable tape to hold the paper down while you work to make it a bit easier. I don’t recommend using Whisper White cardstock if you have a tendency to spray the water on heavily as it “puckered” quite a bit.
Instructions:
- Stamp and emboss an open line image in white on your choice of white cardstock.
- The embossing is important because the embossed lines hold the ink color in the various sections of the image.
- The white on white is part of this technique’s look, but you could use any color embossing powder you like.
- Mist the embossed image generously with water so you have a fairly even watery coat.
- Put a dot each of several water-based dye re-inkers onto a non-absorbing palette( I use my ink pad lids)
- Dip an aqua painter or water color brush into the dots of re-inkers to pick up the ink.
- Brush or dot the ink, as desired, onto the water covered embossed image.
- Use several coordinating colors.
- As you work, the colors blend and flow and will tend to puddle to create darker areas in places.
- If the ink flows outside of the lines; you can cut out the image afterwards.
- When you are happy with the look, use a heat tool to dry the ink in place. Don’t get too close to the ink so you move it around, you just want to dry it.
- Each time you do this technique you will get a different look depending on the amount of each re-inker color you use