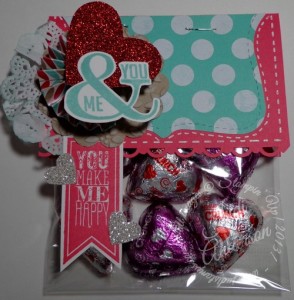
Trendy Valentine Goody Bag

I didn’t want to keep you waiting today so I am bringing you my Trendy Valentine Goody Bag early this morning. I can’t believe what a little sunshine will do for your creative juices, I spent the entire afternoon yesterday creating fun,quick projects to bring to you.   My husband commented that I was like a little kid in a candy store showing him all my creations last night. Even the best of us have that creativity bug bite us and suck all the creativity out!

(I’ll let you in on a little secret.) I’ve been going through boxes since our move but we moved into a house not even 1/4 the size of our last home. I was constantly moving things to get to something then had to move it all back again. With no where for things to go we even had to stack things in front of the windows in the office/closet. While I was away in Houston my husband put up shelves & moved furniture. I came home to sunlight IN my house & I could walk without moving boxes or furniture!! Happy,happy, joy,joy. He’s a real keeper.

Trendy Valentine Goody Bag

Don’t you just love it?

My picture just doesn’t do it justice. It just too dang cute and blingy in real life.

My scrap bin is getting full so I decided it was time for a challenge.I found a scrap of our Tea Lace Doily, some pieces of Red & Silver Glimmer papers & even Whisper White cardstock. I used them all!

Don’t you just love the detail that the Scallop Trim Border punch gives it? If you don’t have one yet now is a great time to get it because it is just one of the products in our Weekly Deals from 1/21/14 – 1/27/14. Check it out here.


I promised you I would share a video on how to create this fun,trendy Valentine goody bag. So without further ado. . . . . . . ( I’ve always wanted to say that!)

Let’s all get scrap happy!~I challenge you to take out some scraps and see what you can create. If you email me a picture of what you create I will share them here. Just email them to me at; judi@judistamps.com. I can’t wait to see what you create!!

Do you have the need to create your own trendy Valentine goody bag but need some supplies? Check out my online store, your supplies will be delivered right to your door.

Til we meet again,

buy Stampin Up! here!

Trendy Valentine sneak peeks

I just loved creating this trendy Valentine goodie bag using the Perfect Pennants stamp set. I knew I wanted it simple but lots of texture and layers. What? Is there such a thing? Yes this is it! It is also economical because you can create several with little materials. I am currently working on a video to show you exactly how to make this but am giggling with delight with the finished product. I just couldn’t wait sharing a few little peeks with you today.

Perfect Pennants

I just love polka dots & the Fresh Prints Designer Series Paper Pack!(132996)


Perfect Pennants banner


Banners are a hot,hot trend! What a better way to let someone know how you feel?


Perfect Pennants ampersand

Another hot, hot trend is the ampersand image!

As you can see this projects has lots of bling! and layers….


Be sure to visit back tomorrow to view the entire project and my video.


Have you checked out theWeekly Deals this week?

Santa Gift Card Holder

I just loved making these Santa Gift Card Holders to hang from the tree this year. This is a project that will help you use up all those scraps you have!  Several demonstrators have made variations of this jolly guy, these are two of my versions. 

For the gift card holder I used 1/2 sheet of cardstock that measured 4 1/4" x 11". I scored it at 2 7/8" & 5 1/2",flipped it and scored at 2 7/8" again using my Simply Scored Scoring Tool. I ran it through the Big Shot using our Perfect Polka Dots embossing folder for texture on the front flap. For the slot to insert your gift card I used the Word Window and 1" Circle punches.

For Santa I used: the Extra Large & Large Oval punches, the Ornament punch, Bird Builder,Owl Builder punch, and the Itty Bitty Shapes Punch Pack.

I added detail with sponge daubers, Bashful Blue and Rose Red inks, our White Gel pen and a a little dazzle with our Dazzling Details.


I attached Santa to a Real Red belly band to keep it from opening on the tree. 1


For this first Santa I drew on his eyes using a Basic Black Stampin' Write Marker. I think he looks like he is just SO jolly! 


For this Santa I punched out Basic Black circles with about      1

1/8 circle punched out of bottom so he didn't look as if he just saw a mouse. I added faux stitching on the belly band with our whilte gel pen. You can't really see the shading in eitherr of these scans but I sponged around all the Whisper White punched pieces using a sponge and Bashful Blue ink. I used a sponge dauber and Rose Red ink to give him cheeks and a little red on his nose.

For the girls I used Regal Rose in place of the Real Red. I wanted these to blend in on my pink and green decorated tree.  I will also add a tag with their name on using our Jewelry Tag punch.


Here is a look at the inside without the back showing.

1These are quick to make  and make that gift card extra special!


HapBEE Stampin'!

                     Judi