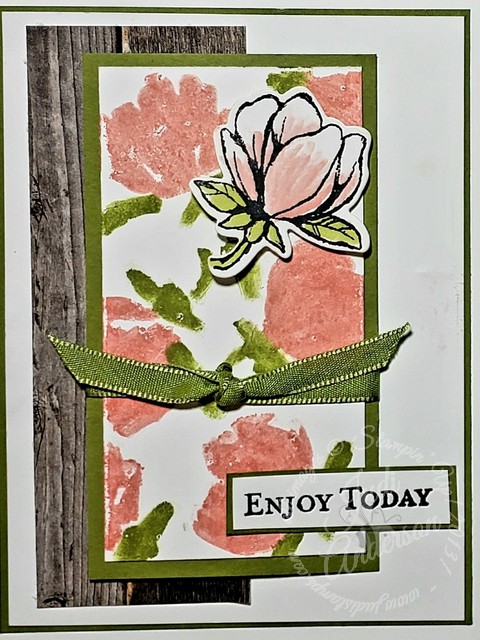
Creating a solid background image with your stamps can be done! I love the images in the Magnolia stamp set, which is an outline set. As I looked at the images, I thought,”Why can’t I use the reverse side of the smaller flower?
I experimented on a scrap piece of Whisper White, stamping in a solid color.
I liked the result I achieved but wanted my image to be two colors. The images on the smaller mat on my card is using Calypso Coral and Old Olive Stampin’ Write Markers on the reverse side of the stamp. I followed the lined image when doing my coloring knowing that it would be more impressionistic. Don’t you think it turned out great?
You may ask,” What is the difference between other photopolymer stamps and those with the “reverse” label by them?” The lined images are cut more closely on the reverse stamps. By molding these stamps in this way, they act like our 2-step stamps.
Creating a solid background image with your stamps, experimenting can be rewarding.
I did experiment using the reverse side of this flower stamp to color it in like our reverse stamps. While it didn’t fit inside, I feel you could do this technique if you don’t want to color your lined image. Imagine all the different looks you can get by using this stamp in this way!
To achieve a more water color look you could color the back side of the stamp with your Marker, spritz the stamp with water using our Stampin’ Spritzer, stamp, let dry, then stamp the lined image over the top. You could do this technique using Whisper White cardstock but I recommend using our water color paper. Why? The water color paper stands up to water better and the color will be less muted.
The patterned paper in my card is from the Designer Series Paper Stack. Several of the papers in this stack would work. Just by changing the paper you will create a different feel/look to it. I hope I inspired you to check out what other stamps in your collection you could use to create a card that has a solid image background.


Leave a Reply