Gift of Salsa with tag

Yesterday I shared a tid bit of a fall project I worked on yesterday, my gift of salsa and handmade tag. This was actually a two day project as I spent most of the day Thursday making home-made salsa with tomatoes, cilantro & peppers from my garden. This is the first time I made salsa with most of the ingredients coming from my garden and kind of made up my own recipe. I put in a little bit of this and a little bit of that. I plan on making more with tomatoes my daughter gave to me from her garden. I will try to remember to  jot down some notes on the amounts of each ingredient and share with you next week.

Now for the stamping & papercrafting part of my project. I wanted to create some tags for my jars because I will be giving many of the jars as hostess gifts during the fall & winter holidays. Each tag will be different and I want an earthy feel to them. While my first tag has some earthy elements and colors, it does have a touch or two of bling as you saw in yesterdays share.

The bling came from cutting out two feathers using our Feather Framelits (#135852 ) and our Silver & Champagne Glimmer Papers. I added some fall color to them both by using Rubbing Alcohol & reinkers. (watch for a video on this technique).

Colors I used for this tag are: Elegant Eggplant, Tangelo Twist &  Crushed Curry, doing the rock & roll.

#featherframelits Dies, Cheerful Tags
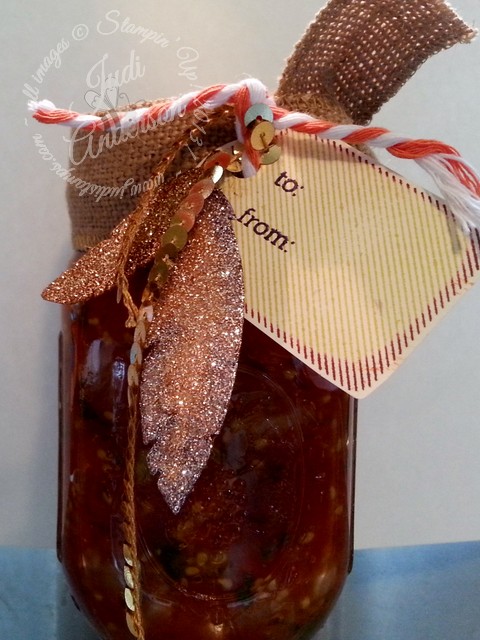
I love that I could capture the colors of the Glimmer paper feathers!

The stamp Set used is : Cheerful Tags (#135065)

To add to the earthy feel I used our Burlap Ribbon & White & Tangelo Two Tone Trim (#135830).

You will find the Cheerful Tags stamp set in our newly released Holiday Catalog on page 5. Yes it is in the Christmas section but you can use it for any occasion just by the colors you use. I also plan on making coordinating labels for the lids.

By the way- the Garth Brooks concert was amazing last night! I saw him 17 years ago at his last concert before retiring so I had some pretty high expectations and I can say he met them. He still puts on a great show and I highly recommend that if he comes to your area you need to go. I shared a picture on my facebook page if you’d like to see it.

Now it’s time to get back to canning the rest of the tomatoes!

Til we meet again,

Judi's Stampin' Up! online store


Button Buddies at the Scrapbook Expo

I'm preparring for the Scrapbook Expo being held at the Pheasant Run Expo Center in St. Charles IL on August 24th & 25th. I will be sharing a variety of home decor, holiday ideas, cards and scrapbook pages in my display. I will also be offering a make&take for a small fee. I will have special gifts for those that book a party with me, place an order or join my team. For those that book a party I have "green bags" that hold either a $5.00, $10.00 OR $20.00 gift certificate in them. They will receive this at their party but I don't want them to go away empty handed so I made these cute notecards, using our Button Buddies stamp set ,and box for them.

100_9090


This is a picture of the cards all boxed and ready to go. I've put them into a cello bag and attached a tag. I will be personalizing the tag to each hostess at the Scrapbook Expo.

The box is made from 2 scallop edge envelopes that I cut out using the BigZ die and the Big Shot. I added a belly band using Real Red cardstock. This made creating this box so simple and quick!


100_9089Here are the card sI created just for these special hostesses! I used our Brights Polka DoOt Designer Series Paper Pack to create these adorable 3×3 notecards. Each notecard is embellished with a button or bow. You can't tell in this picture but the little piggy has mini basic pearls for eyes. These make the perfect little gift card for that special person.

DId you see the flap of the envelope for the baby card peeking out? Yes, I even did my signature cusomized envelopes! For these I just took a strip of the Polka Dot paper and attached it to the envelope flap. SO simple but a great personal touch for these Button Buddy notecards!

Be sure to visit me in my booth on August 24th & 25th at The Scrapbook Expo in St. Charles IL.

                                                        HapBEE Stampin'!

                                             Judi


Santa Gift Card Holder

I just loved making these Santa Gift Card Holders to hang from the tree this year. This is a project that will help you use up all those scraps you have!  Several demonstrators have made variations of this jolly guy, these are two of my versions. 

For the gift card holder I used 1/2 sheet of cardstock that measured 4 1/4" x 11". I scored it at 2 7/8" & 5 1/2",flipped it and scored at 2 7/8" again using my Simply Scored Scoring Tool. I ran it through the Big Shot using our Perfect Polka Dots embossing folder for texture on the front flap. For the slot to insert your gift card I used the Word Window and 1" Circle punches.

For Santa I used: the Extra Large & Large Oval punches, the Ornament punch, Bird Builder,Owl Builder punch, and the Itty Bitty Shapes Punch Pack.

I added detail with sponge daubers, Bashful Blue and Rose Red inks, our White Gel pen and a a little dazzle with our Dazzling Details.


I attached Santa to a Real Red belly band to keep it from opening on the tree. 1


For this first Santa I drew on his eyes using a Basic Black Stampin' Write Marker. I think he looks like he is just SO jolly! 


For this Santa I punched out Basic Black circles with about      1

1/8 circle punched out of bottom so he didn't look as if he just saw a mouse. I added faux stitching on the belly band with our whilte gel pen. You can't really see the shading in eitherr of these scans but I sponged around all the Whisper White punched pieces using a sponge and Bashful Blue ink. I used a sponge dauber and Rose Red ink to give him cheeks and a little red on his nose.

For the girls I used Regal Rose in place of the Real Red. I wanted these to blend in on my pink and green decorated tree.  I will also add a tag with their name on using our Jewelry Tag punch.


Here is a look at the inside without the back showing.

1These are quick to make  and make that gift card extra special!


HapBEE Stampin'!

                     Judi