Using the Abundant Beauty Masks for a quick card

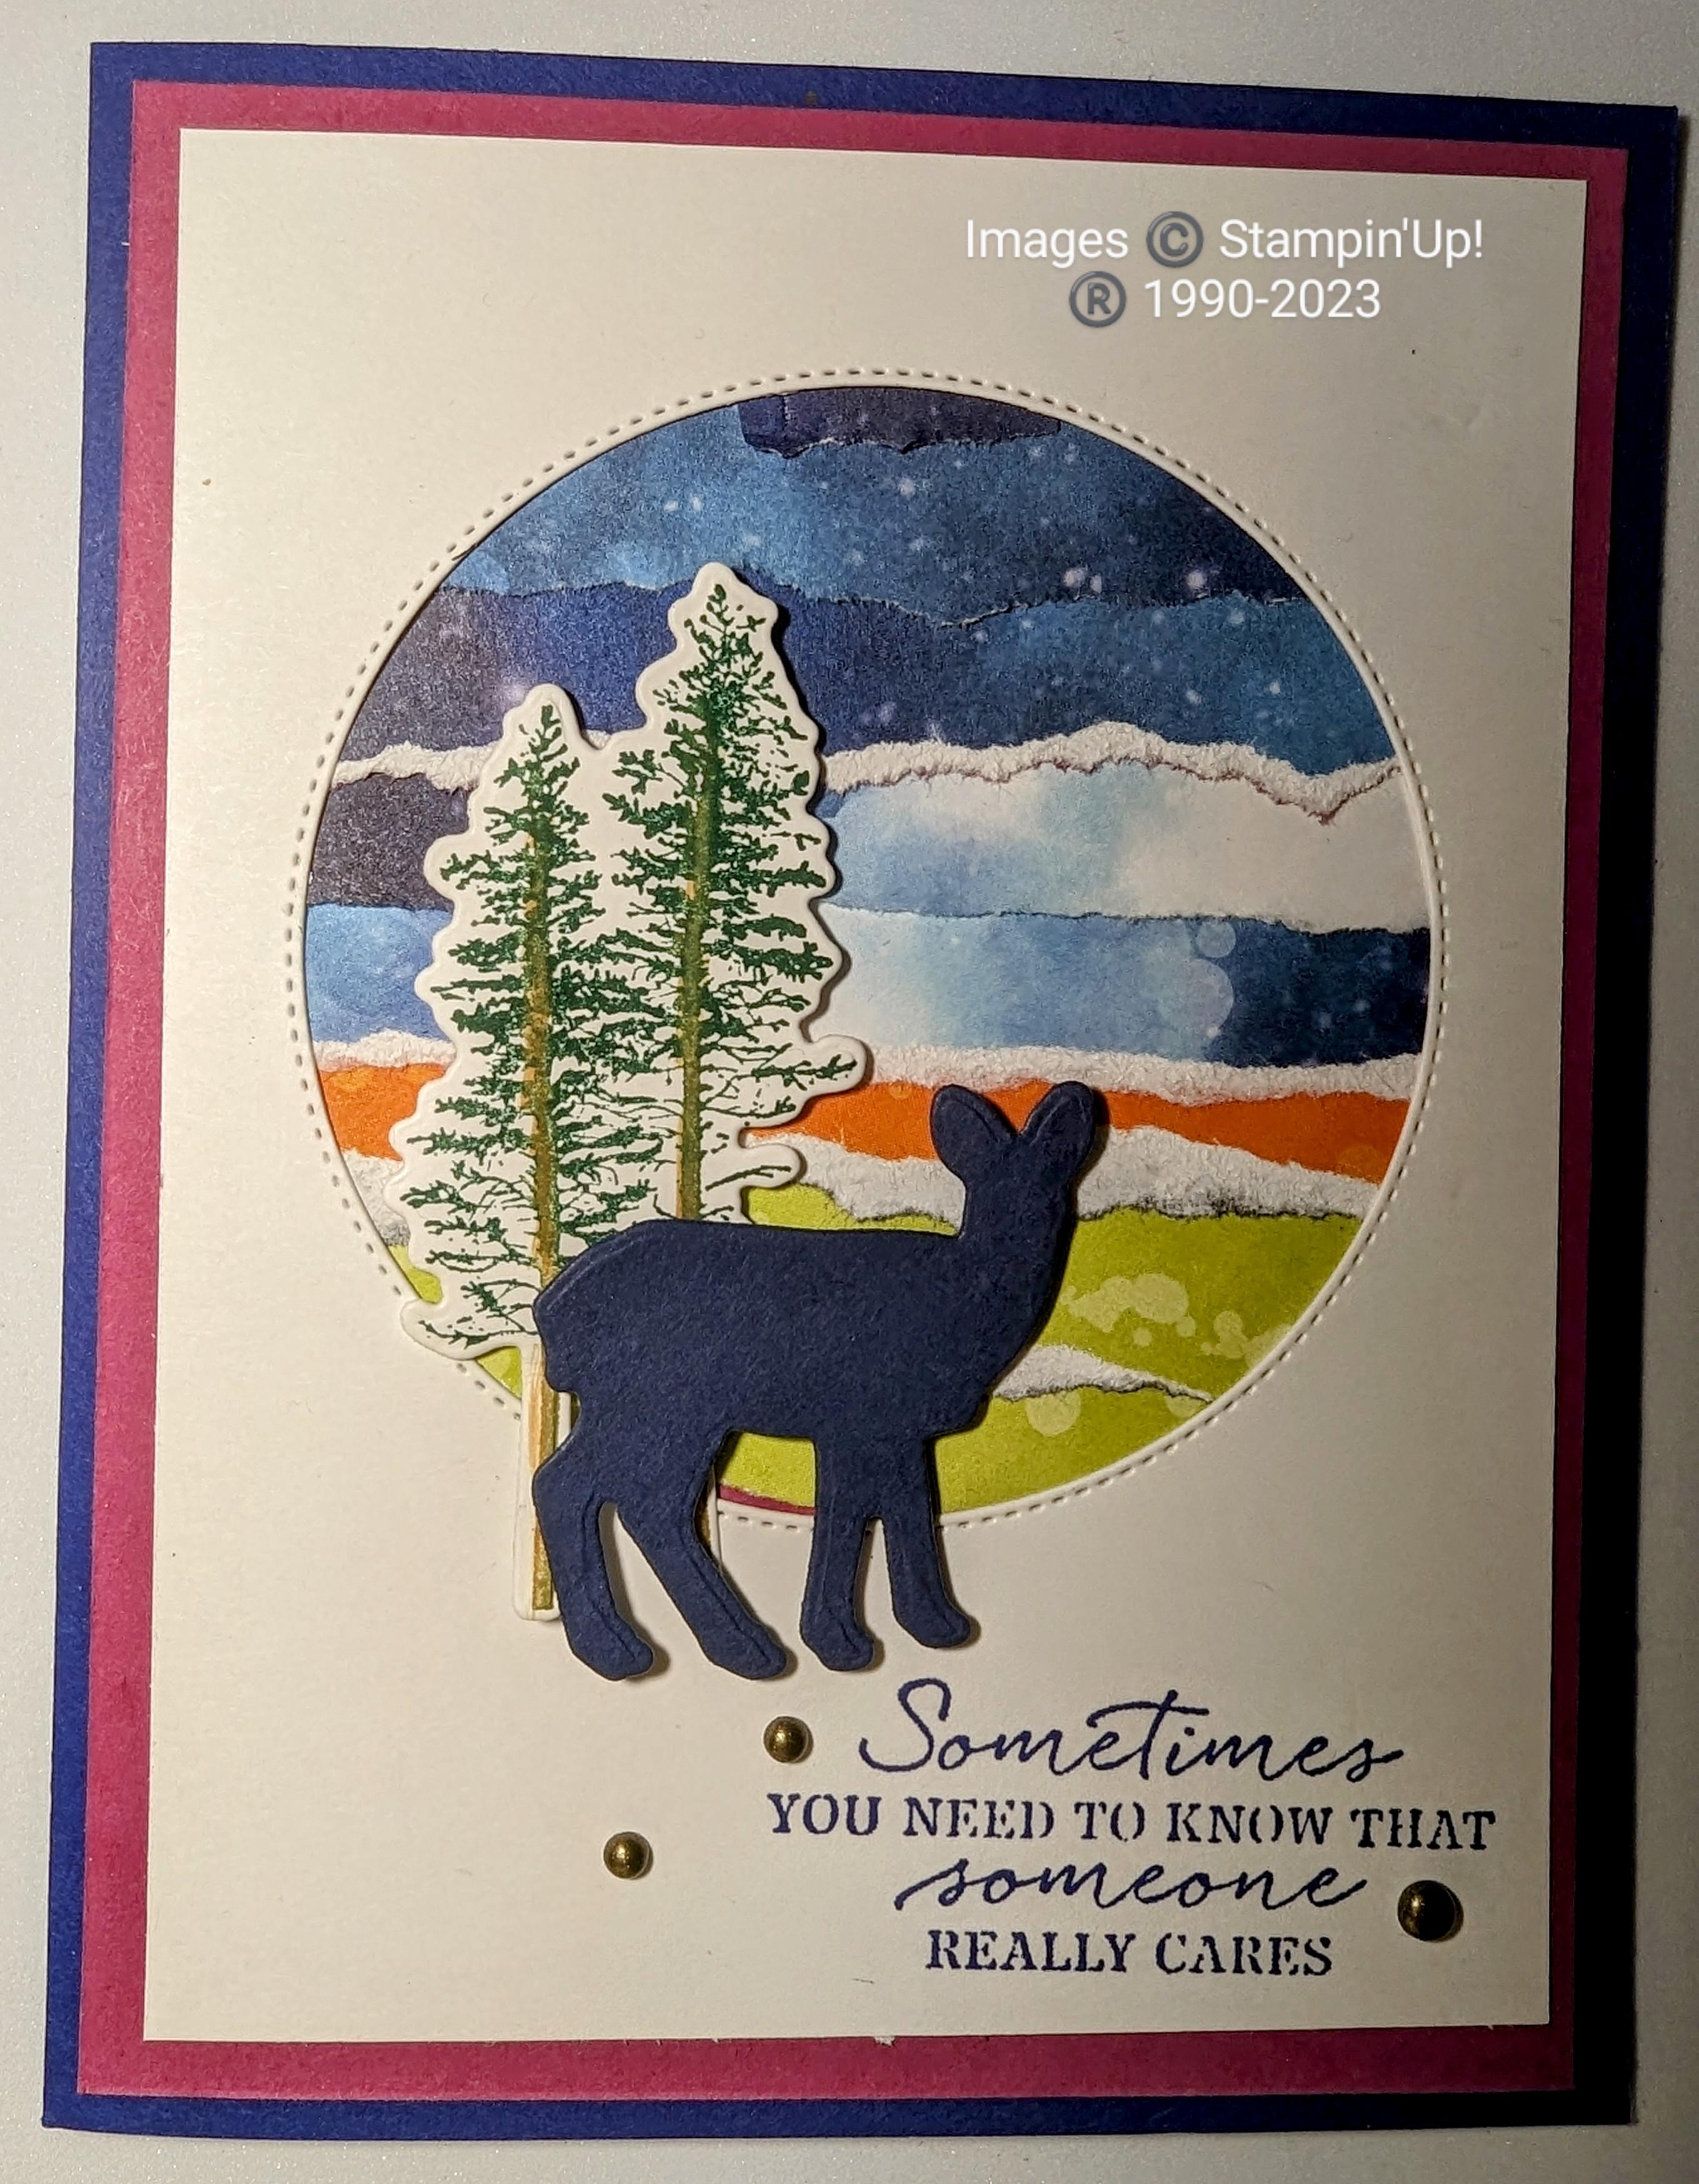
Using the Abundant Beauty Masks to create card for all seasons! These masks will be available to purchase on September 6, 2023.

Don’t overlook these decorative masks that are found in the Sept – Dec. mini catalog on page 47. This is a set of seven masks. You can create beautiful backgrounds and a trio of gorgeous sunflowers.

Begin thinking outside of the box with them. I immediately thought of using different colors to create beautiful flowers. I reccomend using different mediims with the masks. Embossing Paste with Pallette Knives, Versamark ink with embossing powder, and even our Gold Leafing!

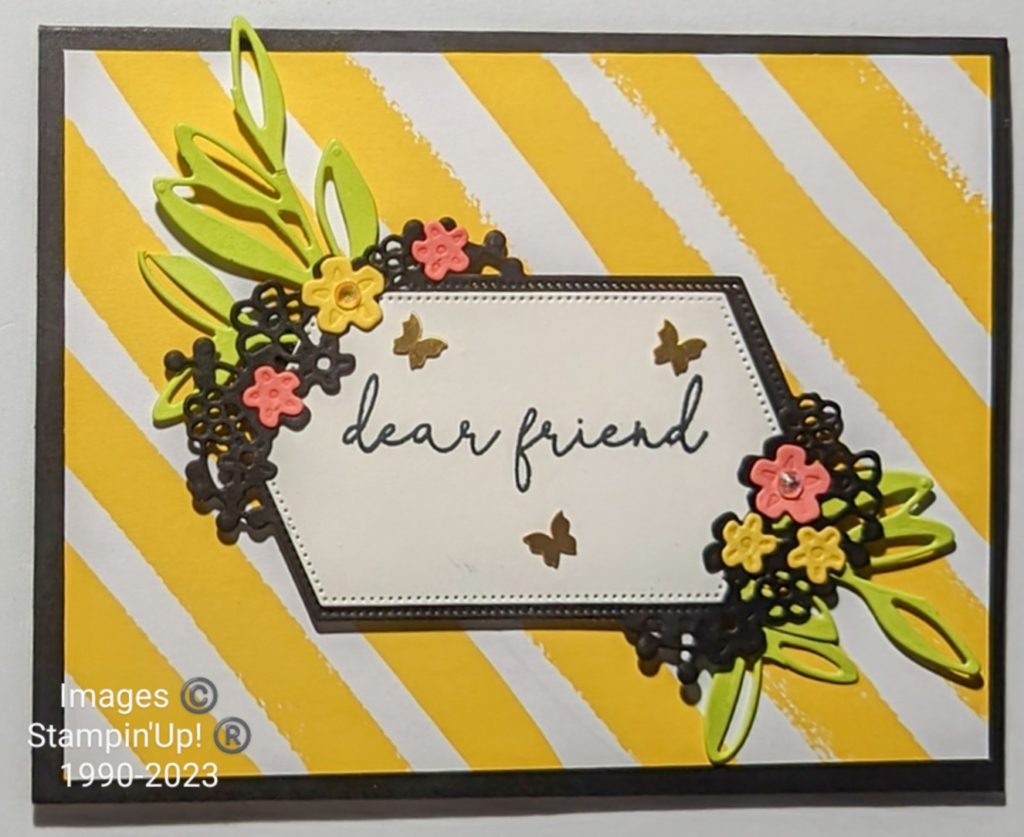
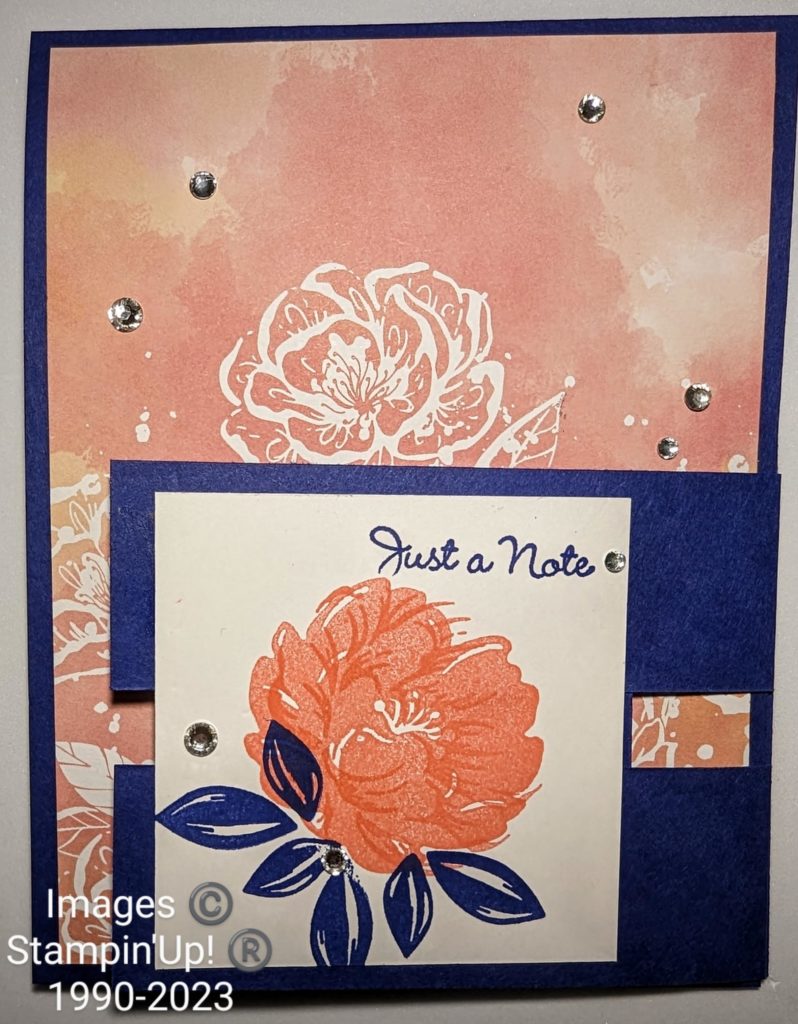
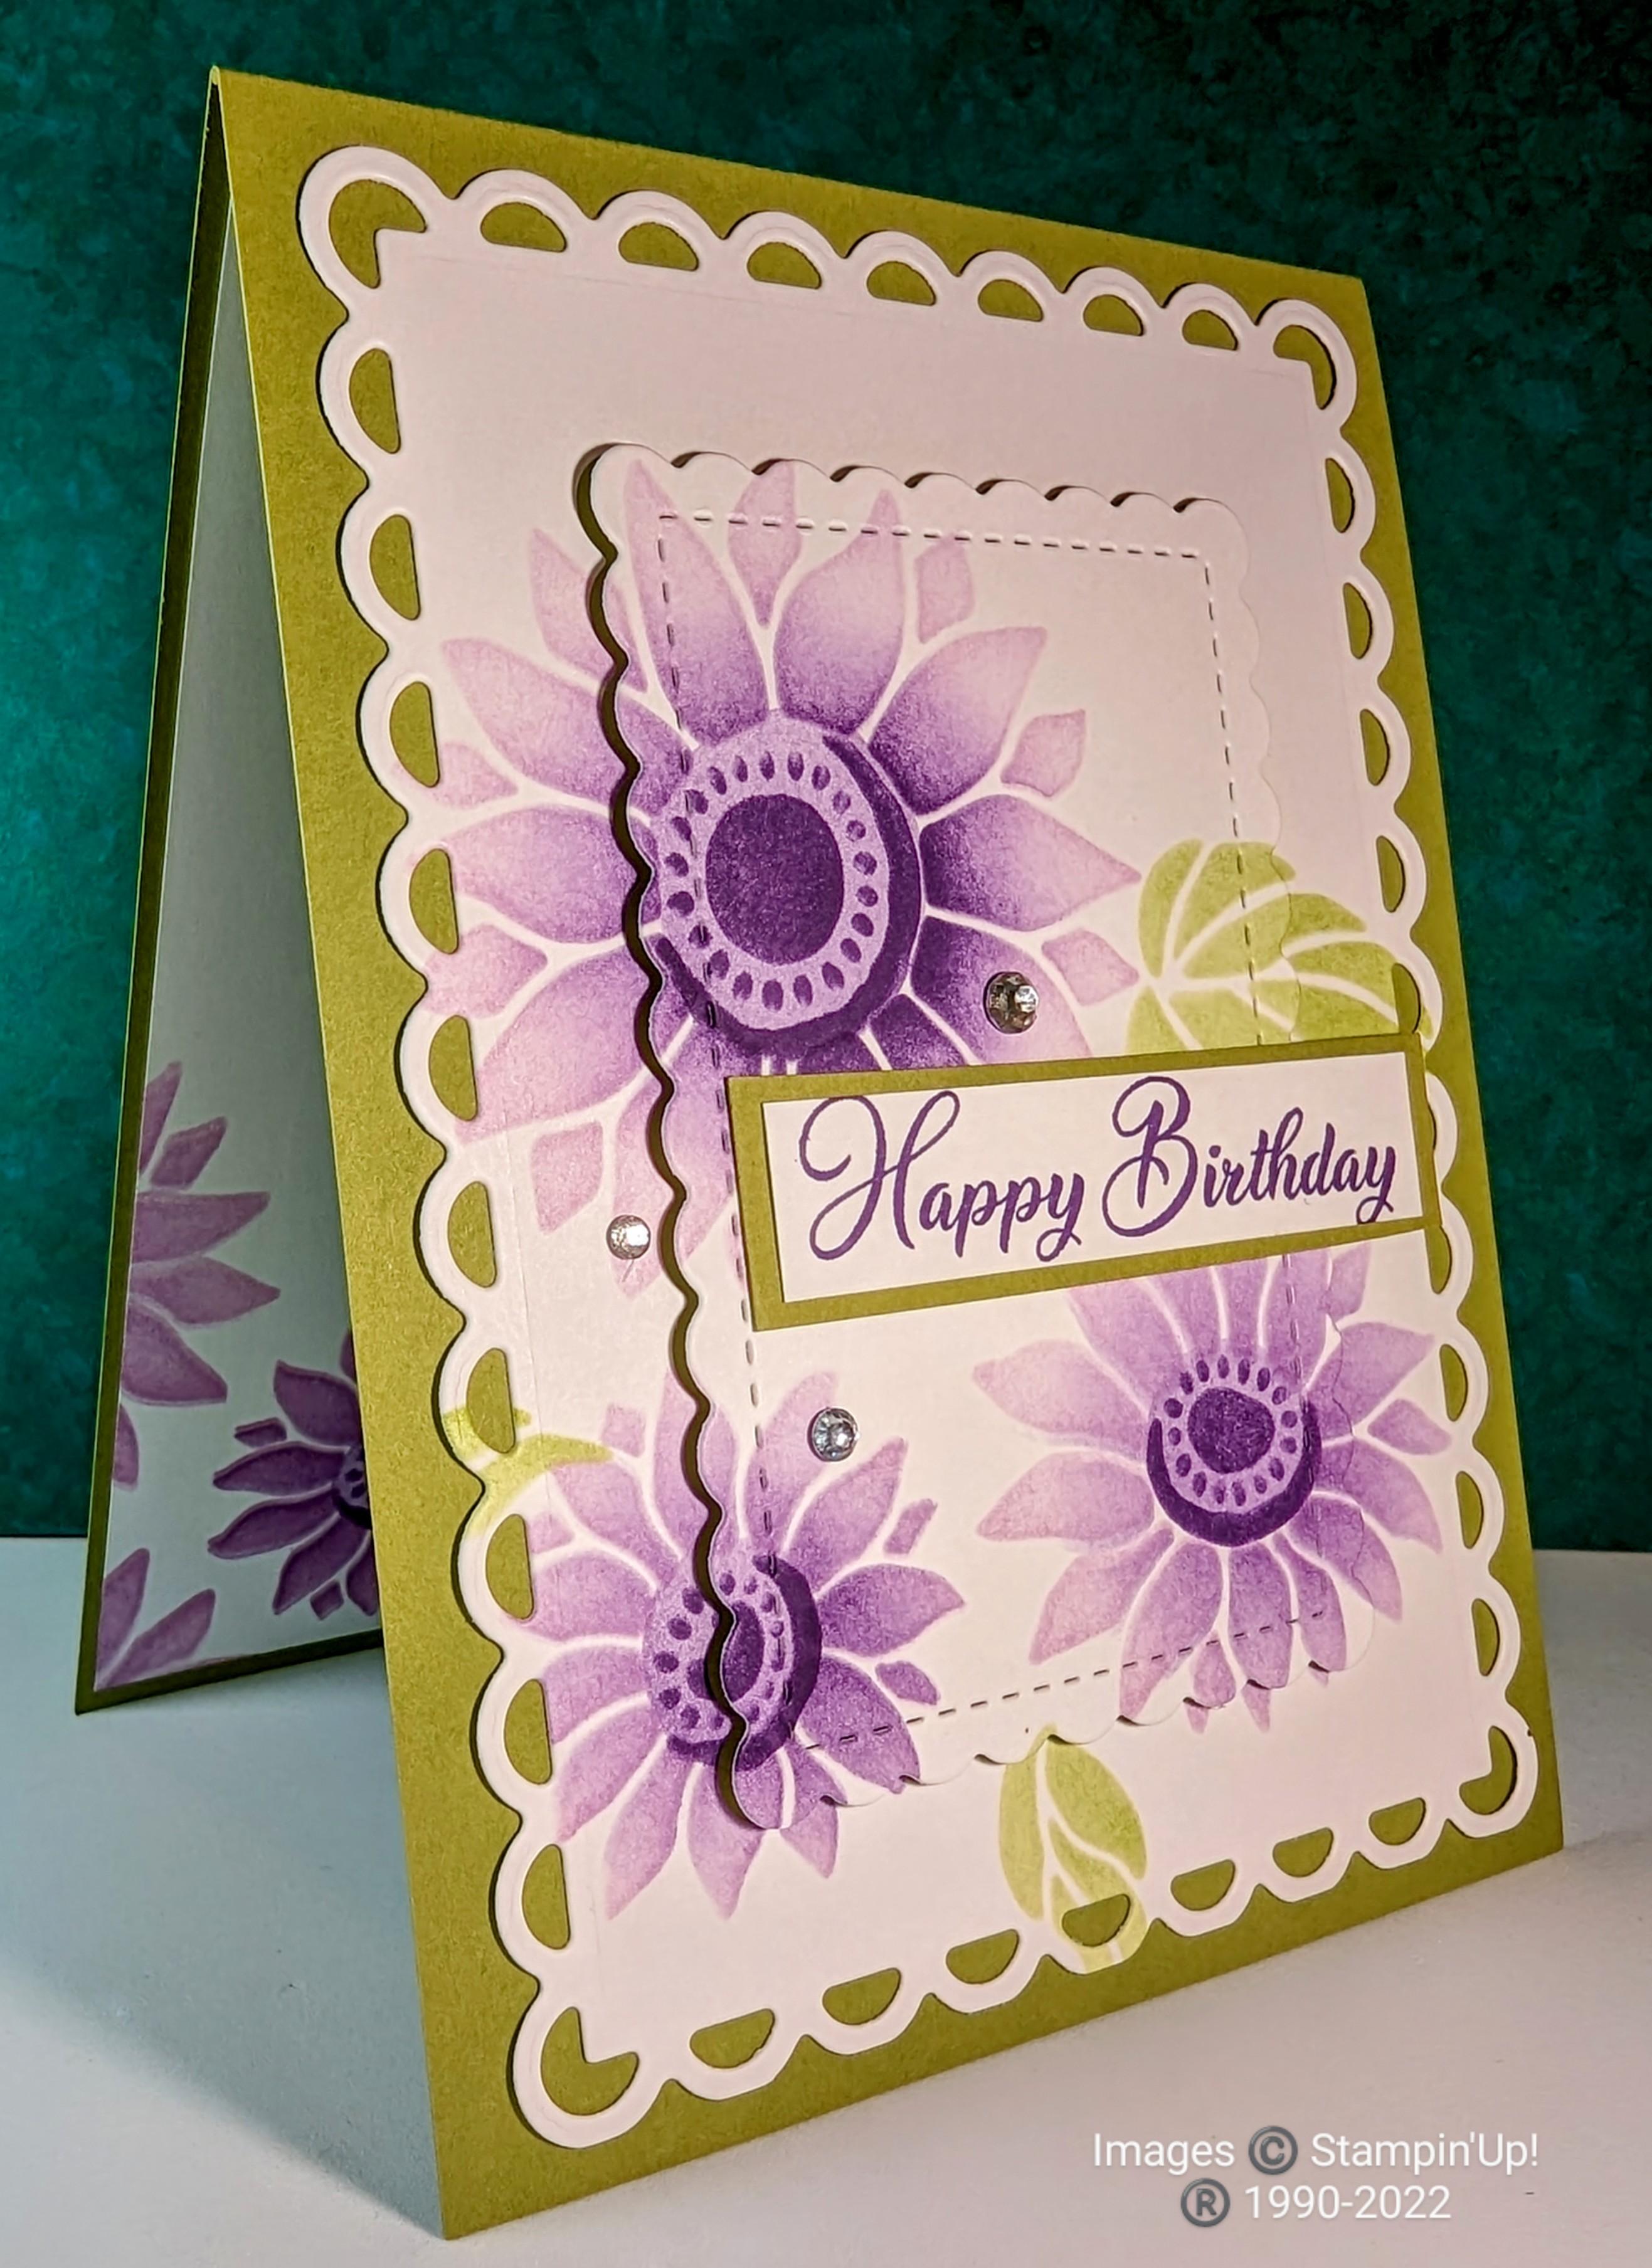
I created some of my swaps for #BackStage2023 with these masks. Wanting to have bright flowers I used Fresh Freesia and Gorgous Grape Classic inks for my flowers.

Starting with a 4 1/4″ x 5-1/2″ piece of Basic White cardstock and the masks with the trio of flowers we will add color. I used my large Blending Brush, in a circular motion, to add Fresh Freesia ink. Keeping the mask on the cardstock, I used a small Blending Brush to add a bit of Gorgeous Grape ink to just the center areas of the flowers. Remove the mask. Then Itook the mask with the centers with the dots, added Gorgeous Grape really dark. Now use the same small Blending Brush and the full circles mask to add color lightly.

Using the Abundant Beauty Masks #StampinUpBackStage

Using the Abundant Beauty Masks with the leaves to finish the look.

Adding leaves to finish the look. I used Granny Apple Green, adding color lightly and then more in a few areas. The result will give the leaves some dimension and interest.

There are two options at this pint. first, you can trim this layer to measure 4″ x 5-1/4″ and adhere it to the card front. Or, second, you can use the Contours and Scallops Dies as I did. I adhered the outer die piece directly to the card front. Grabbing my Stampin’ DImensionals I then added the center die cut. A few Rhinestone Gems and sentiment finish off the frint of my swap card.

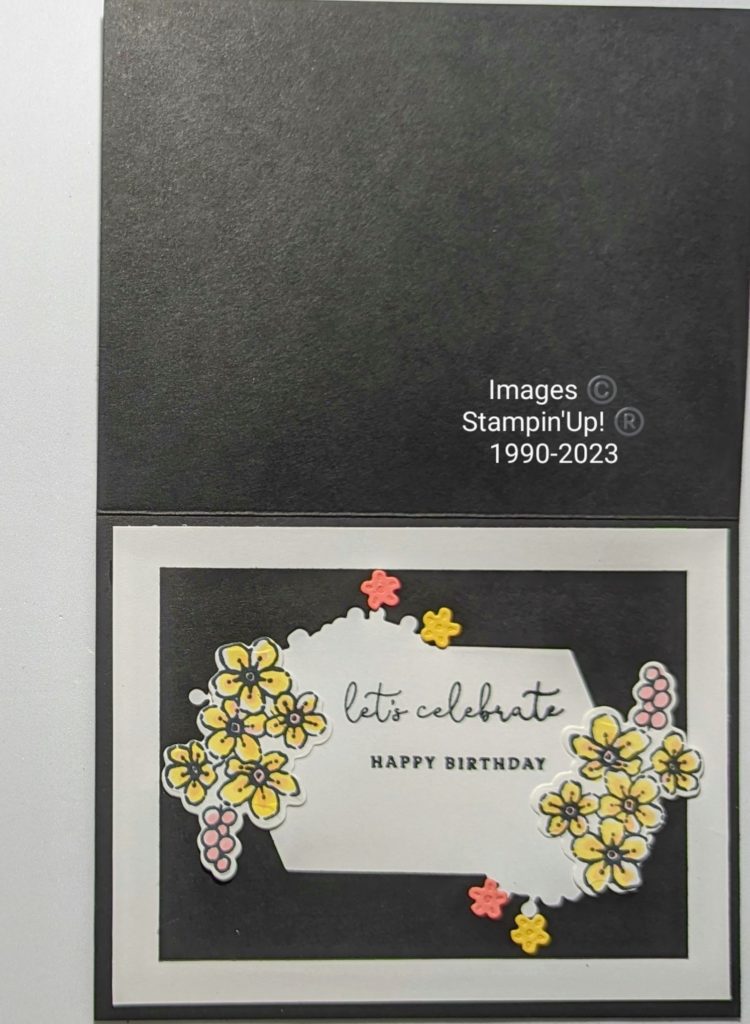
Wanting to add interest to the inside, I used the masks to add some flowers in lower left corner.

I hope you enjoyed learning how to create a beautiful Birthday card using the Abundant Beauty Masks. They will be available on September 6th. You can purchase the masks and other products I used at my online store and have themdelivered right to your front door!

Until we meet again. . .

Judi's online store

Say “Hello” with a little sparkle with Happy Mail

Say “Hello” with a Little Sparkle: Creating a Card to Send Happy Mail. You have to admit, there’s something truly special about receiving a hand-made card in the mail. In this digital age, sending a card filled with warmth and well wishes is a wonderful way to connect.

Today’s  “Say ‘Hello’ with a Little Sparkle card is designed to do just that.

With a Daffodil Delight base and a touch of elegance, this card is a perfect example of how a small gesture can create big smiles. Let’s dive into the details of this charming card, ideal for sending as happy mail.

The card begins with a Daffodil Delight base that sets a cheerful tone right from the start. Adding sophistication to the design, I added a mat of Basic White and Parakeet Party. The Parakeet Party mat is embossed with the Splatters Embossing Folder, adding texture and visual interest.

The focal point is a Poppy Parade circle, which serves as a vibrant backdrop for the main design. I then layered a Basic White circle adorned with delicate flowers on top. Watercoloring these flowers create a soft and artistic effect. Using a tampin’ Write Marker I added stems and leaves for a personal touch.

The sentiment “Hello” takes center stage, making the card a delightful way to initiate a cheerful conversation. By using the Alphabest stamp set, I stamped “Hello” which adds a playful charm. The coordinating punch ensures clean and precise edges, adding a professional finish to the sentiment.

I added a touch of elegance and sparkle by adding delicate, die-cut flowers with iridescent rhinestone centers. These subtle embellishments enhance the beauty of the card, but also reflects the recipient’s importance. It will make them feel cherished and appreciated.

Say "Hello" with a Little Sparkle #SentimentalPark,  #HappyMail

This “Say ‘Hello’ card is a reminder of the impact a handwritten card can have on someone’s day. This card exemplifies the joy of creating and sharing happy mail. Embrace the art of sending heartfelt greetings and spread smiles with this charming card design!

How to create a card for a friend

How to create a card for a friend that embraces the vibrancy of friendship using bright colors. Sending a burst of nature’s beauty to your friend’s day, this card is a heartfelt reminder of the joy you bring into each other’s lives.

This Heartfelt “Dear Friend” Card Blooms with bright colors of summer. Friendship is a treasure that brings light and joy to our lives. What better way to express your appreciation than with a heartfelt “Dear Friend” card? This bright card boasts a bright yellow and white striped background . This sets the stage for a message filled with warmth and affection. Adorned with a beautiful black frame featuring delicate flowers, this card is a true work of art. Let’s explore the captivating details of this card that celebrates the beauty of friendship.

The bright yellow and white striped background instantly catches the eye and radiates positivity. The combination of these cheerful colors signifies happiness and positivity, making it the perfect backdrop to convey your feelings of gratitude to a dear friend. The stripes bring a touch of playfulness and energy, reflecting the joyful nature of friendship. This patterned paper is part of the Brights 6 x 6 designer Series Pack.

How to create a card for a friend with #SentimentalParkstampset

How to create a card for a friend with a focal point that will make them feel extra special.

The centerpiece of the card is a stunning black frame adorned with intricate flowers. This elegant frame beautifully showcases the sentiment from the Sentimental Park stamp set. The contrast between the black frame and the vibrant background creates a visual harmony that draws attention to the heartfelt message.

The white insert nestled within the black frame adds an element of elegance. By tucking under the flowers at two diagonal corners, it creates a dynamic focal point that captures the recipient’s gaze. Choosing this design adds depth and dimension to the card.

The Parakeet Party die-cut leaves, accompanied by Calypso Coral and Daffodil Delight die-cut flowers, enhance the card’s charm. These elements bring a touch of nature’s beauty to the card, symbolizing growth and the blossoming of friendship. The combination of colors adds vibrancy and visual interest to the frame. The frame, flower & leaf elements are all from the coordinating Sentimental Park Die Set.

The Brushed Brass Butterflies gracefully flutter around the sentiment, adding an enchanting touch. Butterflies are often associated with transformation and beauty, making them a wonderful representation of the growth and evolution of a meaningful friendship. The Irridescent Rhinestones that adorn two of the flowers bring a subtle shimmer and elevate the elegance of the card. This “Dear Friend” card featuring a bright yellow and white striped background, a black frame adorned with flowers, Parakeet Party die-cut leaves, Calypso Coral and Daffodil Delight die-cut flowers, Brushed Brass Butterflies, and iridescent rhinestones  beautifully conveys appreciation for a special friend.  

I used the negative from the frame die for the inside of the card for an extra special touch.

Sentimental Park friend card

Let your creativity flourish and create a truly memorable card that celebrates the bond of friendship by using the Sentimental Park stamp set & dies.

Until we meet again. . .

Judi's online store

A Whimsical and Colorful Birthday Card

A Whimsical and Colorful Birthday Card to celebrate that special day. Birthdays are a time of joy, laughter, and colorful celebrations. What better way to convey your best wishes than with a delightful “Pinwheel for a Birthday” card? This enchanting card features a Parakeet Party card base, with vibrant stripes as a background. A square adorned with stars on a Lemon Lolly mat adds a touch of magic, while a patterned pinwheel takes center stage as the focal point. The sentiment “I think it’s time for a Celebration” adds the perfect finishing touch to this whimsical card. Let’s explore the charm and creativity of this delightful “Pinwheel for a Birthday” card.

The choice of Parakeet Party for the card base sets the stage for a fun and lively celebration. Its bright and cheerful green hue symbolizes growth, energy, and renewal, making it the ideal foundation for a birthday card. This color embodies the sense of excitement and anticipation that comes with celebrating another year of life.

I chose bright colors found in the Bright & Beautiful Designer Series Paper. The sentiment is from the Beautiful Balloons stamp set and the embellishment is the 2022-2024 In Color Pearls. All o these products can be purchased at My Online Store Here.

A Whimsical and Colorful Birthday Card filled with different patterns.

A Whimsical and Colorful Birthday Card, #Bright&BeautifulDSP

The use of stripes as the background further adds to the festive spirit of the card. Stripes create a sense of movement and playfulness.

The square element with stars on a Lemon Lolly mat adds a touch of enchantment to the card. Stars are often associated with wishes and dreams, making them a perfect addition to a birthday card. The Lemon Lolly mat provides a lovely contrast to the Parakeet Party base, creating a visually appealing composition.

The star of the show is undoubtedly the patterned pinwheel at the card’s focal point. Pinwheels are whimsical and reminiscent of carefree childhood days. They symbolize happiness and joy, perfectly capturing the essence of a birthday celebration. The pattern on the pinwheel can be personalized to match the recipient’s tastes or the theme of the party.

Adding the sentiment “I think it’s time for a Celebration” completes the card’s message with a sense of excitement and anticipation. The playful wording sets the tone for the celebration and lets the recipient know that it’s time to rejoice and enjoy the special day.

In conclusion, a “Pinwheel for a Birthday” card featuring Parakeet Party, stripes as a background, a square with stars on a Lemon Lolly mat, and a patterned pinwheel for the focal point, is a whimsical and colorful way to celebrate a special day. Whether it’s a child’s birthday or a fun-loving adult, this card design will undoubtedly bring smiles and warm wishes. So, let your creativity soar and create a memorable  birthday card that will make anyone’s celebration even more special!

Check out another bright Birthday Card using this stamp set here!

Until we meet again. . .

Judi's online store

Torn Paper Technique creates beautiful backgrounds

Torn Paper Technique creates beautiful backgrounds for your craft projects. Are you like me and have a lot of leftover papers tucked into folders or drawers? Then this technique is for you!

I was inspired by the Masterfullly Made Designer Series Paper. Many of the patterns in this paper was originally created by tearing paper, putting them together on a board and then photographing them. Previously creating similar looks using paper strips I had an ah-ha moment when I learned about this pack of paper. I can do that!

I used papers from the package of Stargazing Designer Series Paper but could have easily used some of my many scraps. Just going through your papers and finding colors and patterns that would look good together. I used strips that were 1″ x 3-3/4″, but use what ever you have to achieve the look you desire. It is important to choose the shape & size of your cut-out. This will determine the length of your strips. I then tore each strip in 1/2 so they were approximately 1/2″.

Torn Paper Technique has different results each time you do it.

And that is one of the things I love most about it. Use brightly colored paper for happy cards. Try more subtle papers for sympathy cards. Soft pastel colors work for baby cards. You can even mix pattern papers with solid cardstock, the possibilitiesare endless!

I used the same pack of paper to create both of these cards today. The first one has more of a feminine look to it. Using the Sending Smiles stamp set and dies with the Scalloped Contours Dies to achieve a fun look.

Torn Paper Technique #SendingSmiles

This second card, a more masculine look. For this card I used the Grassy Grove stamp set & coordinating dies. the torn paper creates a wonderful landscape behind the deer and trees.

Paper Tearing Technique #GrassyGrove

I encourage you to try this Torn Paper Technique in your next crafting projects. Think, embellishments on scrapbook pages or a framed piece of art for your wall. If you liked learning this technique be sure to sign up for my newsletter where you will receive weekly emails with more project ideas!

Until we meet again. . .

Judi's online store

Christmas in July: Celebrate the Holiday Spirit

Christmas in July, who says the holiday spirit is reserved only for December? I love creating special holiday cards for my friends, family, and clients. I would be crazy to think I could get them done during the holiday rush in November. This is why I begin creating my winter season and holiday cards in July.

I set a goal of creating 10 to 20 cards per month. The “Christmas in July” theme helps to get me started. This is a charming way to enjoy the warmth and magic of Christmas during the summer months. A card design that can be used for various occasions throughout the holiday and winter season is a plus. We a from birthdays to anniversaries, or simply to send warm wishes during colder months. It’s a versatile choice that will surely make your loved ones’ hearts glow with happiness.

Christmas in July is more than the holidays

Choosing my color pallette for each card design is important. Next is imagining a simple yet stunning card that captures the essence of the holiday and winter season. A card perfect for any occasion during the winter season. The card features a harmonious blend of Crumb Cake, Old Olive, Real Red, and Shaded Spruce colors, exuding a natural and inviting feel. Splatters of Real Red ink in the background, created with a Water Pen, add an artistic touch, while the addition of Gold Elegant Trim (155766) adds a shimmer of elegance.

Christmas In July #RingedWithNature

My choice of colors plays a significant role in setting the mood for this card. Crumb Cake, resembling the earthy tones of winter, adds a touch of warmth and coziness. Paired with Old Olive, which symbolizes the beauty of nature, the color palette exudes a natural and rustic charm. Real Red and Shaded Spruce, classic Christmas hues, infuse the card with a festive spirit, reminding recipients of the joyous holiday season. Using the Ringed with Nature stamp set is a great choice for making assorted cards with one color pallette.

I added splatters of Real Red ink in the background with a Water Pen creates a captivating and artistic effect. This adds depth and texture to the card, making it feel more personalized and crafted with love. The splatters can represent the beauty of falling snowflakes or the excitement of unwrapping presents.

Gold cording adds a touch of elegance and shimmer to the card. It complements the natural color scheme while adding a hint of glamour.

A “Christmas in July” themed card featuring Crumb Cake, Old Olive, Real Red, Shaded Spruce colors, Real Red splatters, and Gold cording is a perfect way to celebrate the holiday spirit all year round. Whether it’s Christmas, a winter birthday, or just a thoughtful gesture to brighten someone’s day, this card design is sure to evoke warmth and joy. So, why wait until December? Embrace the magic of Christmas in July and spread happiness with this captivating and friendly card!

Until we meet again. . .

Judi's online store

How to Create a Gate-Fold Card using Les Shoppes

How to Create A Gate-Fold card that will surely impress your loved ones? I will be sharing the steps in this post, you may be surprised at how easy it is. Adding a touch of elegance to your handmade cards, a gatefold card is the perfect choice. Embrace your creativity and let’s embark on this exciting paper crafting journey together!

First, gather your supplies. The supplies below are what I used. These are available for purchase at my ONLINE STORE.

  • STAMPS: Go To Greetings #158763 (I used “Just A Note”)
  • INKS: Starry Sky #159212
  • Paper:
    • Balmy Blue #146982: [5 1/2″ x 8 1/2″ scored @ 2 1/4″, 6 1/2″]
    • Night Of Navy #100867: [2″ x 5 1/4″]
    • Calypso Coral #122925: [3 7/8″ x 3 3/8″, 1″ x 3 1/4″]
    • Basic White #159276: [ 3 1/4″ x 3 3/4″, 4″ x 5 1/4″, 3/4″ x 3″]
    • Les Shoppes DSP #161322
      • Pattern 1: 1 1/2″ x 5 1/4″
      • Pattern 2: choose a sweet shoppe
      • scrap for inside
  • Accessories and Tools:
    • Medium Envelope, Basic White #159236
    • 2022-2024 In Color Pearls #161621
    • Multipurpose Liquid Glue #110755
    • Paper Snips Scissors #103579
    • Stampin’ Cut & Emboss Machine #149653
    • Cane Weave 3D Embossing Folder #160580
    • Bone Folder #102300
How to Create A Gate-Fold Card with Les Shoppe DSP

You will adhere all pieces with the Multipurpose Liquid Glue. TIP: Using this glue on embossed pieces of cardstock ensures your layer won’t come off.

A bone folder will come in handy to create crisp and clean folds.

How to Create A Gate-Fold Card with the above supplies

  1. Score the 5 1/2 x 8 1/2 carstock as listed above. Fold on the score lines to create the gatefold effect.
  2. Using the Cut & Emboss Machine & Cane weave 3D Embossing Folder, emboss the Night of Navy strip. Adhere this to the 2 2/4″ section on the card front.
  3. Emboss the 3 1/4″ x 3 3/4″ piece of Basic White with the same embossing folder. Adhere to the Calypso Coral piece.
  4. Adhere the 1 1/2″ x 5 1/4″ strip to the 2″ section on the card front.
  5. Adhere the Calypso Coral rectangle to the left side of the card front over the Night of Navy section.
  6. Cut out your desired sweet shoppe from the DSP (Designer Series Paper). Adhere to Basic White rectangle on card front.
  7. Adorn your sweet shoppe with the pearls.
  8. Use the Starry Night ink to stamp your desired sentiment onto the 3/4″ x 3″ Basic White, trim. Adhere to Calypso Coral 1″ x 3 1/4″ – trim if necessary.
  9. Onto 4″ x 5 1/4″ Basic White, adhere sentiment and strips of scrap DSP as shown (if desired). Adhere this to the inside of the card.
  10. Decorate your envelope as desired.
inside gate-fold card

If you would like to watch my live class on creating this card, click here to watch it on my Facebook Page.

Creating a gatefold card is a delightful paper crafting adventure, that will bring joy to both you and your cherished recipients. With a blend of artistic flair, you can design cards that leave a lasting impression. The gatefold style adds a surprising touch, making it a standout choice for your handmade creations.

Embrace your creativity, gather your supplies, and let the magic of paper crafting unfold with every gatefold card you create.

Until we meet again. . .

Judi's online store

Stamp Sale- save 15% ending soon!

Stamp Sale – save 15% ending soon! Running for 24- hours but you are about to miss it.

Stamp Sale - save 15% ending soon!

The Stamp Set Sale is ending in a few hours! Don’t miss out on saving 15% on the Stampin’ Up! stamp sets that you have been eyeing in the Stampin’ Up! 2023 – 2024 Annual Catalog.

Take advantage of Bonus Days too!! You will also be able to receive a $5 coupon for every $50 you purchase. These coupons are spendable in the month of August.

You only have a few more hours to take advantage of combining both these specials!

Shop Online HERE. We have a category in the online store titled “Stamp Sale” that lists every stamp set that qualifies for the 15% discount during this promotion.

Until we meet again. .

Judi's online store

Save 15% on Stamp Sets in the 2023-23 Annual Catalog!

Save 15% on Stamp Sets for 24 Hours!

Do you find yourself staring at multiple stamp sets from the 2023–2024 Annual Catalog and can’t decide which ones to get? You don’t have to stare anymore! Today, July 19th 2023, you can get those stamp sets you’ve been wanting at a 15% discount! But you will have to act fast. This lightning deal lasts for one day only. So make sure you are ready to shop ‘til you drop! This is definitely a deal you don’t want to miss out on. 

*Please note that this sale does exclude host stamp sets.

Save 15% on Stamp Sets from Stampin' Up!

OR simply click the above image to be directed to my Online Store!

Save 15% on Stamp Sets without any limits!

  • Shop Online
  • You don’t have to have a discount code
  • Stamps will be discounted automatically
  • Look for the category in the online store titled “Stamp Sale” that lists every stamp set that qualifies for the 15% discount during this promotion.
  • There is no limit to how many stamp sets you can purchase
  • How easy is that?

Don’t forget it is also BONUS DAYS!

Bonus Days

Not only do you save 15% on Stamp Sets BUT you also earn a $5.00 coupon for every $50.00 you spend! Collect as many coupons as you wish and then spend them in August!

Which stamp sets will you choose??

Until we meet again. . .

Judi's online store

Life is Sweeter with You, celebrating National Ice Cream Day

Life is Sweeter with You: I am indulging in a Delightful Card Adventure today! Life’s sweetest moments are like a scoop of ice cream on a sunny day—simply delicious! And what better way to capture that joy than with a card that will bring a smile to anyone’s face? I will be sharing a cute, sweet card today. Picture Bubble Bath cardstock base with a dash of Hello Irresistible Designer Series Paper. A scrumptious ice cream cone made from Pecan Pie cardstock and scoops in Lemon Lolly, Parakeet Party, and Flirty Flamingo. I’ll dive into this delectable adventure and spread some laughter and love along the way!

Before we get started, make sure you have all the necessary supplies on hand. Grab a Bubble Bath cardstock base (4 ¼ x 11), a strip of Hello Irresistible Designer Series Paper (1 ½ x 5 ¼). Some Pecan Pie cardstock for the cone (don’t worry, it’s calorie-free!). Cardstock scraps in Lemon Lolly, Parakeet Party, and Flirty Flamingo for the ice cream scoops. Oh, and don’t forget some favorite snacks to keep energy levels high! I prefer anything chocolate.

Hello Irresistable DSP
Hello, Irresistable DSP Images Copyright Stampin’ Up! (registered) 1990-2023
Share A Milkshake stamp set
Share A Milkshake Dies

Purchase your supplies through My Online Store Here!

Fold the Bubble Bath cardstock in half (5 ½). This will be the foundation of the card. Don’t forget to gather your crafting crew (be it human or furry) for some extra fun and laughter along the way!

Take the strip of Hello Irresistible DSP and adhere it along the left edge of your card base. It’s like adding a burst of confetti to a celebration. I love this dot & line pattern with the subtle water colored background.

Life is sweeter with You especially when it includes ice cream!

Now comes the fun part—stacking those scoops of yumminess on top of the cone! Cut out the largest ice cream scoop die from the Lemon Lolly, Parakeet Party, and Flirty Flamingo cardstock. I find using a Blending Brush, add a bit of the same color around the edges of these scoops adds a bit of dimension. Next, arrange them like a colorful tower of temptation. It’s like a game of Jenga, but way tastier! Attach the ice cream cone to your card front at an angle. Next, I added the scoops, one at a time. I tucked the first scoop so it seems to be dripping from the cone.

I am going to sprinkle Some Magic to the card.  Adding some extra pizzazz and sparkle with some self-adhesive sequins. Go wild and let your creativity run free, just like sprinkles on an ice cream sundae—there’s no such thing as too much! Next, stamp the sentiment onto some Basic White in Memento Black and fussy cut it. Add this to the lower right corner of the card front.

Life iss Sweeter with You Share A Milkshake stamp set

Carrying the theme to the inside, I stamped the sentiment, adding a cherry for some whimsy.

Life is a grand adventure filled with laughter, sweetness, and the joy of shared moments. This whimsical card with an irresistible ice cream cone, you’re guaranteed to spread smiles wherever you go.

Until we meet again. . .

Judi's online store

Celebrate the 4th of July with Star-Stenciled Delight

Celebrate the 4th of July by creating a card with the Beautiful Balloons Bundle.

Get ready to add a burst of patriotism to your crafting projects with the Beautiful Balloons Bundle. This versatile bundle allows you to create stunning designs perfect for celebrating the 4th of July. I’ll dive into the creative possibilities, sharing how to use the star dies as stencils.

One of the key elements of this bundle is the star dies. These dies not only cut out beautiful star shapes but can also be used as stencils. Simply place the star die on your cardstock. Using a Blending Brush to brush ink over it. Creating a stunning starry background on your card base. The result is a festive and eye-catching design that adds an extra touch of patriotism to your creations.

For a truly patriotic look, consider incorporating other elements. I added a strip of Brights DSP (Designer Series Paper) in vibrant red, & white stripes & a circle with blue stars. This adds a playful and colorful dimension to your projects. Pair it with an Azure Afternoon card base, and you’ll have a fantastic canvas for your star-stenciled creations.

Celebrating the 4th of July

Celebrate the 4th of July by creating a variety of projects.

The Beautiful Balloons Bundle is a must-have when creating 4th of July greeting cards, party invitations, or patriotic-themed scrapbook layouts. Combine the star-stenciled backgrounds with the balloon stamps and coordinating dies from the bundle to create a fun project. Balloons can be stamped in shades of red, white, and blue. Adorning them with glitter or metallic accents for an extra touch of sparkle.

The 4th of July is a time to honor and celebrate the independence and spirit of our nation. It’s a time for fireworks, barbecues, and gathering with loved ones. What better way to express your patriotic pride than through the art of paper crafting? Let the Beautiful Balloons Bundle be your creative companion as you commemorate this special day.

Fire up your creativity and embark on a crafting adventure with the Patriotic Beautiful Balloons Bundle. Celebrate the 4th of July in style. Show your love for your country with handmade cards and projects capturing the spirit of patriotism. Let the star-stenciled designs shine bright and inspire joy and appreciation for the land of the free and the home of the brave.

Until we meet again. . .

Judi's online store

A simple flap card with Hello Irresistable DSP

A Simple Flap Card showcasing the Beauty of Hello Irresistible DSP and Two-Tone Flora Stamp Set for today’s project. Opening the flap reveals the beautiful floral pattern.

 I love sharing a creative way to showcase my favorite patterned paper and stamp set. Look no further than this simple flap card design! I am sharing a twist to a traditional flap card. Guiding you through the process of creating a stunning flap card using the gorgeous Hello Irresistible DSP and the versatile Two-Tone Flora stamp set. Be sure to check out this card using the Two-Tone Flora stamp set! With a Starry Sky card base and a Calypso Coral DSP featuring a delicate white floral print, this card design is sure to capture attention and delight your recipients. Let’s dive in and discover how to bring this beautiful design to life.

Step 1: Starting by gathering the following materials:

A simple flap card with Hello Irresistable DSP and Two-Tone Flora

A simple flap card can be assembled as below:

Step 2: Preparing the Card Base Score the Starry Sky card base at 4 ¼  to create a traditional card fold. This will serve as the foundation for your flap card design.

Step 3: Adhere the DSP to the card front. This creates a beautiful contrast against the dark cardstock and adds visual interest to the design.

Step 4: Score the 2 ¾ x 3 ¾ Starry Sky at 1” along the 3 ¾ edge. You will have a 2 ¾ x 2 ¾ square. Cut this piece in half so you have 2 pieces that measure   1 3/8 x 4. Set aside.

Step 5: Using the Two-Tone Flora stamp set, stamp the floral image in Flirty Flamingo for both steps. Next, stamp the leaves in Starry Sky.

Step 6: Adhere the stamped piece of Basic White to the two flap strips. I left a 1/8” reveal on the top and bottom. You will have a space between the two flaps.

Step 7: Folding the score lines of the flaps and adhere to the inside of the card. Line up the score lines to the edge of the card.

Step 8: Next, decorate the 4 x 5 ¼ Basic White and adhere to the inside of the card.

Step 9: Adding any final touches you desire, such as the Basic Rhinestone Jewels as I did will complete your card.

A simple flap card design is an excellent way to highlight the beauty of patterned paper and stamp sets. Using the Simply Irresistible DSP and the Two-Tone Flora stamp set, you can create a stunning card. With a Starry Sky card base and a Flirty Flamingo DSP featuring a delicate white floral print. This combination is sure to captivate and impress others.

Until we meet again. . .

Judi's online store

Creativity Now An Online Event

Creativity Now An Online Event for Demonstrators. I attended this event this past Saturday experiencing the unveiling the Translucent Florals Bundle, seeing some sneak peeks, and product information.

Calling all creative souls! I’m thrilled to share the exciting news of the global event I attended this past weekend. THis event brought together demonstrators from around the world. This exclusive online event showcased the artistic possibilities of the Translucent Florals Bundle. I can’t wait to share a few of the projects we created during this inspiring gathering.

The Translucent Florals Bundle takes your crafting to a new level of elegance and sophistication. The bundle includes a versatile stamp set featuring delicate florals, graceful foliage, and heartfelt sentiments. Paired with coordinating dies, this bundle allows you to effortlessly create stunning, translucent floral designs that will wow your friends and family.

Creativity Now An Online Event

This is the first card I made. I chose to do the step-up versions of all three cards we created. With little changes I personalized all my cards. Don’t you just love how the vellum layer achieves so much dimension?

The next card also uses vellum with the coordinating dies. Again, I personalized it a bit.

Translucent Florals

Creativity Now An Online Event was more than stamping.

The Leegacy Room at the home office was updated and shared during the Creativity Now event. The Legacy Room is celebrating Stampin’ Up!’s 35 Year Anniversary. Learning about & seeing the behind the scenes of products throughout the years was a great reminder of how our products have grown.

But that’s not all! I’d like to offer you an exciting opportunity for you to join our team. As a demonstrator, you gain access to exclusive events like Creativity Now, where you can connect with fellow crafters, learn new techniques, and be the first to experience the latest products. You’ll receive ongoing support, training, and inspiration as we nurture your passion for creativity.

Joining our team means becoming part of a global crafting community that celebrates and shares their love for all things handmade. Whether you’re a seasoned crafter or just starting out, there’s a place for you in our team. As a demonstrator, you’ll have the chance to earn income doing what you love, enjoy product discounts, and have early access to new releases.

With only a few days left to get $155 in products for $99+ free business supplies + free shipping + all the fun being a part of our team + being able to attend Demonstrator- Only Events you don’t want to put off joining!!

So, why wait? Take your creativity to new heights by joining our team today. Be part of the excitement, inspiration, and joy that comes with being a demonstrator. Let’s unlock the artist within you and embark on a creative journey together. The Translucent Florals Bundle is a gateway to boundless creativity, and our team is here to support you every step of the way. Don’t miss out on this incredible opportunity to turn your passion into a fulfilling and rewarding journey. Email me today (at: judi@judisttamps.com )to learn more about joining our team and unlocking a world of creativity.

Until we meet again. . .

Judi's online store

Customizing your patterned paper

Customizing your patterned paper: Adding a Personal Touch to the Brights Paper Stack. We call pattern paper Desgner Series Paper. It is avaiable in both, 12″ x 12″ and 6″ x 6″ and are double sided.

Patterned paper is a beloved staple in the world of papercrafting. Why settle for the pre-designed patterns when you can customize them to suit your unique style? In this blog post, I’ll explore the art of personalizing patterned paper. I will be coloring in some of the dots from the Brights 6″ x 6″ paper stack using Stampin’ Blends. I’ll also incorporate the adorable turtle image from the Rainy Days stamp set as a focal point on a card. Get ready to unleash your creativity and make your patterned paper truly one-of-a-kind.

Selecting the Perfect Paper and Colors Start by choosing a sheet of patterned paper from the Brights paper stack that you would like to customize. Consider the colors and patterns that will complement your overall design. Once you’ve chosen the paper, select a set of Stampin’ Blends markers in colors that coordinate well with the patterns and your chosen focal point image. I’ve chosen the color pallette of; Daffodile Delight, Coastal Cabana, Parakeet Party, and Poppy Parade.

Customizing your patterned paper is simple and rewarding. Let’s get started!

Coloring in the Dots: Using the fine tip of the Stampin’ Blends markers, carefully color in some of the dots on the patterned paper. You can choose a random or specific pattern to follow, allowing your creativity to guide you. The smooth and blendable nature of the Stampin’ Blends markers ensures a seamless and professional finish.

Adding a Focal Point: To enhance the customized patterned paper, incorporate a focal point on your card using the adorable turtle image from the Rainy Days stamp set. Stamp the turtle onto a separate piece of cardstock using a water based ink like Memento Tuxedo Black. Color it using Stampin’ Blends markers. Stamp the sentiment in any of the colors you are using. I wanted to cover the flower with a sparkler. I used an image from the retired Lights Aglow stamp set. *You could just draw this image with your Stampin’ Write Marker if you want.

Customizing your pattern paper

Bringing It All Together Adhere the customized patterned paper to your card base, ensuring that the colored dots are showcased prominently. Position the colored turtle image on the card, allowing it to become the focal point. Embellish the card with coordinating Glossy Dots embellishments that enhances the overall design.

Customizing your patterned paper is a fantastic way to infuse your personal style and creativity into your papercrafting projects. Transform pre-designed patterns into uniquely tailored backgrounds. Incorporating a focal point, such as the adorable turtle image from the Rainy Days stamp set, adds charm and visual interest to your card. Remember to experiment with different patterns, colors, and images to create a variety of customized designs.

Get ready to make a statement with your customized patterned paper—no more generic designs, just pure creativity and artistry at your fingertips!

Check out this bright card using the Rainy Days stamp set here.

Until we meet again. . .

Judi's online store