Holiday All Day Stamp Camp Fun

All seats were filled at my All Day Holiday Stamp Camp last weekend! Attendees enjoyed learning new special folds, quick & cute holiday cards, gift packaging & tags.

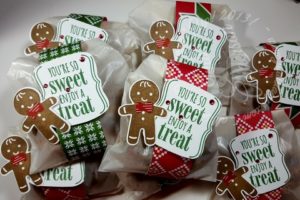
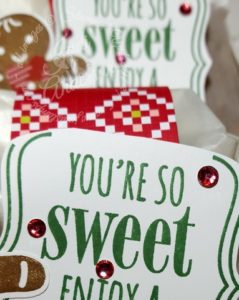
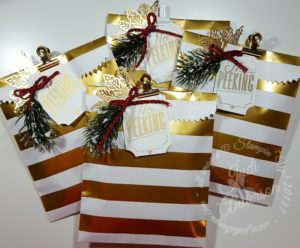
I wanted to share more gifting ideas so each person had an assortment of 3 gift bags filled with goodies (I showed one of them on Friday) setting at their seat when they arrived. Some of the treat bags were filled with products we would be using throughout the day with extras to take home to use to recreate the projects they learned plus more. ( I forgot to take pictures of the seating with the gifts). One held goodies to snack on throughout the day.  I shared that cute & quick treat bag Yesterday.

If you have ever attended one of my All Day Stamp Camps you know that I ask if there is anything you are wanting to learn to do. I try to bring you at least one requested project if possible. Eileen requested to learn how to make a tunnel card while at my last stamp camp so it was our second project of the day. She saw a video that Liz Yuille (an U.K. demonstrator) shared but she was having trouble recreating it.  I taught them some of my tips and tricks on putting this type of card together and gave them ideas on how to use stamps they already owned to make more of these on their own. Eileen said my tips were very helpful and she felt she could now make it on her own.

Here are a few photos of the day.

Here’s Lynndee showing her support for Stampin’ Up! by turning her Dutch Letter into SU!

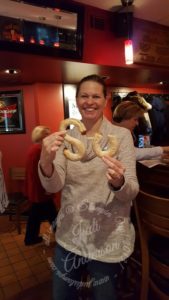
Have you ever had a Dutch letter pastry? They are WONDERFUL!! They are a light pastry with an almond filling.

These tables are hard at work!

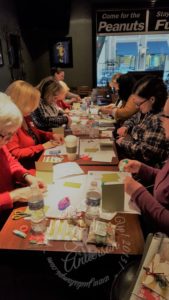
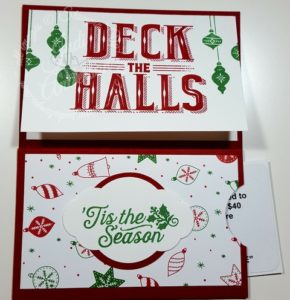
Gift Card holders are always welcome this time of year! I overheard several say they will be making this one again!

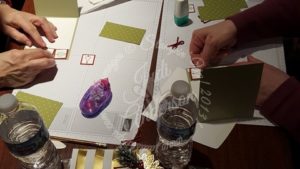
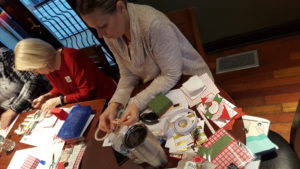
Gail is making sure her gift box goes together smoothly.

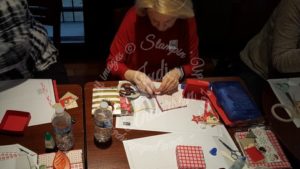
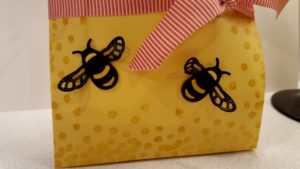
It was fun to see how adorable all the boxes were with the different Designer Series Papers. They were able to choose their own patterns from the goodie bag they received.

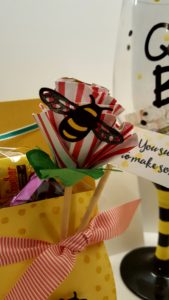
Lynndee is making her tag using the Felt Stitched Shapes that were in another goodie bag. Add some more Designer Series Paper, a silver foil doily and some punched trim and you have an adorable gift tag to add to the gift box they just made.

Lots of laughing and chatting as they decided what they were going to purchase over dessert. Everyone who purchased got to choose a wrapped gift under the ornament tree.

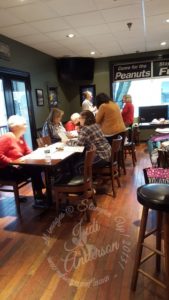
I’d like to give a big Thank You to Peanuts Bar & Grill for letting us spend the day stamping, learning & laughing the day away.

Watch for my next big event, My Weekend Getaway, coming February 2,3 &4!  We’d love to have you join us for some stamping & crafting fun. We even have tables for those who love to scrapbook to join us.

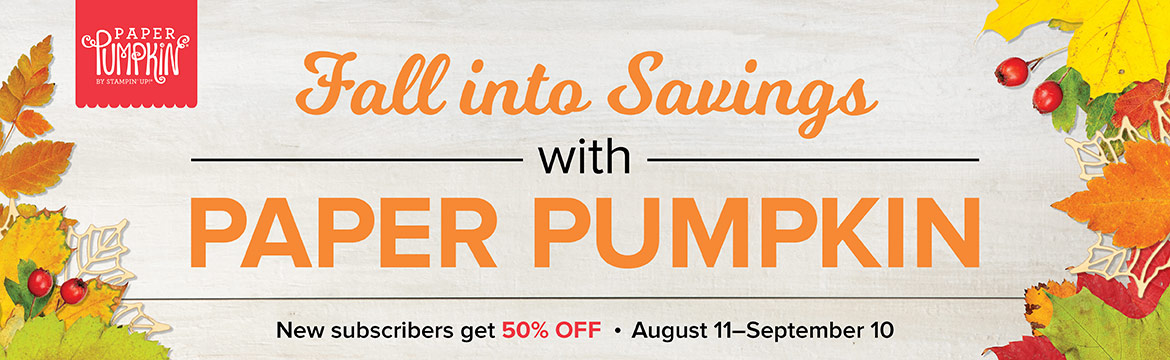
Have you checked out the Online Extravaganza? Save 10%, 20%, & 30% on select items through November 26th.

Be sure to

            & receive a Special Gift from me!!

Let me help you ease the stress of the upcoming holidays~ classes coming in December. Check My Calendar of Events, RSVP & lets create together !


buy Stampin Up! here!

You’re So Sweet Enjoy A Treat, Gift Bag

“You’re So Sweet Enjoy a Treat” is the perfect verse to add to homemade goodies packaging this holiday season. (I use it year round!) This verse is found in the You’re So Sweet Sweet Stamp set (W#138682(C#139440).  I paired it with the Cookie Cutter Christmas Stamp Set (P#142043) to make these treats for attendees at my Holiday Stamp Camp last weekend.

You enjoyed the assortment of gift packaging we brought you in The Stampers Dozen Blog Hop this month that I thought I would share this quick and cute idea also. Did you miss the post?   You can view it here.

Click this link to check out the Online Extravaganza. Save 10%, 20%, & 30% on select items through November 26th.

Be sure to

  • purchase through My Online Store   ,
  • use Hostess Code ~ FTYTZ4WM
  • Did you hear? We will be having a one-day only sale on Monday, November 27th. Watch for details this coming weekend.

            all orders will  receive a Special Gift from me!!

Let me help you ease the stress of the upcoming holidays~ classes coming in December. Check My Calendar of Events, RSVP & lets create together !

I wanted to give the gals a little treat that they could enjoy as needed throughout the stamp camp, chocolate chip cookies, they’re crunchy and have chocolate!

I filled the bags with the cookies, folded over the top and held it closed with a belly band made from assorted patterns of our Quilted Christmas 6×6 Designer Series Stack.

Next came stamping the gingerbread man in Soft Suede on Whisper White cardstock and punching them out using the coordinating Cookie Cutter Builder Punch (#140396). The tie is punched  from one of the patterns in the same paper Stack. Next I stamped the verse using Garden Green ink and fussy cut around it.

The final touch was coloring the medium and large sizes of Basic Rhinestone Jewels using the new Light Cherry Cobbler Blend. Who doesn’t love a little bling with chocolate??

As you can see, these are another quick & cute gift idea for the upcoming holidays. I will be making some to hand out to neighbors, friends and those that need a little cheer as I am shopping these next few weeks. The ones I hand out to strangers will have assorted pre-packaged goodies in them.

I urge you to take some time to make up some little “gifts of cheer” to give while you are out and about because everyone loves to enjoy a sweet treat!


buy Stampin Up! here!

Gift Packaging for the Holidays, Stampers by the Dozen November Blog Hop

The holidays will be upon us before we know it so we have chosen Gift Packaging for the Holidays for the November Theme in this months’ Stampers By The Dozen Blog Hop. I make many home made gifts and I love wrapping them in beautiful hand made packaging to make them extra special, don’t you?


Our Striped Treat Bags (#144255) help make your gift packaging come together quickly while making those smaller gifts feel special. I used Versamark Ink and Gold Embossing powder to emboss the “No Peeking” from our Merry Little Labels stamp set.


I dipped the tips of our Green Sprigs (#144627) into our Embossing Paste (#141979) to look like snow. Add a 1/4 Foil Snowflake, and a bow made from our Red Tinsel Trim (#144636) and you’ve almost got your packaging finished. I attached the foil Snowflake & Green Sprig onto the tag with a staple, the bow with a glue dot & put the gift inside, folded over the top of the bag and clipped the tag on using one of our Gold Library Clips (#144130).


Just imagine these sitting on a table, with greenery and white lights, ready to give to friends as they stop by during the holidays!


How about making the gift everyone wants a little extra special this year? This is a quick Gift Card holder and card in one! You could give a gift card in the simple,plain folder you can get with it at the store but why not make it special? 
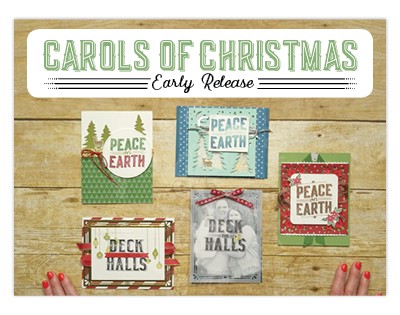
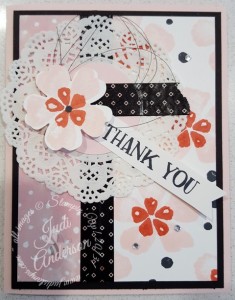
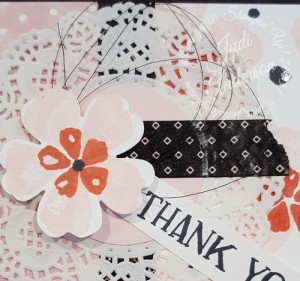
I used the Carols of Christmas stamp set (#144804) and our Be Merry Designer Series Paper (#144111). The colors of ink are Cherry Cobbler & Garden Green with Cherry Cobbler cardstock as the card base.


I will be sharing a video on how to make this holder Tuesday so be sure to come back to see how you can make these and have them ready to fill. I know your friends and family will be in awe when they see all your hand made gift packaging under your tree this year!

Be sure to check out Susan’s project!

  1. Rachel Pine
  2. Karie Beglau
  3. Judi Anderson  (you are here)
  4. Susan Simpson
  5. Tricia Butts
  6. Lyndsay LaRae Carara
  7. Courtenay Heuston
  8. Tashana Lundy
  9. Carly Middleton
  10. Sharleen Luciano
  11. Vicky Thompson
  12. Anastasia Radloff

Don’t forget our Online Extravaganza begins on November 2oth! Click the image above to check out the list.

Use Hostess Code #FTYTZ4WM when placing your order and you will receive a hand made card from me along with a special gift.

buy Stampin Up! here!

Almost time to reserve your Stamparatus!

It’s almost time to reserve your Stamparatus!

When: 2:00 PM Mountain Time

Where: Click Here for my Online Store

LOG Into YOUR Online ACCOUNT


When you log in you should see a link/banner that will say, “Reserve your Stamparatus” .  Fill out the form. You will be notified via emailwhen you may go back into your account to place the order (around February 1, 2018).


PLEASE let me know you have reserved a Stamparatus (the only way I will know) so I can keep you informed. Before it’s time to order, I will send you the Hostess Code, to use, so you can:

  1. Receive my special gift

  2. Receive the link to my FREE, Exclusive online class with project ideas using the Stamparatus

    . . . just for ordering it through me!

Don’t forget, if you log in before 2:00PM Mountain Time you will have to refresh/ log out and log back in before you will be able to reserve it. 

I am as excited as you are to receive the Stamparatus and change the we stamp!!!

buy Stampin Up! here!

Stamparatus, the tool you’ve been waiting for!

Stamparatus, positioning tool

I am happy to let you know that I am one of 2000 Stampin’ Up! demonstrators that helped to design the Stamparatus, the tool you’ve been waiting for! As part of the LDL Team, we are sworn not to share anything we work on or hear about. Believe me, it was hard not to be able to tell you about the Stamparatus these past 4 years. Yes, it took 4 years to design & test this amazing positioning tool. We wanted to get it right and to give you the best on the market. I. like you have watched and wanted to get a positioning tool but am so happy I held out, you will ABSOLUTELY LOVE it!! I am loving the unique “hinge stamping” technique you can accomplish on it. Watch the video below to see how you can position 4 different stamps at one time!!!!

Now that you’ve watched the video, leave me a comment below to let me know what you think.

Here is the information on how you can reserve yours so you can be one of the first to use the Stamparatus.

With the launch of this tool, we’re trying something different: testing a new reservation system. It acts like a true preorder: you reserve your spot and we guarantee shipment as soon as the product arrives in our warehouse. Demonstrators and customers will place reservations and receive their product at the same time. This system will allow us to get the product to market as soon as possible while avoiding backorders and efficiently managing inventory.

  • Reservation quantities are while supplies last.
  • Limit is 1 tool per customer per reservation window.
  • Customers may participate in multiple reservation windows (order 1 per window).
  • In order to reserve your Stamparatus, you are required to provide your credit card information.
  • Credit cards will not be charged until the Stamparatus ships from our facility. When you close your order, be sure to verify that your credit card and shipping information is correct.
  • Reservation Windows Available to Ship
    November 16–30, 2017 Approx. February 1, 2018
    December 5–30, 2017 Approx. March 19, 2018
    January 15–30, 2018 Approx. April 15, 2018

I will be posting details on how to reserve your on November 15th, the day before the reservation period begins! (It will not work until the 16th)

Be sure to leave a comment below and let me know if you are as excited as I am!

buy Stampin Up! here!


What do you do with your leftovers?

You are cleaning your work craft space and you find leftovers. These are pieces that you cut for projects but didn’t use. What do you do with them? You have several choices; First, you could separate all the cardstock and put the pieces with your scraps. You could try to figure out what your original project looked like and duplicate them to help fill your stash of cards. You could throw them away- oh no! Don’t do that! Or, you could do what I did, take the pieces and create cards with new sets giving these leftovers  new life.

Over the next few days I will share some ideas that I come up with using leftover pieces I have found when cleaning out my stamp studio yesterday. I will have extra project pieces from my classes and events so I stick them into a leftover bin. As you could imagine, this bin is currently spilling over the sides of the bin. Time to decide what to do with these pieces!

Before I continue, are you on my V.I.P. mailing list? If not, you’re going to want to sign up today because I have begun my 12 Weeks of Christmas projects emails. Don’t let the holidays sneak up on you! I will help you prepare for them by sending you card, gift, gift tags & packaging ideas over the next 12 weeks. Just sign up by clicking “Join my Publication VIP List” in the left hand column.

SALE! Buy 3 Get 1 FREE select Designer Series Papers through October 31,2017! Check them out here!

Now, onto the projects. . . . This first group of leftovers were found together in envelopes making it easier to put the cards together. The Whisper White layer had already been embossed using our stars embossing folder. The Real Red, Daffodil Delight, and Bermuda Bay stars, and Whisper White label had been pre-punched. The Real Red label had also been cut out using the Chalk Talk Framelits. Many of the items used for this card were recently retired from our 2016-2017 Annual Catalog. My memory recalled (somewhat) what the original card looked like so all I had to do was choose a stamp set or two to finish the card. My choice(s)?

Bella & Friends was my first go-to set. I quickly water colored the pup using Crumb Cake, Real Red & Bermuda Bay inks and my Aqua Painter. I decided to make two cards with this cute guy.

Bella & Friends

Pretty Kitty was my second choice. I couldn’t leave out my cat lovers! She is colored using Smokey Slate, Pink Pirouette & Real Red inks and Aqua Painter.

The boat from the Swirly Scribbles stamp set fit just right onto the label. I just love the solid, bold images of this two step stamp.  This card lends itself to any occasions, birthday, baby, congratulations, way to go, to name a few.

I finished the cards up and started digging into my next group of leftovers when I found my original card!

I guess this old gals memory isn’t too bad, I was pretty much on mark with duplicating it, don’t you think? These cards came together quickly, after all, it was all cut, punched, and embossed for me!

Do you have leftover pieces that you need to clear out? I challenge you to take those pieces and create a card or two from them. I am sure you will be surprised at what you come up with when using up your leftovers.

buy Stampin Up! here!


Painted Harvest Card in non-traditional colors

This Painted Harvest card is made in a color combination that is non-traditional to sunflowers. The Painted Harvest Bundle was my Stamp of The Month which means I featured projects using it in all my classes this month. I held several 3/$10 Card Classes on the Road along with the 5/$20 classes in my studio All cards used the Painted Harvest stamp set showing its versatility. I included at least one project from this bundle in my Birthday 6/$25, Framed Art Sampler, and Hostess Clubs.

I wasn’t sure how this particular card would be received because of the color combination of Bermuda Bay, Dapper Denim, & Soft Sky. Not that the combination isn’t a great one, just that you probably wouldn’t think of using it with this particular set.

I was jumping for joy & happy to let you know that everyone LOVED it!! WOO! HOO!

What do you think?

It’s gorgeous isn’t it?

Here is a close up of the flower

My customers also love to (as they say), “Learn what the heck to do with washi tape.” This card will help you use up those smaller pieces left on the roll. Don’t worry about cutting the ends, just tear them for this look!

I probably could have used this card for our SBTD Blog Hop this past weekend but wanted to share it with those taking my classes. ( I was actually nervous on what people would think of the color combination). If you missed our Hop you can check it out here.

This is what you get when you purchase the Painted Harvest Bundle.


The gorgeous Painted Harvest stamp set that includes a variety of 13 photopolymer stamps that feature the 2-Step Style.

The NEW Leaf Punch.

AND you save 10% when you order the bundle using #146021 !


Don’t forget to use this month’s HOSTESS CODE: PVJUKP6V    When your order is *$40 or more you will receive my Exclusive Card Kit. If your order is over $150.00 please don’t use the Hostess Code because you earn Hostess Dollars!!

*Total before Tax & Shipping.

The otherr products in the Painted Autumn Suite can be found on page 49 of the Holiday Catalog. Don’t miss out on these, they will make your creations look so professional without much work. The Painted Harvest Bundle is a must-have for your fall projects. (You will be able to use them into the spring and summer too!!)

buy Stampin Up! here!

At Home with You Bundle SBTD Hop 9/2017

The At Home with You and Colorful Seasons Bundles were shouting my name as the morning air is crisp and and the fall colors are beginning to show earlier than normal this year. I felt these bundles were perfect for this month’s SBTD Blog Hop Theme, Leaves and Trees. We are 12 Stampin’ Up! Demonstrators from around the world bringing you assorted projects each month. Be sure to read all the way to the bottom of this post to watch a video about the At Home With You Bundle!

At Home with You Bundle #145351
Colorful Seasons Bundle #145348


My card base is Very Vanilla cut to 5 1/4″ x 8″ and then scored at 4″. I used the leaves from the Colorful Seasons stamp set to create a background paper for the 1 3/4″ x 5 1/4″ paper strip. The colors I used for the leaves are Pumpkin Pie, Old Olive and Crushed Curry and Early Espresso for the veins. I backed this strip with a piece of 2″ x 5 1/4″ Early Espresso cardstock.

I felt the card needed more texture so I added the splatter image from Swirly Bird in Crushed Curry along the tip edge of the card and opposite corners of the image mat. The bouquet of sunflowers in the bucket from the At Home with You Bundle was my inspiration for my card and make the perfect focal point. Sunflowers are my favorite fall flower and I continued the color theme when water coloring them. The bucket is colored using Crumb Cake for the bucket and Smokey Slate for the metal rings. I added a bit of sparkle by adding Clear Wink of Stella to the rings. I then cut the image out using the Seasonal Layer Thinlit Dies, gotta love thilits! I then popped the image up with our new Mini Stampin’ Dimensionals.

I felt the image needed grounding so I cut a branch from Early Espresso by using the die from the Colorful Seasons Bundle. The Pumpkin Pie and Old Olive 1/4″ Stitch Ribbon are a perfect touch.

The verse I chose is also one from the Colorful Seasons stamp set however, the At Home with You set also has verses that could be used for this card that can be used for an assortment of fall occasions.

Now to see what Susan has created for you this month!

Rachel Pine

Karie Beglau

Judi Anderson – You are here!

Susan Simpson

Tricia Butts

Lyndsay LaRae Carara

Courtenay Heuston

Tashana Lundy

Carly Middleton

Sharleen Luciano

Vicky Thompson

Anastasia Radloff

I though you might enjoy this video Stampin’ Up! made showing you all about the At Home with You Bundle.


Be sure to use this month’s HOSTESS CODE (PVJUKP6V)! You will receive my exclusive Card Kit FREE with a $40.00 minimum order when you do!!

buy Stampin Up! here!

Deals, Clearance Rack, Paper Pumpkin & more!

Everyone likes deals & to save on their paper crafting supplies so I wanted to take today to remind you of all the specials that are currently going on including The Clearance Rack, & Paper Pumpkin. 

Be sure to use this HOSTESS CODE :36DPXGFF

WHY? Because when you place an order of $40 or more I will send you one of my Card Kits. AND when you use a Hostess Code 6 months in a row and have $300 in purchases (not including tax & shipping) I will give you a FREE item valued at $25.00 or less! BUT you must use the hostess code each time.

A new season is almost here, and that means it’s time for some change. What else does it mean? New Clearance Rack deals!Visit My online store  now and save up to 60% on select products. These deals won’t last forever though, so fill up your shopping bag before supplies run out!

Have you remembered  to use your Bonus Day Coupons? You earned a $5.00 coupon for every $50.00 you spent in July. Don’t forget they expire on August 31st. If you don’t know your Coupon Code give me a call and I will get it for you.

Just click the above photo to sign up today!

The Carols of Christmas Early Release Bundle is very popular! You will be able to get a jump on your holiday cards by purchasing it before it’s official release on September 1.

Item Description USD  
146036 Carols of Christmas Bundle (wood-mount) $52.00  
146037 Carols of Christmas Bundle (clear-mount) $45.00  
144674 Card Front Builder Thinlits Dies $30.00  
144801 Carols of Christmas Stamp Set (wood-mount) $28.00  
144804 Carols of Christmas Stamp Set (clear-mount) $20.00  
 

We have made it easy to get started on your fall & holiday projects by bringing you these fabulous deals on Paper Pumpkin, the clearance rack, and your earned bonus days coupons,  in addition to our early release Carols of Christmas Bundle.

buy Stampin Up! here!

Bumble Bee Pouch

I just loved creating this Bumble Bee Pouch with the paper flower last week in my Facebook Live class. Using the Dragonfly Dreams Bundle (#144728) paired with the Fruit Stand Designer Series Paper (141660) creates a cheery pouch that is sure to put a smile on the face of the person who receives it.

The pouch is created using Daffodil Delight cardstock (119683). Wanting to add a pattern without distracting from the 3-D bees, I stamped the bees on the back of the pouch in Crushed Curry (131173). I also added the scattered dot image around the edges of the pouch front.

This image also shows the details of the hand made flower.

Adding the 2 circles from the Owl Builder punch (118074) to the back of the bees make a quick and easy way to add color to the bee bodies. I also added a bit of shimmer to the Bumble Bee Pouch by adding Wink of Stella (141897) to the bee’s wings.You can also see the scattered dots details in this picture.

Added a bee to this flower to add a fun accent. I wrapped the Bumble Bee Pouch with 5/8″ Mini Striped Watermelon Wonder Ribbon (141433). To purchase the products I used visit my ONLINE STORE HERE.

Want to see how I create this & other projects live? Be sure to go to

http://www.facebook.com/judistamps and click “LIKE”  & be sure to follow me. You will get an alert each time I do a live class.

I will be doing my next class at 3:00 PM central time today!

Do you want to always save on your Stampin’ Up! supplies?

Join my TEAM HERE & you not only get $125.00 in product for $99, but you will receive an additional 2 stamp sets when you join before March 31, 2017. I will even send everyone who joins my TEAM during this special, one of these adorable Bumble Bee Pouches filled with goodies!

Click here to JOIN The Fun TODAY! 

Creating all the elements and accents on this Bumble Bee Pouch was so much fun! I hope you enjoyed it.

                              Til we meet again,

buy Stampin Up! here!


Last Day- buy 3 get 1 free!

I just want to remind everyone that today is the last day to buy 3 packages of Designer Series Paper (priced at $11.00 each) and get one free!

Our Designer Series Papers are double-sided to give you twice as many choices. This sale does not include our Specialty Designer Series Papers or our Paper Stacks. Head on over to MY SPECIALS PAGE to view all your choices.

Happy Halloween!

             Til we meet again,

                  HapBEE Stamping!

                                Judi

Thank you Fresh Fruit

I came up with this card while prepping for my Facebook Live Event that was supposed to happen last night. Like many others, I experienced technical difficulties, my phone would not / could not connect! After many attempts I had to abort the event for last night.

Now you all know that I am not the most technical person but I won’t give up! Got up this morning and after several more attempts my phone still would not connect so I could do a live event, even standing right next to the router!! I had to take a break to enjoy some time with my friends in my product of the month class.

We had a fun time in class and it was just the break I needed! I decided it was a phone problem and not an internet so I started digging into my phone ( Galaxy 6) I mean what is the worse thing that would happen? I would have to take a trip to the phone store for them to get it up and running because I did something I shouldn’t? Wouldn’t be the first time and I am quite sure not the last.

I did it!

Sorry for the babbling, on to the card. . . .

Well, I came up with the start of the card and admittedly finished the design right there with everyone watching! I know, scarrrrrrrrrry! My motto is, ” It’s only paper.”

I created the card using the flower images from the Fresh Fruit stamp set, one of my new favorites! I chose Pink Pirouette, Watermelon Wonder, and Basic Black and added a Delicate White Doily (141701), Pop of Pink Washi Tape (141659) & Black Metallic Thread (141695) & a few Rhinestone Basic Jewels (119246).

Don’t you just love it?

Fresh Fruits Stampin' Up!

Here is the detail of the new Black Metallic Thread

fresh fruit Stampin' Up!detail

If you would like to watch the video on how to create this card do a search on Facebook for

Judi Stamps. Be sure to “LIKE” my page so you can get more project ideas & watch my next Facebook Live event next week!


Shop 24/7 for the products I used here at My Online Store

Til we meet again,

Judi's Stampin' Up! online store

Going Global Sneak Peek Project!

I thought I would share a Sneak Peek project using the Going Global Stamp Set with you today. Many of you are aware that you may begin ordering from our new 2016 Occasions Catalog tomorrow AND you can earn a FREE Sale A Bration item with each $50 you purchase! Sadly, this means that the End of Year Sale ends today. It is also the last day you can order product from our 2015 Holiday Catalog, I will miss many of those products. In fact, I stocked up on several of the consumables to begin creating some fun holiday goodies for next year.

Today marks the beginning of  new season of paper crafting for me. I look forward to our Occasions Catalog and spring ( well, spring won’t be here for a little while). I love creating projects for birthday’s during the month of January as well as some Valentine goodies. You would think that with all the cards I create, I would send birthday cards. I want to be honest here, my intentions are there, but I seem to forget to send them!! Yep, I have an entire box of birthday cards just waiting to be sent! This changes this year! I will get a system in place, during January, and send birthday cards all year. I didn’t put a birthday greeting inside this card yet, but I will when I put it into my January slot. I will be doing a more feminine version using a different color pallet but the design will be the same. My mission for today is to go through my Birthday Book and see how many masculine and how many feminine cards I need for this month. I will then create them, this week, and share the pile of cards with you on Friday.

Here is a video showing you how you can create your birthday cards for the month of January too! (Don’t forget, you can order these items beginning tomorrow, January 5,2016)

I will be sharing my monthly design with you right here, each month to help keep me on track!! I will be sharing my card for February next week to give you time to order the supplies and create your cards by the first of February. Are you up for the challenge? Let me know by leaving a comment below.

This is what I used for this card:

STAMPS:

Going Global Stamp Set (W-140745) (C-140748)

INKS:

Mossy Meadow (133645)

Delightful Dijon (138327)

Lost Lagoon (133644)

Memento Jet Black

PAPER:

Very Vanilla (101650)

Tip Top Taupe (138336)

Going Places Designer Series Paper Pack (140581)

Foil Sheets- Gold (132622)

ACCESSORIES:

Fast Fuse (129026)

Multipurpose Liquid Glue (110755)

Stampin’ Dimensionals (104430)

3/8” Satin Stitched Ribbon – Basic Black (138430)

Banner Triple Punch (138292)

Confetti Stars Border Punch (135861)

Label Bracket Punch (132153)

World Traveler Textured Impressions Folder (138289)


Til we meet again,

buy Stampin Up! here!


Project Life Halloween Page & Save 15% off stamps!

Scrapping Friends created this Halloween Page this month and I know they will be excited to learn they can get the stamp sets used to create it at 15% off this week! Each month, Scrapping Friends get together to create 2 layouts and 3 Birthday cards and I get to choose the themes! I ask them what they would like in the future and then I design the pages for them to make. Sometimes they copy me exactly but other times their creative minds run! ( I like it when that happens!). They all have young children so Birthday’s, Holiday’s and Sports layouts are always welcomed. This month I brought them 2 different Halloween layouts to make, in each they created 1 traditional 12×12 page & 1 Project Life by Stampin’ Up! page ( they love Project Life). Here is the Project Life page.

Project Life Halloween They loved combining the different elements to coordinate with their first page. We used the Happy Haunting Designer Series Paper, the Witches’ Night Stamp set, Happy Hauntings Washi Tape, Spider Web Doilies, Metallic Sequins in creating the page.

Spider Web shaker pocketWe used a small cello bag to create this Spider Web Shaker Pocket to fit into one of the 3 x 4 pockets. Don’t you just love it? Adds lots of bling to the layout!

Witches' Night stamp set imageHappy Huntings Designer Series Paper


Don’t you just love, love,love how this pattern from the Happy Hauntings Designer Series Paper coordinates with the Witches’ Night stamp set (#139708)? Look closely. . .  do you see that those crows are sitting on tombstones!

I actually created the coordinating page to this one on Periscope last week, did you see it? You will want to be sure to catch my scopes because I share other exclusive, fun projects on my scopes.  Be sure to go to my ONLINE STORE to purchase your stamps because. . . .

Did you hear the news?? You can purchase stamp sets at 15 % off this week!! Here are the details:

Header_15-Stamps_Demo_10.19.2015_NA

Details:

  • Dates: October 19-23, 2015
  • Host stamp sets, rotary stamps, and supply list stamp sets are not eligible for the 15 percent promotional discount on stamps.
  • Bundles are not eligible for this promotional discount, but they will retain their current 15 percent Bundle & Save discount. The stamp set from the bundle may still be purchased ala carte with the 15 percent promotional discount.
  • Stamps purchased using a 50 percent Stampin’ Rewards discount will not be available for this 15 percent promotional discount. Stamps purchased using Stampin’ Rewards discounts will still be 50 percent off retail value of the stamp set.
  • All order types qualify for this promotion.
  • There is no limit to how many discounted stamp sets can be placed on an order.
  • There is no minimum purchase required for this promotion.
  • Order Deadlines:
    • Phone: October 23, 2015 by 6:50 PM (MT).  CALL ME- 630-853-1908 to place your order
    • Online THROUGH MY STORE: October 23, 2015 by 11:55 PM (MT).  Use Hostess Code 99NBFXKD


I just can’t believe it-Stampin’ Up! has all stamps on sale for 15 percent off for just a few days. This rarely happens, so check it out and get your stamps ordered today! Everyone that uses the HOSTESS CODE    99NBFXKD  will be receiving a special surprise from me in their mailbox!!

Don’t forget about the host promotion happening this month, too. You can combine orders (or simply order $300 on your own) to achieve extra Stampin’ Rewards AND deals on stamp sets!  PLEASE don’t use the hostess code if you choose this option!!

Til we meet again,

buy Stampin Up! here!


Did you click on it? Questions about Periscope Answered.

I shared about my Periscope Button yesterday, did you click on it? I know several of you did!! If not, you will want to be sure to click on it at 1:30 each weekday to watch something new.

I have had some questions

about using Periscope, while I am in no means an expert I thought I would try to share a few simple items with you.

  • To get Periscope on your phone: go to play store, type in periscope, download FREE App, register by using your phone or Twitter account ( twitter is easiest I have found)
  • When watching on your phone;
  • To comment, click on the “say something” in the lower left corner and type in the box that pops up.
  • To let me know you like what I am sharing, tap in the lower right hand corner to give me love hearts.
  • To comment to someone else who comments just tap on their comment box, click reply when the next box pops up, type your reply and send.
  • If watching on your computer:
  • you can not comment or give hearts on the scope BUT
  • You can comment through Twitter

Why do I do these scopes? I have been asked over and over again to do live  workshops and shares online. I have tried Google Hang Outs but most had troubles figuring it out and I was spending more time explaining on how to get on than actually doing live events. Also, they were limited to the first 10 who joined so several of you were left out. I tried doing Facetime, but again too many obstacles and hoops to jump through. Periscope seems to be a good fit, easy to use, easy to get on, several of you cn get on. AND BEST OF ALL- you and I can talk with each other!! WOOO!!HOOO!!

SO why not give it a try and join me at 1:30 today?? Just click on the Periscope (judistamps) bar on the left at the end of all my social media buttons. It is blue when  I am not live and turn red when I am live. Remember if you click on it when it is blue it will bring you to my last scope within the past 24 hours.

As always, all materials shown can be purchased through my ONLINE STORE 24/7 !!

Til we meet again,

buy Stampin Up! here!