Animal Outing Birthday Card for theStamper by the Dozen June Hop

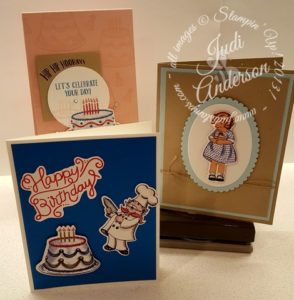
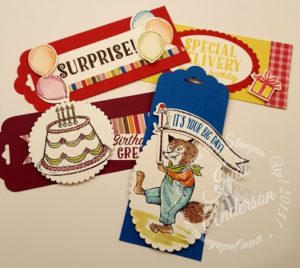
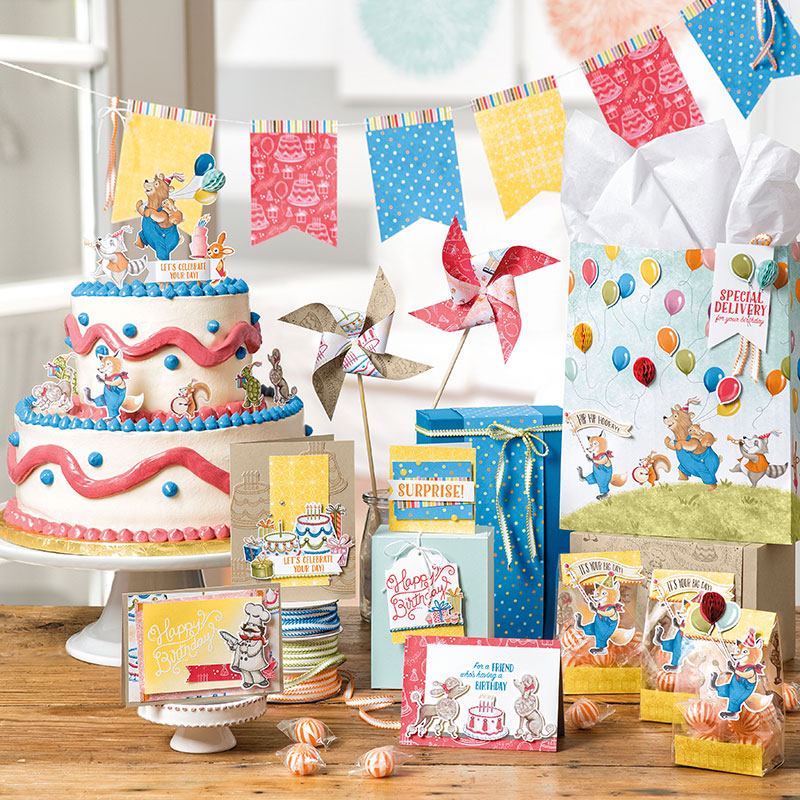
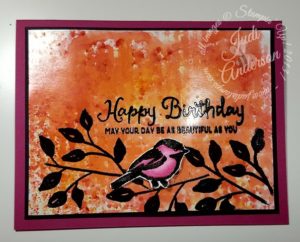
Children love visiting the zoo so what makes a better birthday card than the kangaroo from the Animal Outing stamp set? My granddaughter says,” I love to watch the kangaroos hop, but grandma,this kangaroo is so silly cause it has a koala in its pouch, not a baby kangaroo!”

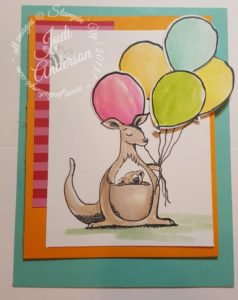
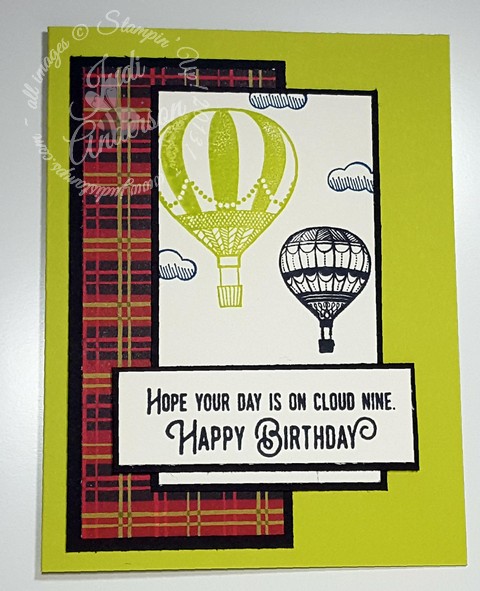
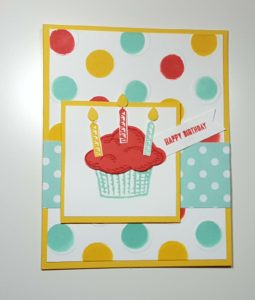
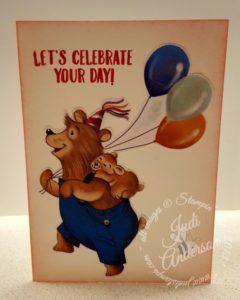
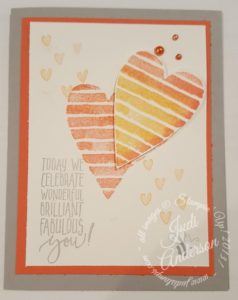
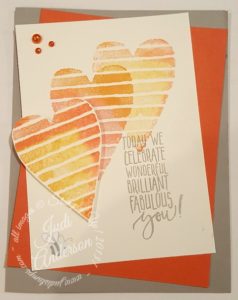
The balloons and the sentiment are from the Balloon Celebration stamp set and coordinate perfectly for this card. I water colored the balloons using my Aqua Painter and the following new colors added during our color refresh; Lovely Lipstick, Pineapple Punch, Mango Melody, Granny Apple Green, and Coastal Cabana. You are going to love using these colors on your projects to give them a bright and happy feeling.

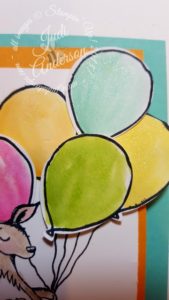
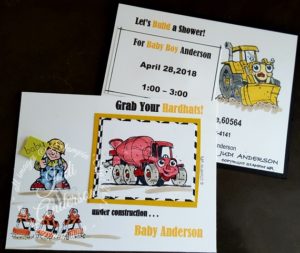
Surprise!! This isn’t a full size card. I added a 1 1/2 x 3 1/2 strip of 2018-2020 In-Color (Lovely Lipstick) 6×6 Designer Series Paper (1469630) to the upper left hand corner of the image mat. I then mounted the image onto a 3 1/4″ x 9″ piece of Mango Melody cardstock, and scored it at 4 1/2″. This is what created the mini card. I colored the balloons before punching them out using the Balloon Bouquet punch,. To create the illusion of them floating I adhered them using our Mini Stampin’ Dimensionals and SNAIL. See the Lovely Lipstick balloon? I stamped the head of the kangaroo and then cut around the head and ears to give the illusion that it is behind the kangaroo. I also added a touch of Wink of Stella to the balloons.

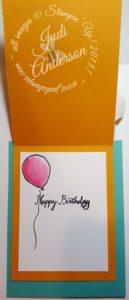
I added a 3 x 4 piece of Whisper White cardstock to the inside, stamped the sentiment and one more balloon was the finishing touch.

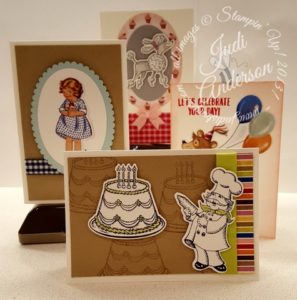
Are you thinking,” Judi, you didn’t get the layers on too even!” Nothing on this card is centered, which does drive me a bit wacky!! I love even, centered layouts but will change things up a bit just to throw myself off. When I do this I often find myself liking the uneveness. I do love this layout and the way the card turned out. You can’t help but smile when you see it!

Please visit Susan to see what she made this month!

Susan’s Creation

Have you received your copy of the NEW 2018-2019 Annual Catalog yet? If you aren’t currently working with another demonstrator and live in the USA, contact me (judi@judistamps.com)and I will send one your way!

buy Stampin Up! here!

Cowboy Boots for Dad for the SBTD Blog Hop

Our Stampers By The Dozen theme this month is Father’s Day so I chose cowboy boots from the Country Livin’ stamp set  for my dad themed  projects. This is one of my most used set for masculine cards, you can see the truck card that I previously shared here.

My father passed several years ago so I made this card to give to one of my two sons this Father’s Day. My other son will be receiving a card with the truck on it. The colors I used for this card are; Cajun Craze, Early espresso, and Very Vanilla for the cardstock. I used a retired embossing folder for the texture, I’m sure you have it!

Did you notice that the mats behind the boots don’t meet up? I think it adds a little more spunk to the card. The twine that I used is coming out in our new catalog on June 2nd, it’s Crumb Cake found in the .

In coloring the boots, I first water colored with my Aqua Pen and Crumb Cake ink and followed up with a bit of Cajun Craze for more of a leather look. I am sure my son is going to love this card.

Did you see that adorable nugget box I also made? It holds 2 Hershey Nuggets inside. In the close up you will notice I wrinkled the paper a bit to give it more of a leather look. Want to know how I made it?

Stamp 2 sets of boots using Memento Jet Black ink onto Crumb Cake cardstock. Cut 1 side of one of the pair of boots. Line up the second pair along this edge and continue cutting out both pairs at the same time. Next, take a piece of 2” x 4 ¼ crumb cake cardstock. Score it along both long ends at ½”. Score at1 ¾ & 2 ½. Fold on all score lines and clip the 1 ¾ & 2 ½ lines up to the ½ score lines on both sides. Use Tear & Tape to assemble and fill with 2 nuggets.

My granddaughter saw the boots filed with candy and wanted them to give to her dad. She told me she wouldn’t eat the candy until she gave them to him! I think I will make a few, tuck them in a small cello bag and give out to our waiter and other helpers on Father’s Day.

I hope you are enjoying this month’s Stampers By The Dozen Blog hop. You could even make your dad or children a few pairs of boots without breaking the bank this year!

Be sure to mosey on to  Susan’s Blog for another great project.

Here is the list of participants:

Karie Beglau

Judi Anderson 

Susan Simpson 

Tricia Butts 

Courtenay Heuston

Tashana Lundy

Carly Middleton

Sharleen Luciano

Vicky Thompson

Anastasia Radloff


Don’t forget to reserve your copy of the NEW 2018-2019 Annual Catalog today! If you are not currently working with another demonstrator I would be happy to send one your way. You will continue to receive catalogs, that’s the Holiday, Occasions & Sale A Bration catalogs, from me as long as you purchase $50 from me in the previous 6 months before they come out. How do you get it? Just send me an email at : judi@judistamps.com. * You must reside in the USA for this offer.

It’s not too late to get those must have retiring items they’re available while quantities last, through May 31st~  Just click here to shop now.


buy Stampin Up! here!

More Special Delivery projects

Today I’m sharing the rest of the projects in my Special Delivery Card Box. I shared the box and the note cards, here,  last week and had several of you want to see what else was in the box. I would like to remind you that all of my projects for this box and its contents were inspired by others.

These are the four assorted cards made by using the designer series paper and stamps.


I also made a variety of 4 different gift tags:

I scattered in a few chocolates and this made the perfect gift for a special friend.

Did you miss seeing the box and notecards? See them here!

The bundle includes:

The Birthday Delivery Stamp Set
* Suggested clear blocks (sold separately): a, b, c, d, g
Birthday Memories Designer Series Paper
* Each sheet is double-sided
* 12 sheets: 2 each of 6 double-sided designs.
* 12” x 12” (30.5 x 30.5 cm)
* Acid-free
* Lignin free
Birthday Friends Framelits Dies
* 10 dies
* Largest image: 3 x 2-3/8″” (7.6 x 6 cm)

Click on the photo below to purchase it through my online store today!

Don’t forget, this bundle is on our Last Chance List and won’t be available after May 31st.

buy Stampin Up! here!


Early Release~ Share What You Love Suite


How would you love to be able to purchase some of the new product coming in the 2018-2019 Stampin’ Up! Annual Catalog early? Beginning May 1-31 you will be able to purchase exclusive, special bundles that include the Share What You Love Suite early!!

As a demonstrator who attended On Stage in April, I was able to order my bundle early and have been creating wonderful samples with it. I will be featuring this suite along with current products in all my May Events. If you would love to make some fun projects with this suite check out my events and RSVP here.

Here is a video to show you these exclusive bundles only available through the early release special:

Don’t you just love it? I am so in love with the versatility of the stamp sets and am in love with the Designer Series paper that I am sure you will be too!!

Don’t forget in all the excitement of the early release to double check your wish list of the Last Chance Products. We have some wonderful products available in our Clearance Rack too!

Remember, you too can be creating with our exclusive early release Share What You Love Bundle when you order it May 1-31.

buy Stampin Up! here!

Birthday Delivery Bundle for the Stampers By The Dozen Blog Hop

I am sad to see the Birthday Delivery Bundle will not be available in the new 2081-2019 Annual Catalog, and is just one reason I chose it for our Stampers By The Dozen Blog Hop this month. I love all the coordinating products in this Birthday Memories Suite and have used most for my project.

I made this gift box and filled it with an assortment of 4 cards, 4 note cards and 4 gift tags. When I give it I will add some chocolate treats. The box has a window to give a peak of what’s inside and the balloon Honeycomb Embellishments add a fun touch to the corners of the window.

The assorted note cards are great for all ages and would be a great touch to any gift. My favorites to make were the poodle and the chef note cards. All of these note cards were inspired by an array of cards I have seen on social media and swaps I have received. I did change them up a bit, but don’t remember who inspired me, if one of these looks similar to a card you have made please let me know so I can give you credit.

The poodle, little girl and bear with balloons are all cut out from the Birthday Memories Designer Series Paper.

Now let’s go see which bundle Susan chose to use!

If you love making cards that are quick and simple to create I want to urge you to get

the Birthday Delivery Bundle that includes the Birthday Delivery stamp set, Birthday Memories Designer Series Paper, and the Birthday Friends Framelits Dies at a 10% savings!!

SHOP MY ONLINE STORE HERE

Don’t forget to check the CLEARANCE RACK!!

Spend a minimum of $40 and use Hostess Code : AYWMWVH4 and I will send you my exclusive April Card Kit!

Karie Beglau

Judi Anderson    You are here!

Susan Simpson 

Tricia Butts 

Lyndsay LaRae Carara

Courtenay Heuston

Tashana Lundy

Carly Middleton

Sharleen Luciano

Vicky Thompson

Anastasia Radloff

Deb Naylor

buy Stampin Up! here!


A free, live class and challenge each week!

How would you love a free, live class along with a challenge to help get your creative juices flowing each week? That’s exactly what you will get when you join my monthly Private Challenge Groups at Judi Anderson-Judi Stamps on Facebook!

We just finished our Easter Card theme for the month of March. It was so much fun seeing what everyone came up with using the same measurements as the weekly cards I shared in my live classes. During the live classes I teach you the tips and tricks I have learned by trial and error as well as my twists to techniques,layouts and more. I will then post a picture of the project with the measurements I used. You then get to go create your project using the same measurements with your own twists. Participants have found this is a great way to learn techniques and more. The fun doesn’t end when the month does, I encourage you to continue creating and sharing on the group. Each month I start up a new private group with a new theme, you may choose to join or if your schedule is busy the next month, you may skip a month. Would yo like to see one of the projects I did last month?

This is the final project of the month and uses the Beautiful You stamp set and I wanted to introduce our next months theme so a special fold. This is the focal point of the card, so simple and fun to make!

The image was colored using our water color pencils and an aqua painter. Group members learned how to make their images seem to pop off the paper in the live class.

I used the gate fold for the card and live class attendees got to help me choose which pattern of the Designer Series Paper was used.

Don’t forget:

Sale-A-Bration ends this Saturday, March 31st. Choose a FREE Sale-A-Bration item with a $50 purchase at my online store.

Receive a card kit from me when you place a minimum $40 order using this Hostess Code:  AYWMWVH4

Don’t forget to click on the Facebook icon in the left column and then look in our GROUPS and join in on our weekly live classes and challenges, we’d love to have you join us!

buy Stampin Up! here!

Black & White OR a Pop of Color

I had so many requests to hold a Black & White card class at one of my recent Bingo Events. I had shown a few cards I was currently making to send when someone asked,” Oh my gosh, those are beautiful, when is that class?”  Class? I hadn’t thought of one but I quickly answered, ” Look for it coming in April!” So my Black & White or a Pop of Color Class was born.

I am sharing one of the cards participants will be making that day as a Sneak Peek. I absolutely love, love,love this card. It is a card layout that is simple but you can make it as plain or elegant as you want just by changing out the papers and embellishments.

Ready?

Here it is!

The butterfly embellishment is the focal point of this card . Here is a little better view of it but it still doesn’t show its’ in-person beauty!

You still really can’t see how it glimmers, believe me, it is drop dead gorgeous!!

Don’t forget, March is ending so that means Sale-A-Bration is going away too. Next week is the final week to put in your orders to earn the FREE Sale-A-Bration items with qualifying purchases. Use Hostess Code: AYWMWVH4, spend a minimum $40 and I will send you March’s Card Kit. The first kits were mailed out today, the final kits will be mailed out on April 2nd.

If you’d live in the Chicago area, check out my Calendar of Events. If you are long distant, I will mail them to you!! As you can see, there is no reason to miss out on my Black & White OR A Pop Of Color, or any other classes!

buy Stampin Up! here!

Little Trucks Baby Shower Invitations

The retired stamp set, Little Trucks, is perfect for these baby shower invitations!  Grandbaby number 6 is due this coming July and we are preparing to have a baby shower for my daughter-in-law. she is having a boy, she has 3 girls ages 3,2,& 1 so all are excited for the appearance of a little brother. I am super excited because our current grandson will not have to play with only girls when they are all together.

My son said he would like the theme of the shower to be trucks & tractors so I went into my stash of retired stamps to get out “Little Trucks”. This set is perfect as it has several different tractors, trucks, a construction worker, and barricades which are all perfect for a little boy. I volunteered to do the invitations and party decorations and favors, all will be made from this stamp set.

I loved designing this invitation, but it did have it’s challenges.

You see, it takes me forever to design things on the computer and this task was no exception! I thought I had everything spaced correctly so I made copies on Whisper White cardstock and then stamped, & colored the images. Time to adhere the truck onto the fronts. Challenge #1! The words on 1/2 of them were too close to be able to put on the image. Solution: print out the words “Grab Your Hardhats” , trim and mount onto Basic Black and adhere where possible. SOLVED! See them towards the middle of the stack?

I chose this tractor for the back side of the invitation.

Isn’t it adorable? I used a combination of Stampin’ Write Markers and Stampin’ Blends(R) to color the images on the invitation.

Here’s a look at the rest of the back side. Can you spot my next challenge?

I didn’t discover this challenge until I had them all stamped,colored,assembled and putting the final detail on them.


Yep, it’s 2018 not 2017. I had two solutions for this one.

One was to change the 7 into an 8 and the other was to re-print the information and adhere it over the previous information. Both looked fine.

The final detail, and one of the benefits of making your own, was to cusomize the envelopes.

I will also be making a 2-page spread for the pictures from the shower.

If you are partaking in a shower, no matter what it is for, please consider making them yourself. There’s nothing like creating special things for the special people in your life. And, don’t forget to look at those stamps you haven’t used in a while like I did when creating these baby shower invitations from the Little Trucks stamp set.

buy Stampin Up! here!

February HOSTESS CODE: 7ZHTE4J4


More backgrounds with Brushos®

As promised, I am bringing you some more backgrounds with the Brushos® technique I shared in our SBTD Blog Hop on Saturday which you can check them out here.

WARNING: When trying this technique you may find yourself acting like a child experiencing finger painting for the first time! The giddiness (is that a word) & fun is addicting!!

These samples are from my students in my Brushos® class. They were told to use any color combination they wanted, and to sprinkle the Brushos®onto the Glossy Cardstock and spritz with water. They could then use the shelf liner that I provided in any way they wished to create their own background. All had fun and were amazed at the different looks each achieved by sing the same products! I enjoyed watching the fun, laughter, oooohh’s and aaaah’s coming from them. The excitement and fun was so addicting as each revealed their creation!

Here’s a look at them:

This was Cindy’s creation, she used all the colors, sprinkling the Brushos® a little bit heavier and then lightly spritzed with the water at a small angle. She waited for the water to dry a little bit and then laid the shelf liner on the top, dabbed,lightly,with a paper towel to absorb extra water and then lifted the shelf liner straight up. You don’t want to dab up too much water because you will be pulling up some of the crystals which lessens the intensity of the color.

Annalise used a lighter hand at sprinkling her Brushos®, spritzed with a very light hand straight over the top of her cardstock. She then laid the shelf liner directly over the wet cardstock and lifted straight up. Her result was more definition of the pattern from the shelf liner.

The next is Chris’s design. Chris decided to sprinkle her Brushos® with more of a rainbow effect rather than mixing the colors (red, blue, yellow) by sprinkling the colors in sections rather than over each other. She also spritzed a little heavier with water, and laid the shelf liner onto the water immediately allowing the water to spread more than Annalise’s. She also dabbed paper towel over the shelf liner a little to help absorb the water giving the color a lighter look.I love how the colors meld into each other creating a soft transition.

Debi achieved a totally different with hers. She decided not to dab hers with the shelf liner and instead of spritzing the crystals with long strokes she did small bursts of water, lightly over the top. I think it gave it a look of granite, don’t you?

Each person got to decide on their card base color, depending on what color they wanted to pull out of the background they created. I then showed them my sample ( the card from the hop plus a few more) and they chose from a few different stamp sets. *This is one of the perks of taking classes in my HapBEE Stamping Studio!

Want to see what they created?

Debbi’s had a shine on it so I took a single picture of hers.

It was hard getting good pictures because of the glare the Glossy Cardstock gives when taking pictures. I will be holding another class with Brushos® and other products so if you are interested in learning how to use this amazing product, contact me.

To purchase your Brushos® and other products used for these amazing cards be sure to head over to my online store by clicking the link in my signature.

So are you amazed with the different looks you can get by using the same products? Glossy cardstock, water and Brushos® Crystal Colour!

buy Stampin Up! here!HOSTESS CODE: 7ZHTE4J4

Brushos for backgrounds, the S.B.T.D. February Blog Hop

Brushos ®   are making a debut in our Stampin’ Up! Occasions Catalog and make creating backgrounds so much fun! I knew I had to share a fun background with you for our S.B.T.D. Blog Hop theme this month.

First of all, what are Brushos® ?

They are concentrated watercolor ink crystals that burst with color when you add water. They come in a package that includes 5 containers, 1 each of 5 colors: Brilliant Red, Gamboge (orange), Moss Green, Prussian Blue, Yellow . Each container contains  0.5 oz. (14 g) of colored crystals.

Now that you know what Brushos® are, let’s see what I have created for you!

I love the look that was achieved by using the Yellow, Gambroge, Brilliant Red Brushos® with Glossy White Cardstock and shelf paper to achieve the look. I sprinkled the Brushos® onto the glossy cardstock and then spritzed them with water using our Stampin’ Spritzers. I let the colors meld a little and then laid the shelf liner on top and let it set on there for about a minute. I loved the texture that was achieved. Here’s a closer look at the background:

Next I embossed the images using Black Embossing Powder. The bird was embossed onto Whisper White Cardstock and then colored with an Aqua Painter and Berry Burst ink. I used Stampin’ Dimansionals to adhere the bird to the card and then layered the Glossy White onto Basic Black and then onto a Berry Burst card base.

We played with backgrounds using this same technique in my Brushos® class tonight. You will want to be sure to come back on Monday when I will share what my students achieved with their take on this background using Brushos®!

See what Susan has in store for you here: 

I invite you to check out the projects from this month’s hoppers by clicking their links below.

Karie Beglau     

Judi Anderson  YOU ARE HERE!

Susan Simpson

Tricia Butts 

Lyndsay LaRae Carara  

Courtenay Heuston

Tashana Lundy 

Carly Middleton    

Sharleen Luciano     

Vicky Thompson 

Anastasia Radloff 

buy Stampin Up! here!


Heart Happiness for any occasion, SBTD January Blog Hop

You will find yourself reaching for the Heart Happiness stamp set (145769) for just about any occasion, that is why I chose it for this month’s Stampers By The Dozen Blog Hop. I always love it when the design of a stamp set lends itself to a variety of occasions without much effort on my part. How about you?

The Heart Happiness was on the top of my list when I looked through the newly released Occasions Catalog. I envisioned wedding, just for you, birthday, St. Patrick’s Day, butterflies, and, of coarse, Valentine cards when I first saw the images.  When I can see using a set more than one idea it’s a winner!  I will be sharing a few cards with this set today, none are Valentine cards!

This first card is one I taught at my Coffee and A Card Class I hold locally monthly. Attendees couldn’t believe the built-in texture to the striped image. When stamping it in one color, it automatically gives you different depth of color. We added a Stampin’ Spritzer and used 2 colors in creating our card.


We stamped the heart, using Peek A Boo Peach and Flirty Flamingo, spritzed it, & stamped one heart directly onto the card front and one on a scrap. This is a fun technique as each one comes out different! We fussy cut the heart on the scrap and popped it up with Stampin’ Dimensionals. And those coordinating pearls, they were done using the Dark Calypso Coral Blend.  The verse is found in the Picture Perfect Birthday set (145519). Here is another variation of this card. This one the heart directly on the card front was stamped twice, first and second generation. By slightly offsetting the layers it gave motion to those hearts!


I love polka dots and strawberries, can you see where I’m going with this? TO get more bang for my buck I paired the polka dot heart with the Tutti-frutti 6×6 Designers Series Paper (DSP) (#145606). These paper stacks are perfect for card making and memory keeping! I turned to my  dark Night of Navy Blend (144039) to color the Pearl Perfect Jewels to mimmick the blueberries in the DSP.

Here is another take on this same card:

 Be sure to click the link below to go to see the idea Susan has for you this month.

I hope I have made your creative juices begun to flow with ideas for this Heart Happiness set that is found on page 20 of the newly released Occasions Catalog (click to view). If you’d like your own copy to browse just contact me today!

Don’t forget, Sale-A-Bration (SAB) is also going on right now. Choose a SAB item FREE with a qualifying purchase. View the catalog here.

You can earn your favorite SAB item just by adding a few items to your Heart Happiness stamp set today!


buy Stampin Up! here!

Karie Beglau     

Judi Anderson   YOU ARE HERE!

Susan Simpson 

Tricia Butts  

Lyndsay LaRae Carara  

Courtenay Heuston 

Tashana Lundy   

Carly Middleton     

Sharleen Luciano              

Vicky Thompson 

Anastasia Radloff 

Smitten Mittens all warm and cozy

Who doesn’t love feeling all warm and cozy in this cold season weather? Mittens keep your fingers so warm during the season’s cold so what better stamp set to reach for than Smitten Mittens? I learned long ago that hues of pink help warm your complexion so I chose Powder Pink to hoping it would help give that warm and fuzzy feeling to this card.

Using Sahara Sand and the Cable Knit embossing folder was a good decision ( I am loving this color combination!!) and the Shimmery Satin Blush Blossom ribbon gives it a soft feeling. The tiny mittens and snowflakes are the perfect embellishments for this card. Now as I look at this card while writing this post it reminds me of my daughter when she was little and had a cable knit blankie with satin ribbon binding.

The Smitten Mittens Bundle will not be available after January 2nd. Be sure to check out the newly added items to the Clearance Rack too! Be sure to check out other projects using the Smitten Mittens Bundle HERE.

click image to check out out the deals available while quantities last!

I don’t know about you, but when I finished assembling this card I feel that is is just like a nice warm,soft blanket you could get all snuggly warm and all cozy with.

buy Stampin Up! here!

Country Livin’ makes a great masculine themed card, SBTD October Blog Hop

Masculine themed cards seem to be tough for most people and that is why we chose it for our SBTD theme this month. To get your juices flowing I recommend starting with a stamp set like Country Livin’  and then move on to other sets you have. By using more masculine papers you will be amazed at what you will soon be creating!

This is exactly what I did when creating for this months’ blog hop. Country Livin’ has been on my shelf for about 3 months and this is the first time I took it out to play. I needed a masculine card for someone who loves to hunt so I looked through my papers to see what I had. I thought of flannel and bright orange because that is what my father-in-law used to wear when he would go out. Now to find what I have that would fit either of these two criteria. You will find this pattern in the Merry Little Christmas Designer Series Paper (#144621) but it isn’t red & black. This is what it looks like,  
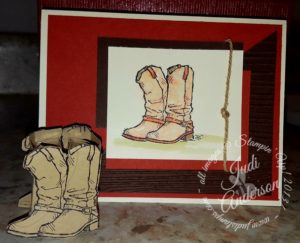
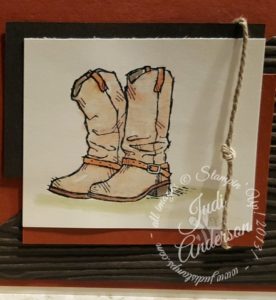
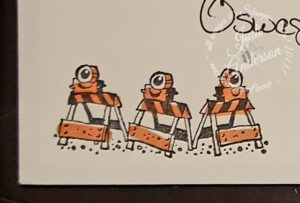
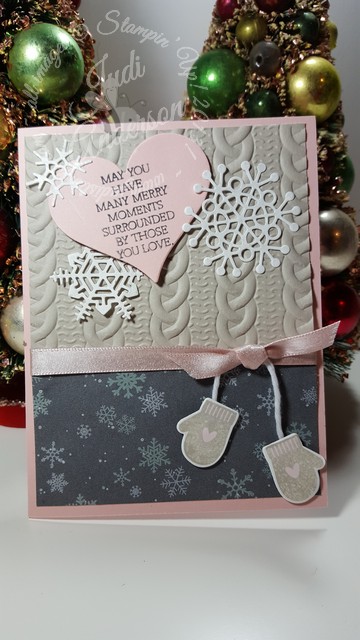
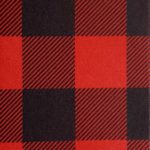
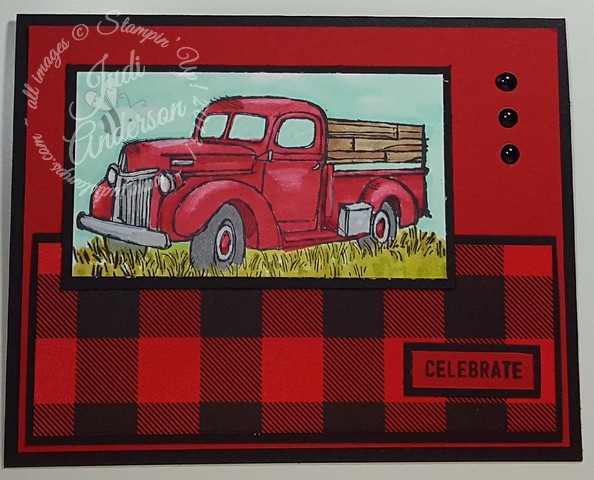
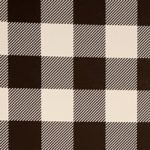
white & black ( the trend for this holiday season). I wanted to make it look like a flannel shirt so I grabbed my sponge brayer and used it to layer Real Red ink over the paper. What a difference~it even looks like real flannel!!

I paired the flannel look with the truck from the Country Livin’ set. I decided to give my new Stampin’ Blends alcohol markers a try to color the image. I colored the entire image and background with them & just love how it turned out! It was so easy to get the effect I was looking for with these new markers. I know exactly what you are thinking, “Where can I find these Stampin’ Blends?” You will be able to order them on November 1st!  If you would like to try to win a whole set of the Stampin’ Blends, head over to my Facebook Page. As a demonstrator I was able to order them early to begin playing with them. 

It is hard to tell from the photo but the sky isn’t solid but looks like it has fluffy clouds throughout it. I finished the card off by taking a black Sharpie marker and coloring 3 small Perfect White Accents. I know the recipient is going to love this card.

Once I got going I couldn’t stop so I made a second masculine card using the Up,Up, & Away stamp set and Christmas Around the World Designer Series Paper(#144629), also from the Holiday Catalog. I was thinking of using Night of Navy with the Lemon Lime Twist when starting this card but switched to Basic Black after choosing my Designer Series Paper.

As you can see, once you get going on creating masculine cards it can be quite fun!

Be sure to check out what Susan is sharing this month by clicking below. . .

Rachel Pine      

Karie Beglau     

Judi Anderson  – You are here!

Susan Simpson 

Tricia Butts  

Lyndsay LaRae Carara   

Courtenay Heuston 

Tashana Lundy 

Carly Middleton    

Sharleen Luciano           

Vicky Thompson 


Check out our Designer Series Paper Sale going on now through Oct 31st here.

Be sure to sign up for my Monthly Newsletter, you don’t want to miss out on the rest of my 12 Weeks of Christmas ideas that will have your friends envious of you!


I hope you are enjoying our SBTD Masculine Blog Hop this month. I urge you to look for some masculine pattern paper, even seasonal papers work, a masculine set like Country Livin’, and you will be on your way to creating some cards for the men in your life! 

                                       Until we meet again,

buy Stampin Up! here!


Sprinkles of Life leftovers

Continuing on my journey through my leftovers I came across these leftover packets and remembered I used the Sprinkles of Life stamp set but couldn’t remember the layout. The designer series paper has since retired but they are already cut to size so I was determined to figure a card with all the pieces. I began by separating all the pieces and then chose the Lots of Love stamp set to use. By the way, you can save 15% on this stamp set through October 10th as part of National Card Making Day. The colors I had to work with were, Whisper White, Daffodil Delight, Pool Party, and Calypso Coral. I pulled out my Petal Burst embossing folder to give texture to the Whisper White mat. This is the card I came up with.

The packets that I found also had different colored card bases which I remembered used the colors I used on the original card. I felt the background could use a pop of color but I had already embossed it so I decided to leave it. I then remembered that the Sprinkles of Life card had polka dots as a background that I made with sponge daubers in the 3 colors. I started digging through my samples and I found it! 

It is a bit cheerier ( is that a word?) and does have some of the pieces I didn’t use on this leftovers card, maybe I should add a tiny Daffodil Delight banner coming from the right side of the smaller mat, what do you think?

 I have been having fun going through my leftovers and have come across a stack of 1×3 strips of holiday designer series paper from last year. I’m going to see what I can pull together to share with you on Monday.

While both of the cards I shared with you today use the same colors they have a totally different feel to them. It was fun playing with my Sprinkles of Life leftovers and hope you are enjoying seeing what I come up with.

Don’t forget to check out our SPECIALS BY CLICKING THIS LINK!

What do you do with your leftovers?

You are cleaning your work craft space and you find leftovers. These are pieces that you cut for projects but didn’t use. What do you do with them? You have several choices; First, you could separate all the cardstock and put the pieces with your scraps. You could try to figure out what your original project looked like and duplicate them to help fill your stash of cards. You could throw them away- oh no! Don’t do that! Or, you could do what I did, take the pieces and create cards with new sets giving these leftovers  new life.

Over the next few days I will share some ideas that I come up with using leftover pieces I have found when cleaning out my stamp studio yesterday. I will have extra project pieces from my classes and events so I stick them into a leftover bin. As you could imagine, this bin is currently spilling over the sides of the bin. Time to decide what to do with these pieces!

Before I continue, are you on my V.I.P. mailing list? If not, you’re going to want to sign up today because I have begun my 12 Weeks of Christmas projects emails. Don’t let the holidays sneak up on you! I will help you prepare for them by sending you card, gift, gift tags & packaging ideas over the next 12 weeks. Just sign up by clicking “Join my Publication VIP List” in the left hand column.

SALE! Buy 3 Get 1 FREE select Designer Series Papers through October 31,2017! Check them out here!

Now, onto the projects. . . . This first group of leftovers were found together in envelopes making it easier to put the cards together. The Whisper White layer had already been embossed using our stars embossing folder. The Real Red, Daffodil Delight, and Bermuda Bay stars, and Whisper White label had been pre-punched. The Real Red label had also been cut out using the Chalk Talk Framelits. Many of the items used for this card were recently retired from our 2016-2017 Annual Catalog. My memory recalled (somewhat) what the original card looked like so all I had to do was choose a stamp set or two to finish the card. My choice(s)?

Bella & Friends was my first go-to set. I quickly water colored the pup using Crumb Cake, Real Red & Bermuda Bay inks and my Aqua Painter. I decided to make two cards with this cute guy.

Bella & Friends

Pretty Kitty was my second choice. I couldn’t leave out my cat lovers! She is colored using Smokey Slate, Pink Pirouette & Real Red inks and Aqua Painter.

The boat from the Swirly Scribbles stamp set fit just right onto the label. I just love the solid, bold images of this two step stamp.  This card lends itself to any occasions, birthday, baby, congratulations, way to go, to name a few.

I finished the cards up and started digging into my next group of leftovers when I found my original card!

I guess this old gals memory isn’t too bad, I was pretty much on mark with duplicating it, don’t you think? These cards came together quickly, after all, it was all cut, punched, and embossed for me!

Do you have leftover pieces that you need to clear out? I challenge you to take those pieces and create a card or two from them. I am sure you will be surprised at what you come up with when using up your leftovers.

buy Stampin Up! here!